What is a ‘project’#
In the MINERVA Platform, a project is a set of systems biology diagrams with their accompanying data and metadata.
The project structure is as follows
- root diagram (file, mandatory)
a systems biology diagram in one of the compatible formats: CellDesigner SBML, SBML, SBGN-ML, or GPML, see compatible formats. - submaps (folder, optional)
- any number of compatible systems biology diagrams (file(s))
- mapping of links between diagram elements and submaps (file in CellDesigner SBML format, default name: mapping.xml)
- overlays (folder, optional)
files with data overlays to be set as publicly visible for the project, see more in visualisation - glyphs: directory with predefined glyphs
- images: directory with accompanying images
See (set up the structured project) for details.
Compatible formats#
Diagram files that can be uploaded to create a project on a MINERVA instance are:
- CellDesigner SBML files (source)
- GPML files (source)
- SBML files, importantly:
- elements (species) and reactions should be defined by SBOTerms, to match the CellDesigner style (see the list of CellDesigner types matching SBOTerms). If not, all elements will be shown as small molecules and all reactions as state transitions. Find more in example 2 - SBML file modifications
- layout and render packages are supported
- MIRIAM annotations in the
<annotation>node are supported
- SBGN-ML and Newt files (source). SBGN-ML import and export now supports annotations.
Project panel#
The project panel (the starting screen in the admin panel) gives an overview of all projects in the MINERVA Platform visible for a given user (see user roles). The header of the table is shown below.
| Header of the project panel |
|---|
 |
Using this table, you can
- Search projects (top left): filter the list of displayed projects
- Create project (top right): add a new project, see below
- Manage (leftmost column): configure different options of individual projects
- Examine project details (remaining columns): specific for each project
- Project ID: Unique project ID, and a hyperlink to open this project
- Name: Project name, visible in the user view
- Owner: The user who uploaded the project
- Status: OK/Warning/Failure - result of the project creation
- Activity: A column summarising i) annotations available in the map, ii) number of comments, iii) number of users who can view the project
- Logs: Details of the project creation, including warnings and reasons for potential failure
- Created: Creation date
- Shared in minerva-net: tick this box to share this project via the MINERVA-Net repository, see below
Create Project#
Your project in MINERVA can be created either from a single diagram file (see compatible formats), or a structured directory (see project structure above).
You can create a project from a local file, or a git repository.
- local upload
-
You can upload the single diagram file directly; the structured directory has to be compressed into a zip file.
The format of the uploaded diagrams will be recognised automatically, based on the root diagram format for structured projects.
For locally uploaded, structured projects, information from the file will be extracted and displayed.
| Information fetched from the .zip file |
|---|
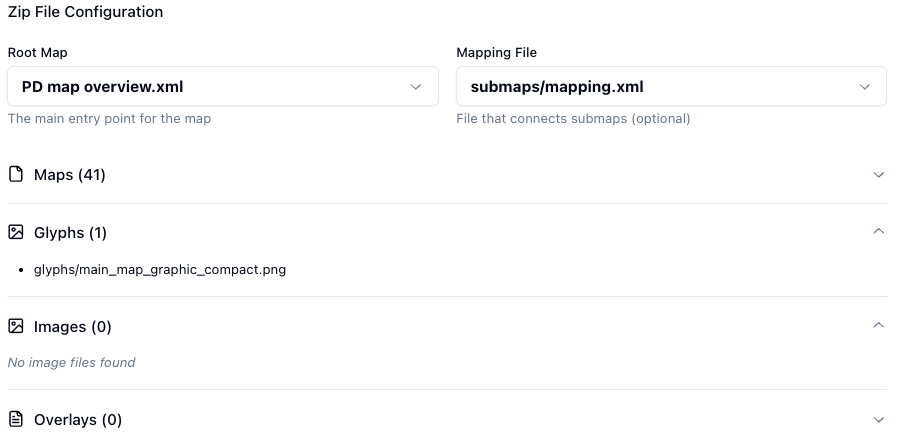 |
- git upload
-
You have to provide the link of the git repository (clone/https) containing the single diagram file or the structured directory, and you can specify a tag or a branch to use.
The format of the uploaded diagrams has to be specified.
Configure uploaded project#
After providing the source, the upload window will expand into a form where upload parameters can be provided.
| Project upload parameters |
|---|
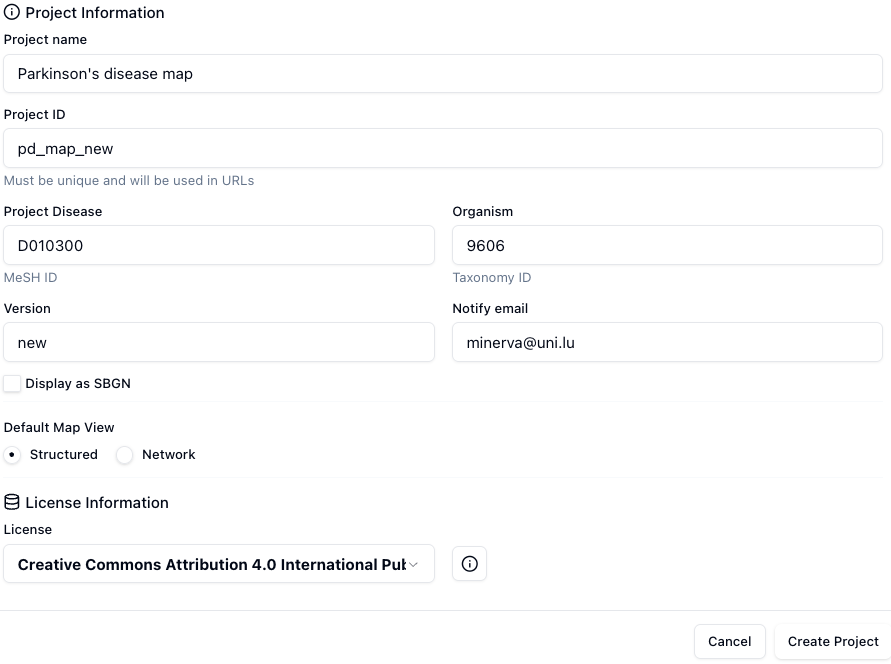 |
These include:
- Project name
- the name of the uploaded project displayed in the top left corner of the main view; your official name of the project.
- Project ID
- a working name of the uploaded project on the MINERVA platform. Project IDs are unique.
- Project Disease
- the disease associated with the project, the code has to be a valid MeSH identifier, e.g.D010300. This is needed for chemical target search.
- Organism
- the taxonomy id of the species, for which the map is primarily developed, e.g. 9606. This is needed to display genetic variants overlays.
- Version
- a text field displayed next to the name of your project in the User panel.
- Notify email
- e-mail address that should be used for project-related notifications.
- Display as SBGN
- if this checkbox is checked, the uploaded model will be displayed in SBGN format, instead of the default CellDesigner format.
- Default Map View
- this defines the default view for the diagrams in this project; Structured view masks and reveals complex contents of diagrams when zooming, Network displays all diagram contents without masking.
- License
- allows you to choose the license under which your content is shared on the MINERVA Platform. This information will be visible in the Project Info. You can choose from a list of Creative Common licenses, or provide your own name and a URL to license description and conditions (Custom license name, Custom license url)
Clicking Create project button in the bottom right corner starts the generation of the project. The status of the project in the Projects panel will update during the process. Any warnings raised during the process will be visible in the Logs next to the project status (see list of possible errors and their explanations). You will receive an email notification after the generation is complete.
To find out more, check example 1 - CellDesigner file upload and annotation.
Manage project#
Manage project button for a given project unfolds a list of options described below.
Edit project#
Allows to configure project information provided during its creation (see above), as well as the read-only status. When a project is marked as read-only, its content cannot be modified by curators or users – only administrators can change its read-only status.
Edit maps#
Allows to configure starting view for each diagram, including center point and zoom level.
Edit users#
Allows to configure user access to a given project (see also user roles).
Edit overlays#
Configure overlays for this map, both public (uploaded via the project) and user-provided (see also here); you can also add public and private overlays using Add overlay button.
Besides Name and Description, the following columns are available:
- Public - this checkbox makes the overlay available to any user. It will be available to display in OVERLAYS.
- Owner - the user having the access right to a given overlay. Dropdown menu allows to choose from existing users.
- Data - action buttons to download the associated dataset.
- Remove - action buttons to remove the corresponding overlay.
Edit comments#
Manage user-provided comments for this map (see section User manual - Comments).
The field Title is a hyperlink to a given comment in the map. In the following columns there are author of the comment, their email and the content. Last column Pinned informs if the comment’s icon is visible on the map.
Users logged in as administrators or curators have a possibility to delete a comment by clicking on Remove button. The users can remove only their own comments. The removed comment will no longer be visible among the pinned comments on the map, and its status will be updated in the Removed column with comment in the brackets.
Annotate#
Displays a list of previously defined annotator presets, which can be run for this project (see Annotation). This will provide annotations for this project. After the job is started, this will display a message Annotation in progress. The job can be stopped in the Annotation panel.
Share project via MINERVA-Net#
Individual projects can be shared via MINERVA-Net, a public registry of projects hosted on the MINERVA Platform. To share projects, your MINERVA instance needs to be registered in MINERVA-Net. Read more about the registry and how to connect to it in the Configuration > Connectors > Register in MINERVA-Net.
Only public projects can be shared Importantly, only projects publicly visible (visible by anonymous user) on a given instance of the MINERVA Platform can be shared via the registry. This way the registry contains information that is openly accessible.
To share your project, check the box in column Shared in minerva-net of project you wish to share.
Dialog below will be open informing what details MINERVA-Net collects. This information becomes available via the MINERVA-Net API. Additionally, the registry collects the email address associated with the project to inform about potential communication errors observed by the registry, related to the availability of the project.
When project is shared in MINERVA-Net, its box Shared in minerva-net is checked.
At any moment you can stop sharing project’s details by unchecking the box and remove (unregister) your project from MINERVA-Net.
Customise graphics and exploration#
Individual projects can be further customised regarding the look and feel of the entire diagram or individual elements.
The functionality of Layers (see here in detail) allows to create graphical overlays for better content exploration.
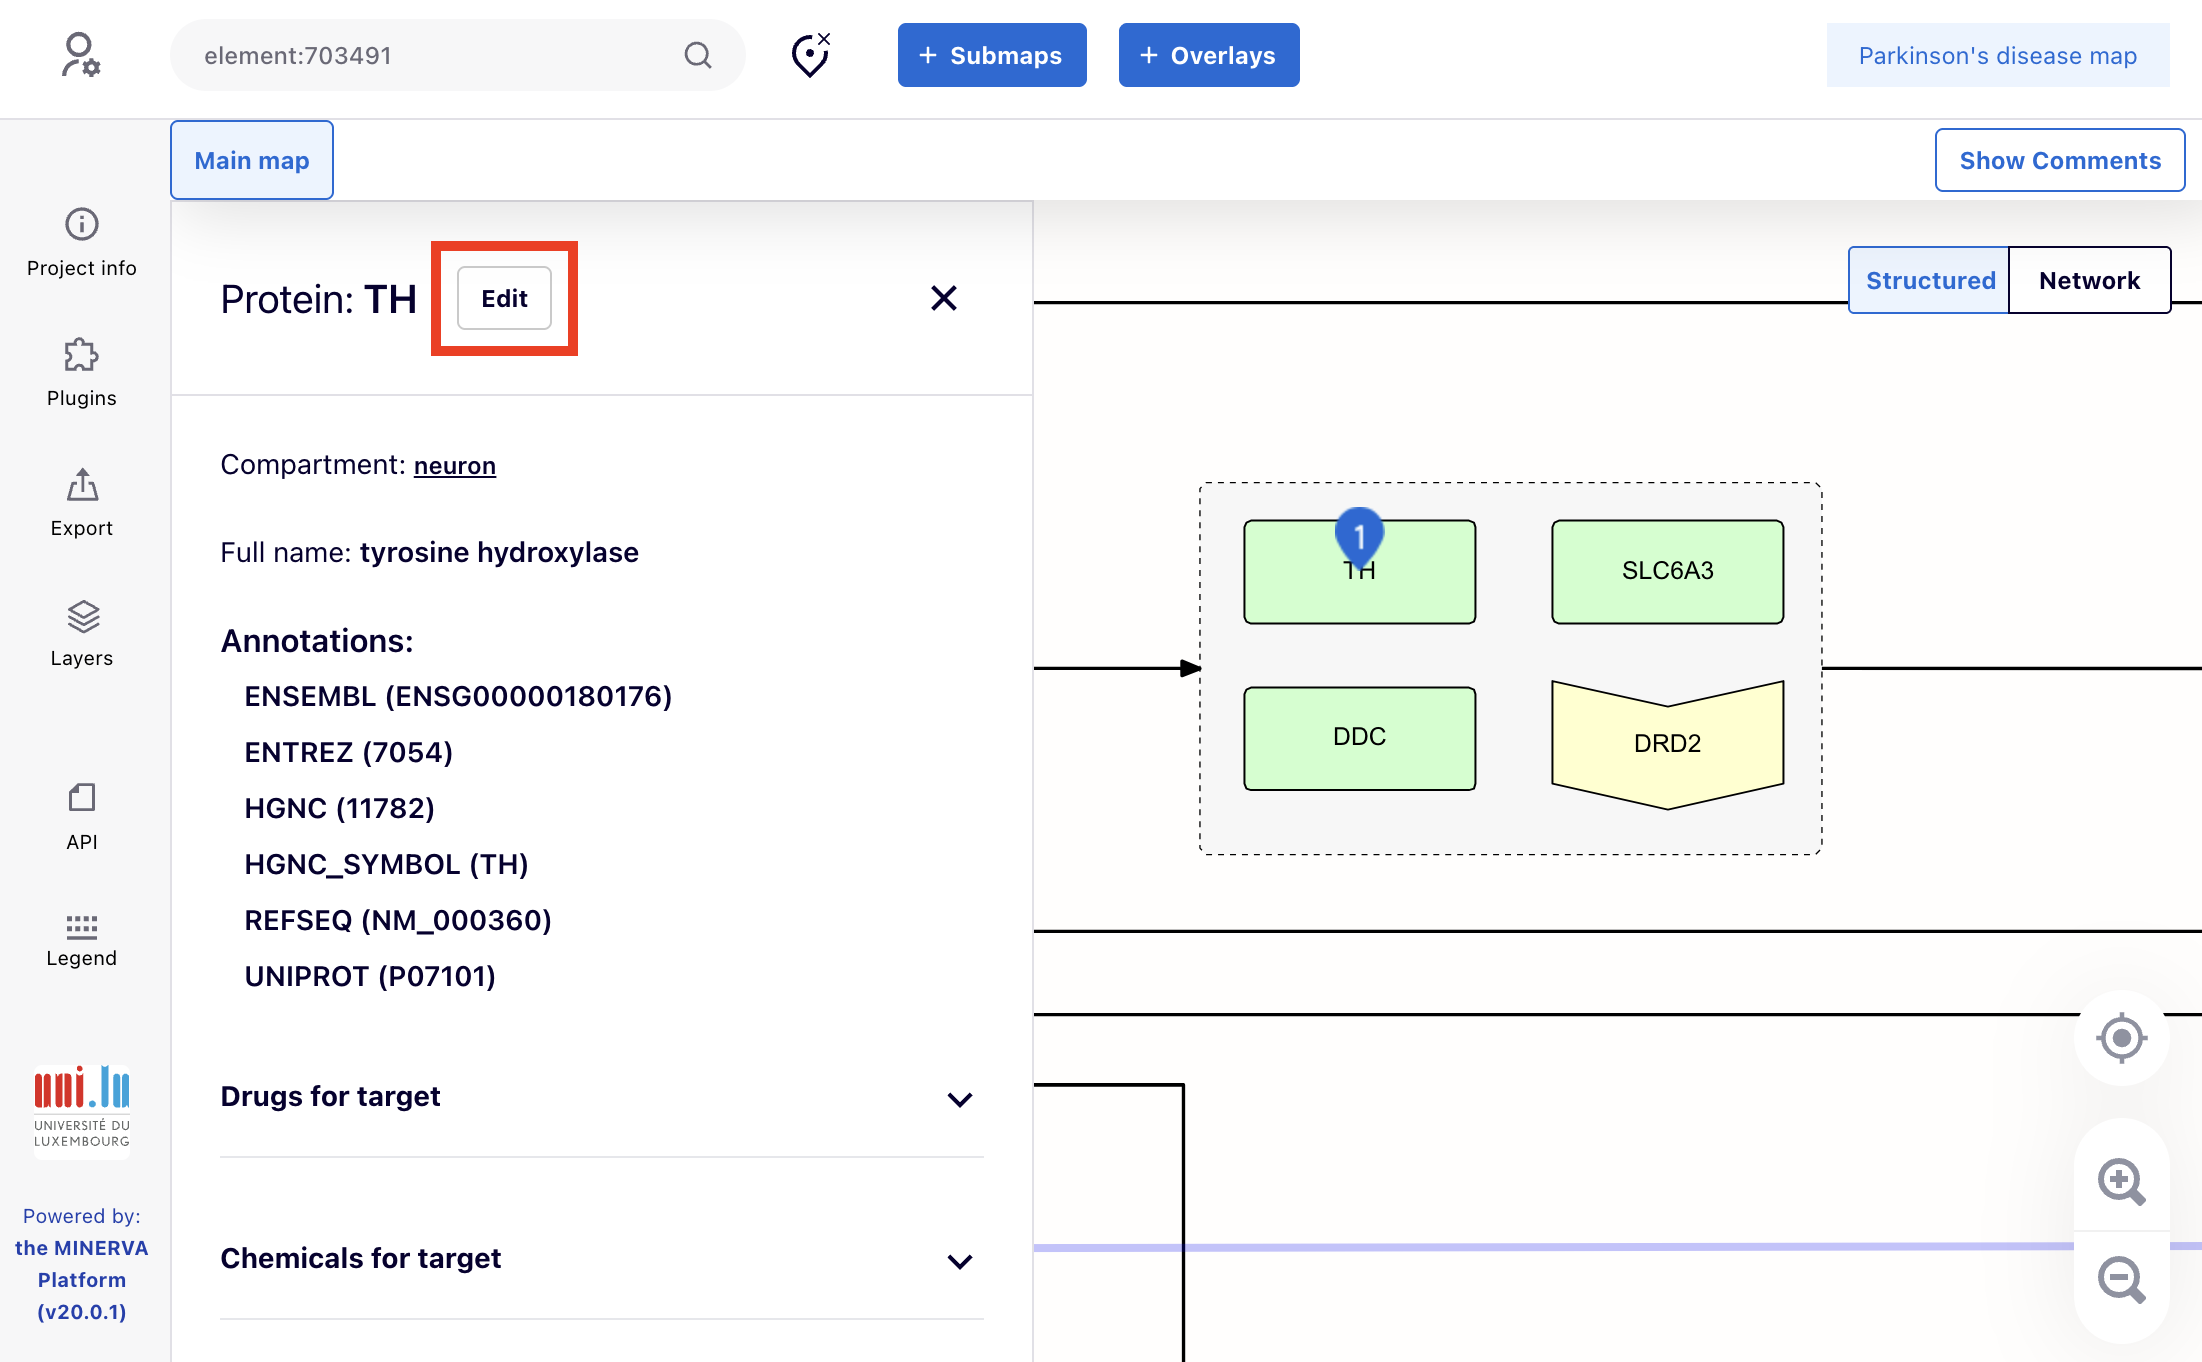
Independently, custom look of diagram elements can be configured by administrators or curators of a project (see user roles). For these users, an Edit button is available next to the name of a selected element, allowing to to select a custom glyph or link a submap to this element (see images below).
Element glyphs#
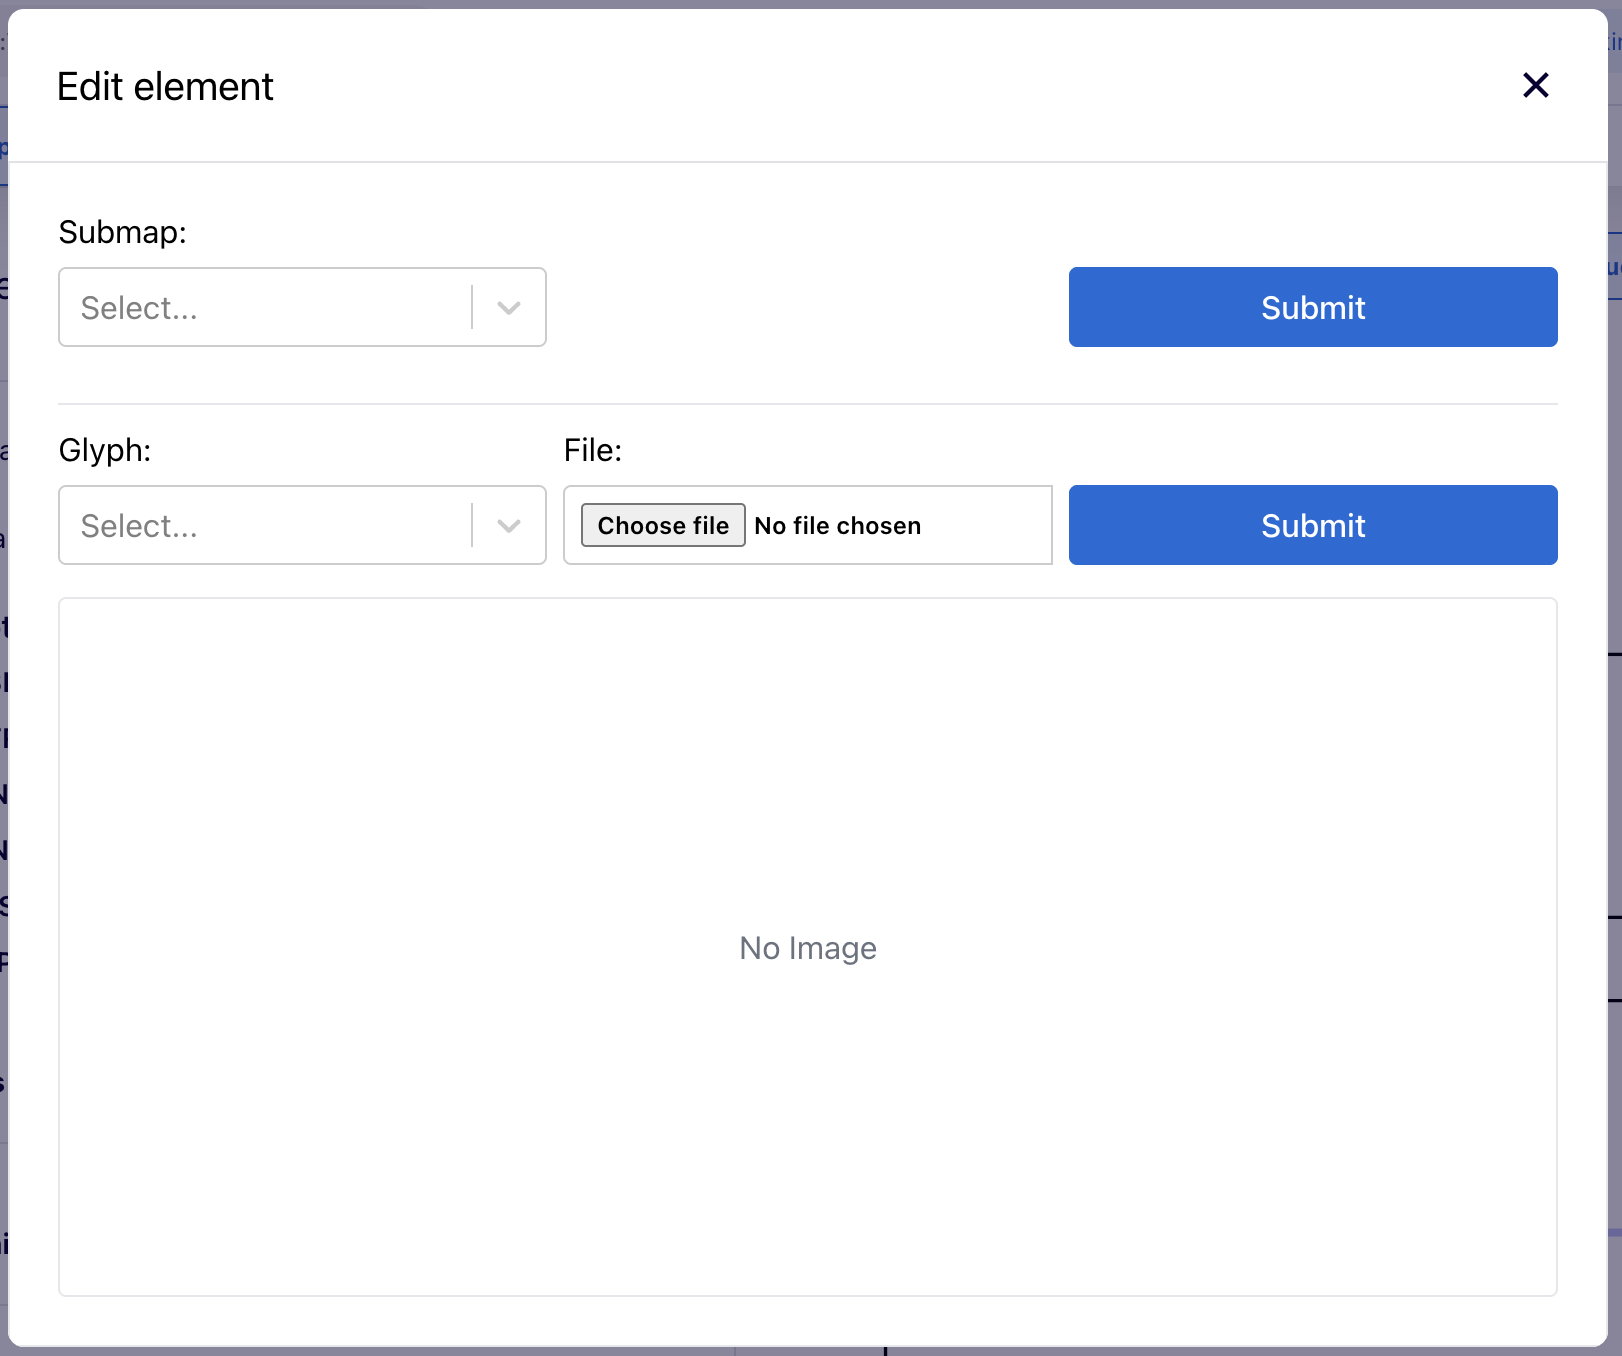
Glyphs are custom images that can be added to diagrams visualised in the MINERVA Platform (see also here).
Directly in browser you can upload, edit, or clear a glyph for a given element. Glyphs can be selected via the dropdown menu from those uploaded with the project (see here), or uploaded as a file. Glyph assigned to a given element will be displayed below the Submit button.
Submap links#
Submap links are useful for improving map navigation and data visualisation.
Directly in browser you can select a submap this element will link to.