MINERVA configuration: Examples (version 11)#
CellDesigner file upload and annotation#
This section provides examples of usage of automatic annotators, automatic verifiers and construction of procedural semantic zoom.
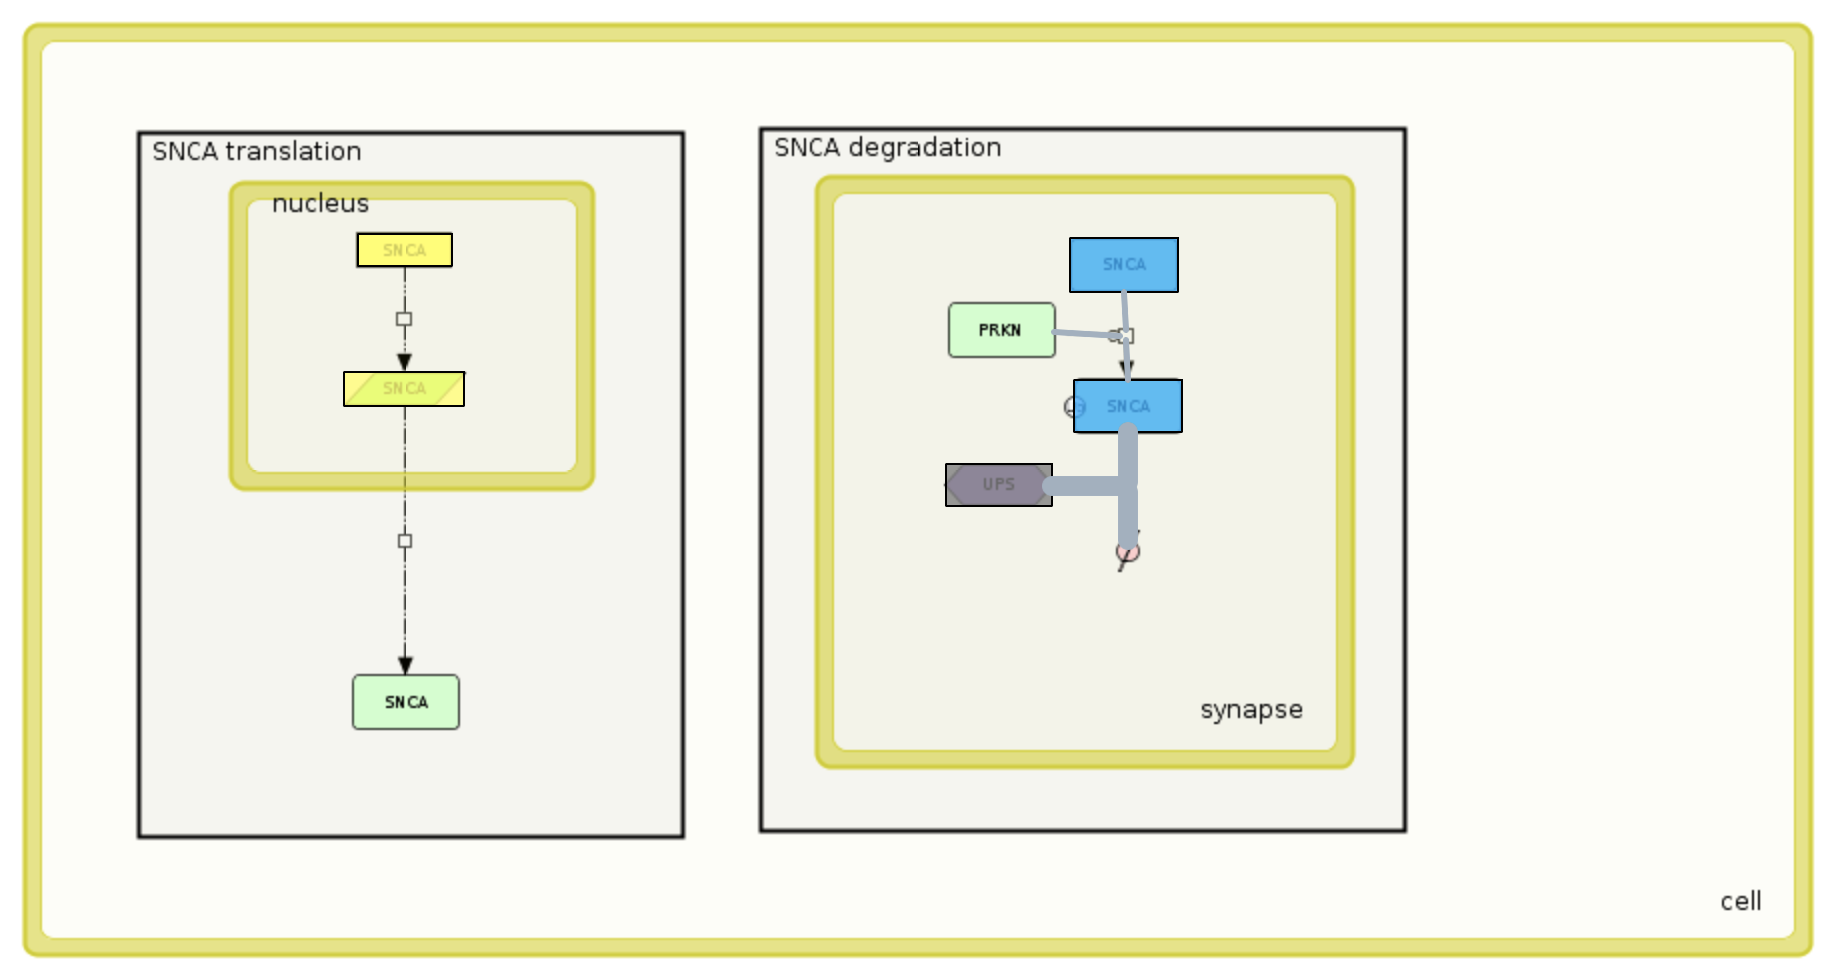
This is Example File 1 containing a CellDesigner file. The file is quite simple, and has the following properties:
- Annotations
- Gene component (SNCA) is not annotated
- RNA component (SNCA) is annotated with Entrez Gene id (NCBI Gene in CellDesigner MIRIAM tab)
- one protein component (SNCA) is annotated with UniProt ID, while the other (PRKN) is not annotated
- Phenotype component (UPS) is annotated with Gene Ontology
- one interaction re3 is annotated wit PubMed id, while others are not
- Compartments and visual layers
- Translation and Degradation visual layers are drawn on top of the diagram
- cell, synapse and nucleus compartments are drawn
Automatic annotation#
See Admin manual - Configure automatic annotation for details on annotators.
- Upload the Example File 1 to your MINERVA instance using Add project button
- Configure automatic annotations by:
- checking the checkbox Annotate model automatically
- pressing the Advanced button; set the following:
- for Element > Species > Gene, set HGNC annotator
- for Element > Species > Phenotype, set Gene Ontology annotator
- for Element > Species > Rna, set Entrez annotator
- for Element > Species > Protein > GenericProtein, set UniProt annotator
- Press Submit
Examine the generated content. Please note that:
- Annotations between SNCA DNA, RNA and Protein are different, because different annotators used different information sources to obtain the information on the elements
- Even though SNCA DNA had no CellDesigner annotation, it was correctly annotated by name by HGNC annotator
- UniProt annotator works only by identifier, so it was unable to provide annotations for PRKN (it is not annotated in CellDesigner)
- Gene Ontology annotator retrieved a definition of the annotated Phenotype
Automatic verification#
See Section Configure automatic verification for details on annotators.
NOTE: Your MINERVA instance remembers the settings from the previous run, so keep annotation settings as above.
- Upload the Example File 1 to your MINERVA instance again. Make sure to either remove previously uploaded example, or to name the uploaded project differently (use Add project button button)
- Configure automatic verification by:
- checking the checkbox Verify manual annotations
- pressing the Advanced button; set the following:
- for Element > Species > Gene
- set HGNC, HGNC symbol, Entrez Gene and Ensembl as Valid
- check Require annotations checkbox and as Required set HGNC, HGNC symbol, Entrez Gene and Ensembl
- for Element > Species > Phenotype
- set Gene Ontology as Valid
- check Require annotations checkbox and as Required set Gene Ontology
- for Element > Species > Rna
- set HGNC, HGNC symbol and Entrez Gene as Valid
- check Require annotations checkbox and as Required set HGNC, HGNC symbol and Entrez Gene
- for Element > Species > Protein > GenericProtein
- set UniProt, HGNC symbol and Entrez Gene as Valid
- check Require annotations checkbox and as Required set UniProt
- for Reaction > StateTransitionReaction
- set PubMed as Valid
- check Require annotations checkbox and as Required set PubMed
- for Reaction > TranslationReaction
- set PubMed as Valid
- uncheck Require annotations checkbox
- for Reaction > TranscriptionReaction
- set PubMed as Valid
- uncheck Require annotations checkbox
- Make sure no items in upper hierarchy levels (e.g. Element, Species or Protein for GenericProtein) have different sets of verification rules
- Press Submit
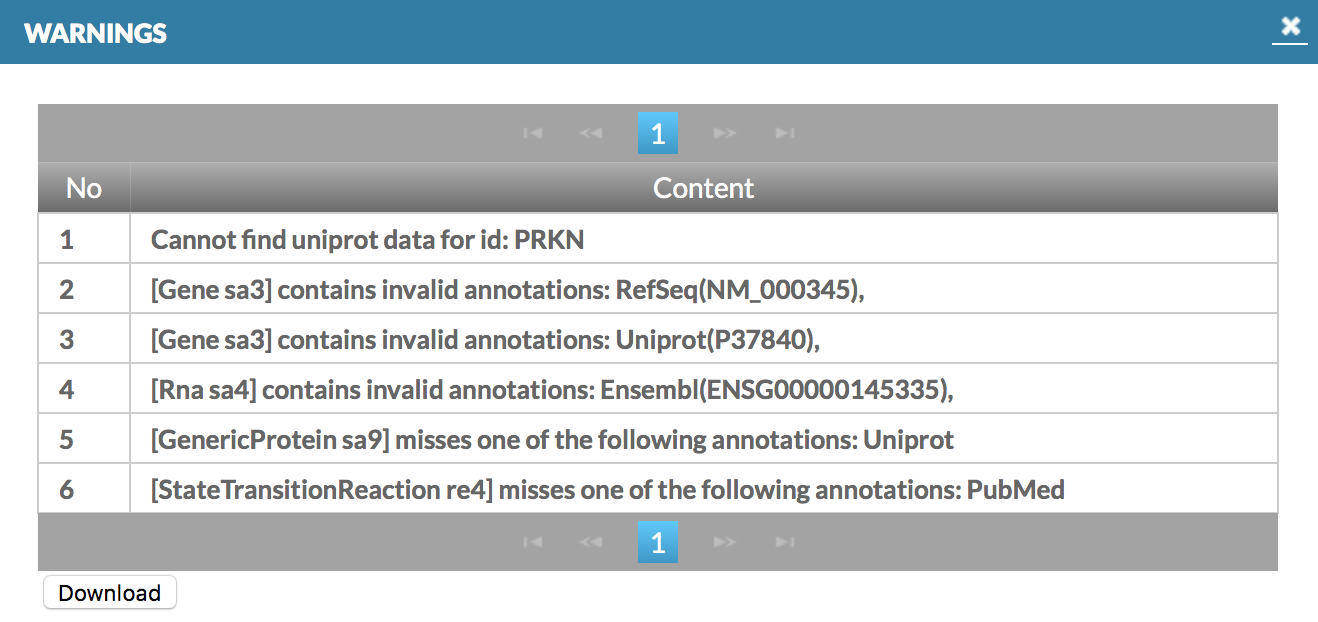
Upon upload, an exclamation mark icon will appear next to the project. After clicking, the popup window will look like this:
 {:width=“700px”}
Examine the generated warnings. Please note that:
- PRKN is missing UniProt ID in CellDesigner
- Automatic annotators provided additional annotations to Gene and RNA elements, outside of the Valid list, you can suppress these warnings by updating the Valid list
- GenericProtein element (PRKN) was indicated as missing a required annotation (UniProt)
- StateTransitionReaction re4 was indicated as missing a required annotation (PubMed)
- TranslationReaction and TranscriptionReaction did not raise any warnings as no annotation was required for them
NOTE: Valid and Required settings for lower hierarchy levels are overridden by settings for upper hierarchy levels. For instance, if no PubMed annotation is required for TranslationReaction, but Reaction requires PubMed, reactions re1 and re2 raise a warning.
Procedural semantic zoom#
Example File 1 after upload and submit will generate a view with procedurally-generated semantic zoom. Please, note that on the highest zoom out level only one compartment - cell is visible. After zoom-in, two grey areas become visible, describing functional areas in the map. After another zoom-in, nucleus and synapse compartment become visible. See also Add project button.
Custom data upload by registered users#
This section provides examples of data upload by registered users. Two subsection provide detailed examples for uploading basic and advanced formats.
Basic format#
The file in basic format has two tab-separated columns Name and Value (see also Upload user-provided overlay data):
- Name containing names of elements to be colored
- Value containing a value from [-1,1] range, to be transformed to red-green coloring, with negative values colored red, positive colored green; the saturation of the color will be defined by the absolute value.
This is Example File 2, containing a custom coloring for an example map above Example File 1
To upload this data set, do the following:
- Make sure you have the privileges to generate overlays in the example map
- Click on Project detail (magnifying glass icon in the rightmost column)
- Go to Users tab, see if by your name the View project checkbox is checked
- Enter the User view of the example map from the Admin view > Map manager by clicking on the name of the uploaded project (example_map by default)
- Make sure that you are logged in by checking the Profile tab in the left panel
- In Overlays > User-provided Overlays tab, choose Add overlay then press Choose File to select Example File 2 to upload Warning: To see uploaded overlay agree on Google Maps terms
- In Overlays > User-provided Overlays tab, click View checkbox to examine generated view
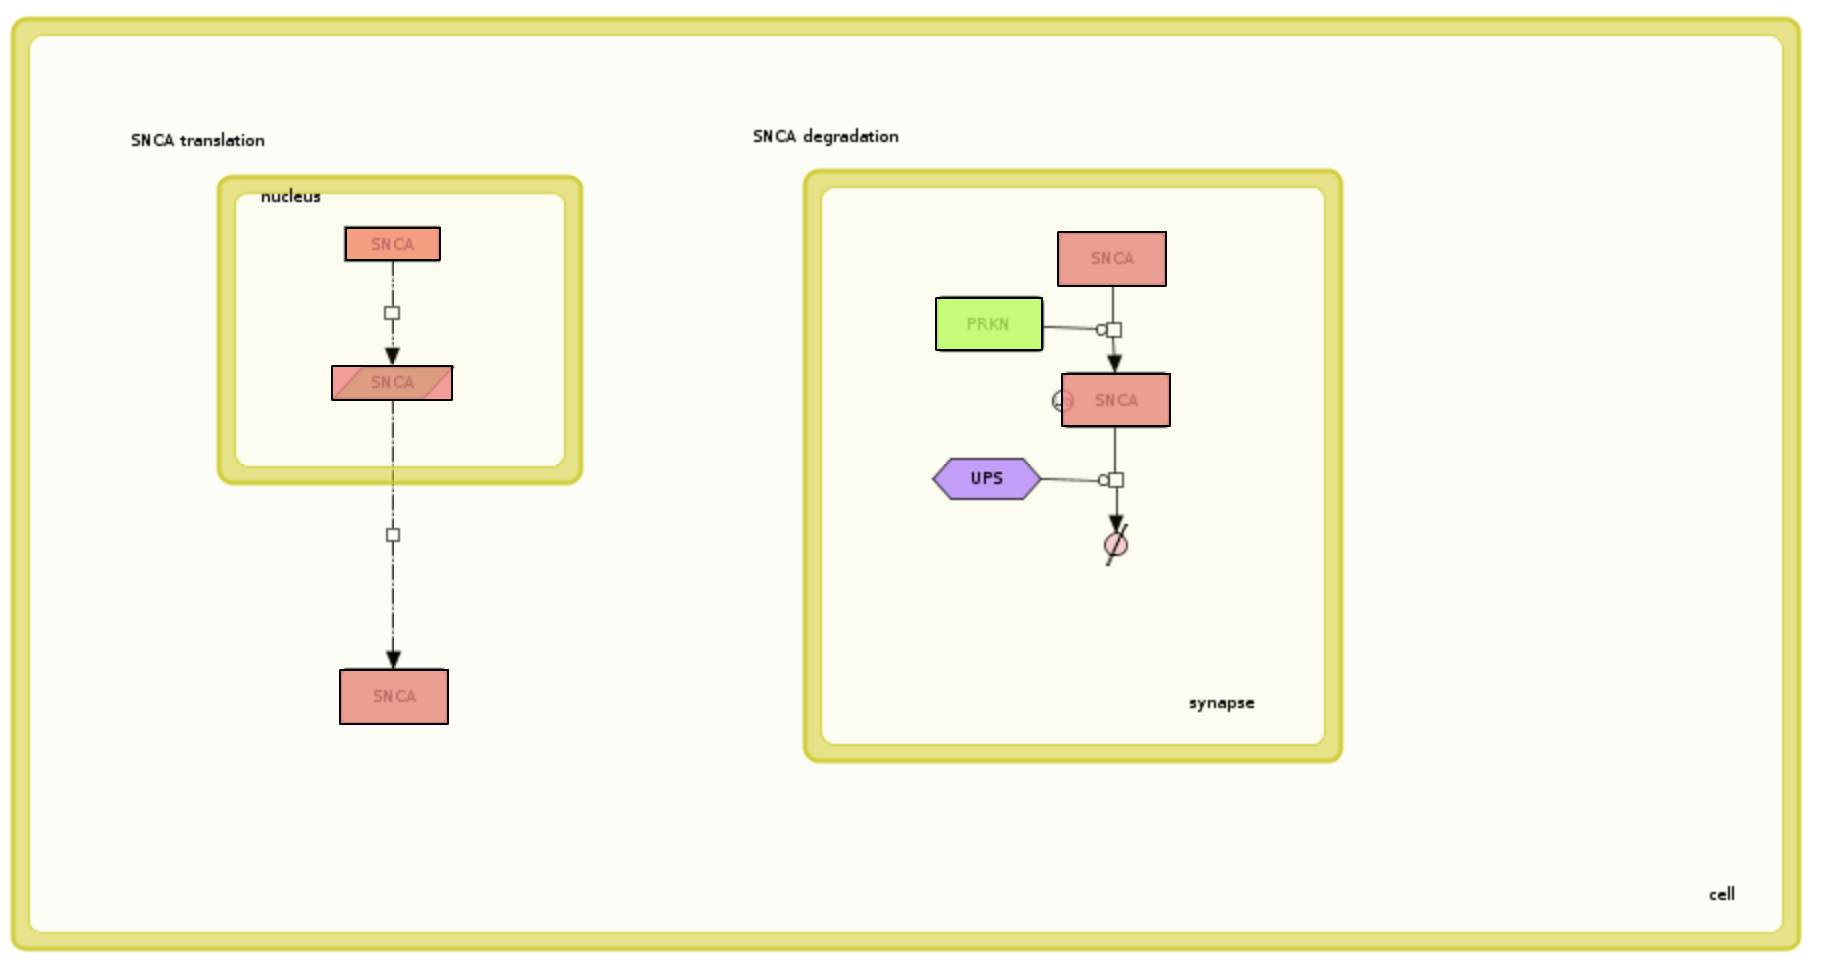
Examine the generated coloring and the uploaded data set. Please see image below and note that:
- All SNCA elements are colored to the same color because of by-name matching
- SNCA elements are red-colored (the value in the file is -0.5), while PRKN is green (the value in the file is 0.75)
 {:width=“900px”}
Advanced format#
Advanced format foresees two parts of the uploaded dataset - header and body (see also Upload user-provided overlay data).
Header lines have to start with ‘#’. It can contain the following elements:
- Version
# VERSION=xyz- a version of this custom layout - Name
# NAME=xyz- a name that will be automatically assigned upon upload - Description
# DESCRIPTION=xyz- a description that will be automatically assigned upon upload
Body is a table with a following set of columns:
- Name, Value - same as in basic layout
- Compartment - name of a compartment in which coloring should take place Warning! Coloring of the elements in different compartments works ONLY for separate (not nested) compartments. Setting a color for elements in a compartment that encloses other compartments sets the color in the nested compartments as well.
- ChEBI - ChEBI identifiers of elements to be colored
- Entrez gene - Entrez identifiers of elements to be colored
- Gene ontology - Gene Ontology identifiers of elements to be colored
- Ensembl - Ensembl identifiers of elements to be colored
- HGNC symbol - HGNC symbols of elements to be colored
- UniProt - UniProt identifiers of elements to be colored
- ReactionIdentifier - ID of interaction to be colored (interactions coloring only)
- LineWidth - line width of the colored interaction (interactions coloring only)
- Color - color of the colored element.
By-identifier coloring#
This is Example File 3, containing a custom coloring for an example map above Example File 1.
Upload this data set similarly as in basic format upload.
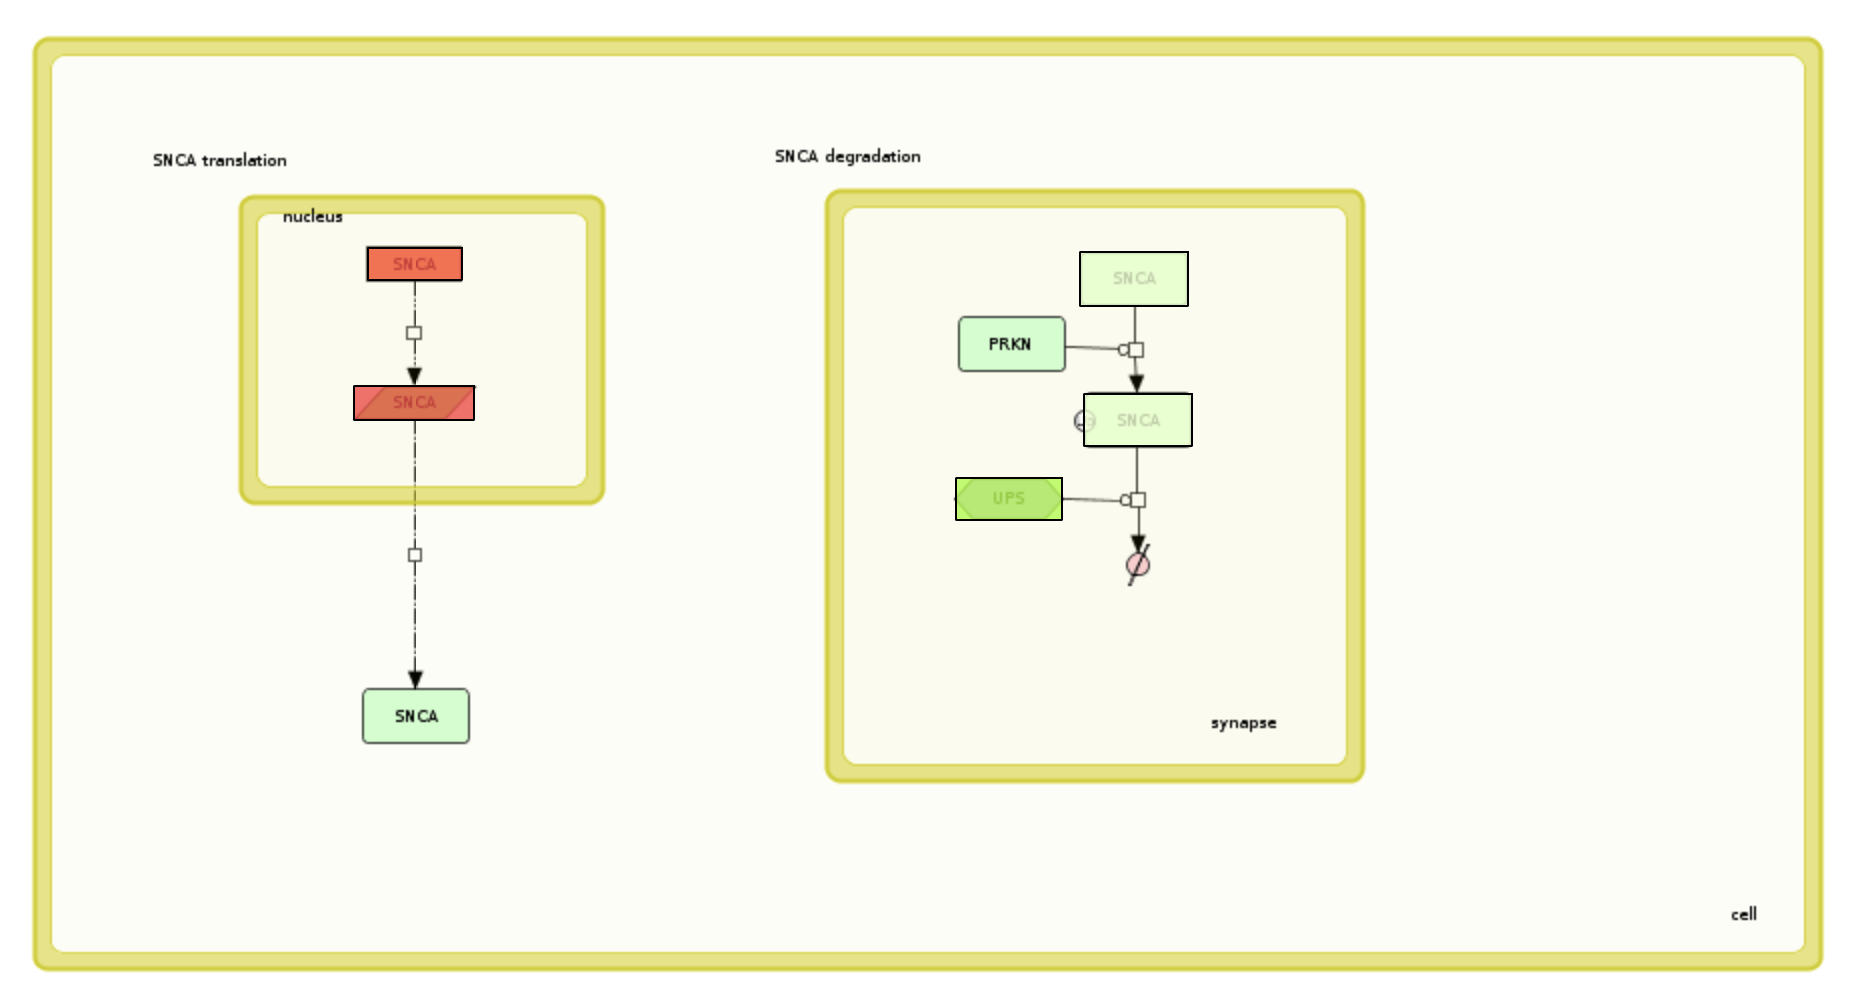
Examine the generated coloring and the uploaded data set. Please see image below and note that:
- elements are colored by their identifiers instead of their names
- groups of SNCA elements are colored differently - nucleus elements are colored red, synapse elements are colored green; this is by compartment constraint
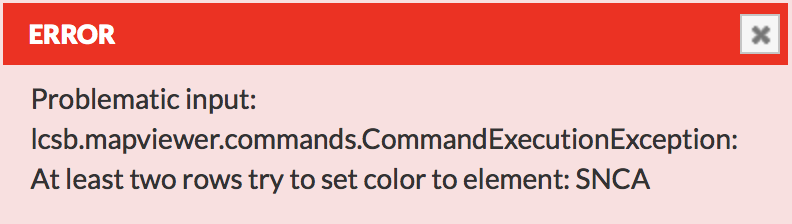
Warning! Coloring compartments works ONLY for separate (not nested) compartments. Setting the color for SNCA identifier in the cell will color the contents of the nucleus and synapse as well. Setting different colors for the same SNCA identifier in the cell and in the nucleus will cause an error, as two different colors will be assigned to the same SNCA identifier in the nucleus inside the cell.
 {:width=“400px”}
 - removing compartment column will also cause the error described above
- using SNCA coloring by-name overrides by-identifier coloring, the order of selection is as follows:
- match by-name
- match by-identifier
- constrain by-compartment
 {:width=“900px”}
Custom colors and interaction coloring#
Advanced format foresees assigning user-defined colors to both elements and interactions.
This is Example File 4, containing a custom coloring for an example map above (Example File 1).
Upload this data set similarly as in basic format upload.
Examine the generated coloring and the uploaded data set. Please see image below and note that:
- color column replaces value for defining colors of interactions and elements
- reactionIdentifier is not affected by compartment constraint
 {:width=“900px”}
Remarks#
- Column names work only if an element is annotated by one of the terms above
- Column name: Name refers to the full name in the annotation panel; e.g., HGNC gene name for genes/proteins; ChEBI name for simple molecules or GO name for a Gene Ontology term.
- Elements needs to be written in the table as displayed in the left panel; e.g., HGNC: 11138; Ensembl: “ENSG00000184845”; ChEBI: “CHEBI:18243”.
- The uploaded table must be a text file
- Most columns could be used simultaneously as long as the same element is not addressed in two different columns; e.g. LRRK2 by HGNC name (=LRRK2) and Entrez gene ID (=120892) or a reaction identifier and a PubMed target the same reaction.
- Restrictions:
- A value or a color columns must in the uploaded text file but they mutually exclusive
- Name should only be combined with the identifiers: reaction Identifier and compartment
- Reaction identifier should only be combined with the identifiers name or PubMed
- If the column compartment is used the field must be filled by a compartment name derived from the content, otherwise the element will not be displayed in the content. Currently there is no possibility to choose all compartments.
Alternatively: you can always extract an area of interest as a CellDesigner file, open it in CellDesigner and colour it there.
Advanced file upload#
This is Example File 5, containing a .zip archive withe following structure:
- example_advanced_map.xml - CellDesigner file with the main map
- images - folder containing:
- image files overview_main.png and overview_sub.png
- coords.txt file containing relationships between the images and the content of the map
- layouts - folder containing a text file example_upload_basic.txt
- submaps - folder containing:
- a submap CellDesigner file example_submap.xml
- a mapping CellDesigner file mapping.xml
- Upload the Example File 5 to your MINERVA instance using Add project button
- Examine the upload window, note the automatically filled positions
- Make sure that in the Complex section proper checkboxes are checked for the main map and the mapping file
- In the Complex section, you can set the names of uploaded submaps
Examine the generated project. Please note that:
- Images files
- Show overview button is displayed, invoking one of the uploaded images
- Links between the images and links directly to the map are configured
- The link from Active area 3 invokes a search query, highlighting two interactions
- Layout files: one selectable, predefined overlay in General overlays named Advanced example is available for non-registered users
- Submap files
- in the Submap tab, the uploaded example_submap is visible
- in the Search tab, if you look for PRKN or SNCA, the results in both main map and the submap will be shown
- contents of the example_submap are not annotated, as the example_submap.xml file elements are not annotated with relevant MIRIAM identifiers; even though SNCA elements are annotated in the main map, SNCA element in the submap is not annotated
- upon switching to a custom coloring (Overlays tab) contents of the example_submap are colored as the contents of the main map