MINERVA configuration: Administrator’s manual#
Administrator view#
Administrator view refers to the set of functionalities for web-based management of the content and configuration of your MINERVA instance.
Login#
Administrator view is accessible via the button with the lock icon in the upper left corner of the user view (see below). See also User manual - Main view).
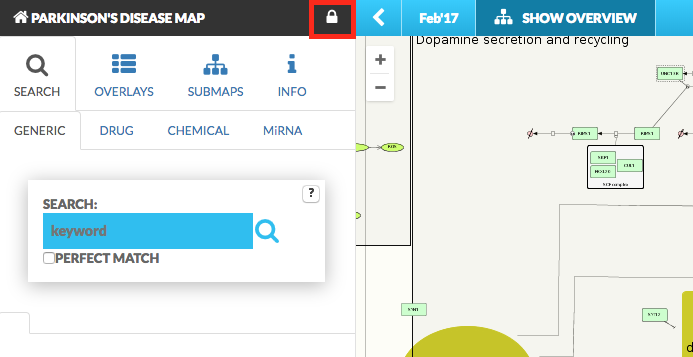 {:width=“600px”}
Many projects (maps, networks) can be hosted in parallel on a single MINERVA instance (see User manual - Accessing the project) and a user having administrator rights to at least one of them can log via ADMIN link. After successful login (see below), you will have access to the administrator panel to manage your MINERVA instance.
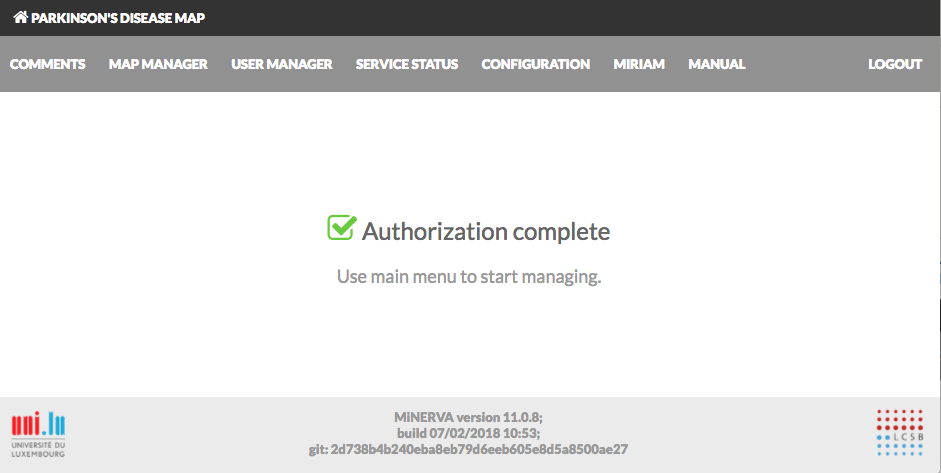 {:width=“700px”}
Comments#
This panel allows you to manage comments provided by users of your maps (see Section User manual - Comments). The panel to the right (Projects) allows you to switch between different maps. Current active map will be highlighted. The field Title is a hyperlink to a given comment in the map. For the current active map, comments will be displayed in the panel to the left.
In case the comments are not loaded correctly, press Refresh button to show them.
Users logged in as administrators have a possibility to delete a comment by pressing press the Remove button.
The removed comment will no longer be visible among the pinned comments, and its status will be updated in the Comments panel (see below).
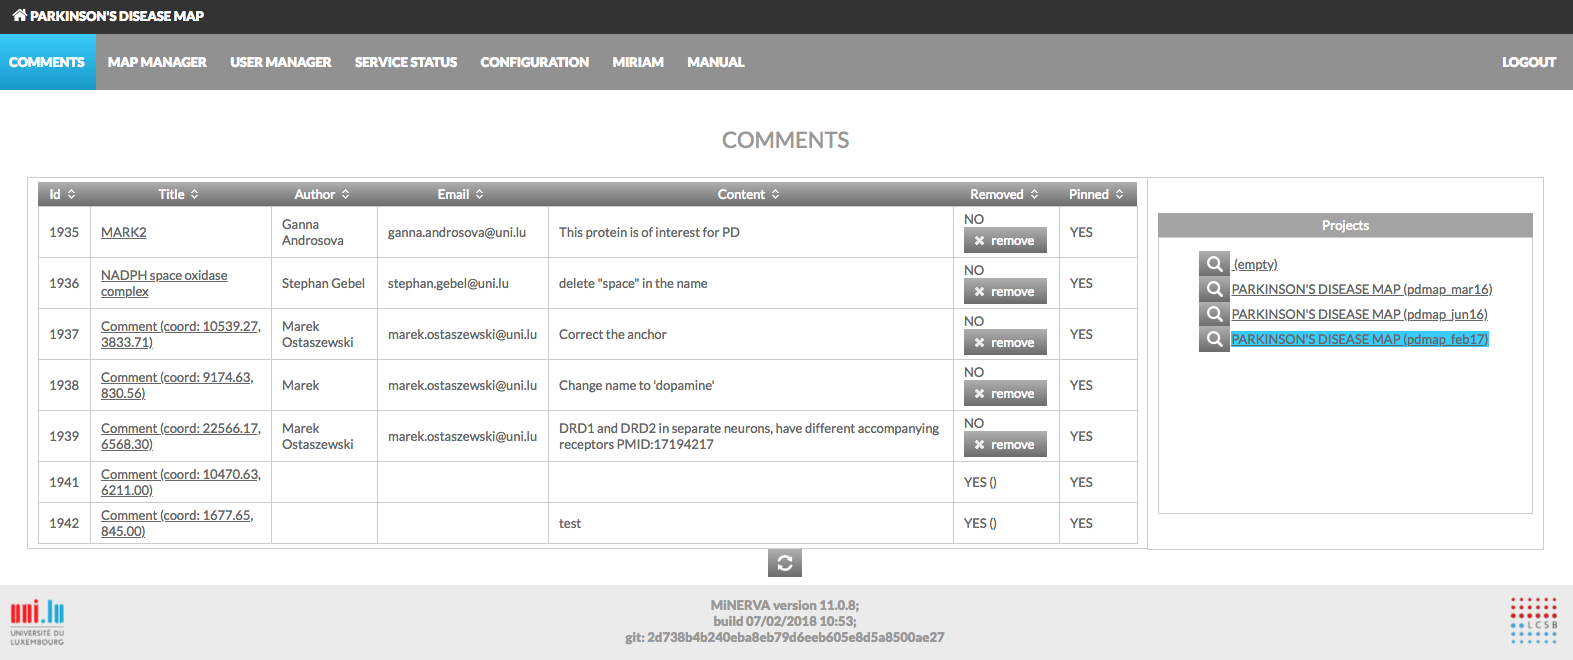 {:width=“800px”}
Map manager#
This panel allows you to add new projects and manage existing ones. In the top left corner, the name of current active project is displayed. The panel allows you to (1) add new projects (2) edit them and (3) examine messages generated during the upload of the project.
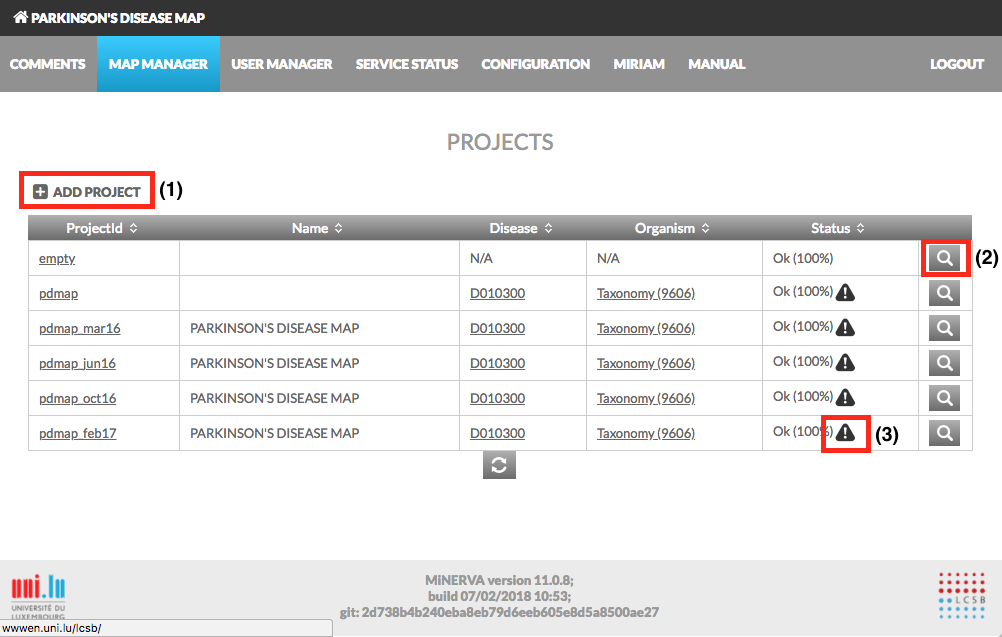 {:width=“800px”}
This view gives information about:
- Disease: the disease associated with the project, the code has to be a valid MeSH identifier, e.g.D010300. This is needed for chemical target search, see Section User manual - chemical target.
- Organism: the taxonomy id of the species, for which the map is primarily developed, e.g. 9606.
Detailed map management#
The magnifying glass symbol in the last column of the map manager gives access to the management dialogue (see below).
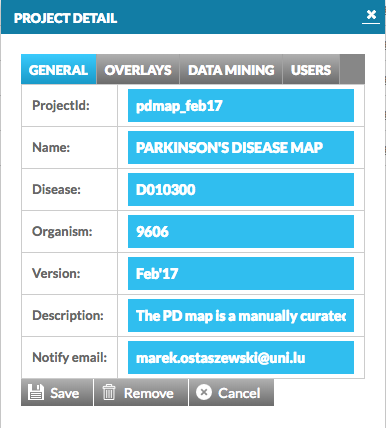 {:width=“300px”}
- Save button saves all introduced changes
- Remove button removes this map
There are four tabs available:
- General - allows to edit information about this map, including disease and species
- Overlays - allows to manage overlays for this map, both general and user-provided
- Data mining - obsolete, will be removed in the upcoming version of MINERVA
- Users - allows to manage users’ rights to access and manage this map
Manage overlays tab#
This tab allows you to edit the details about the overlays and their ownership. You see here overlays that have been:
- uploaded with the project (see Section Add project)
- Important! overlays named Pathways and compartments, Network and Empty allow for different ways of displaying the map’s content, and they don’t have any data associated with them.
- uploaded by the users (see Section Upload user-provided overlay data)
- uploaded by the administrators (see this section, below)
In this tab, besides Name and Description, the following columns are available:
- Directory - an internal reference for storage at the MINERVA webserver
- Owner - the user having the access right to a given overlay. Dropdown menu allows to choose from existing users.
- Important! Choosing the owner to be ‘N/A’ (top of the list) makes this overlay a General overlay, publicly visible for all users
- Data - action buttons allowing to download the associated dataset of a particular overlay
- Update - action buttons to save any changes in the configuration of a particular overlay
- Remove - action buttons to remove a particular overlay
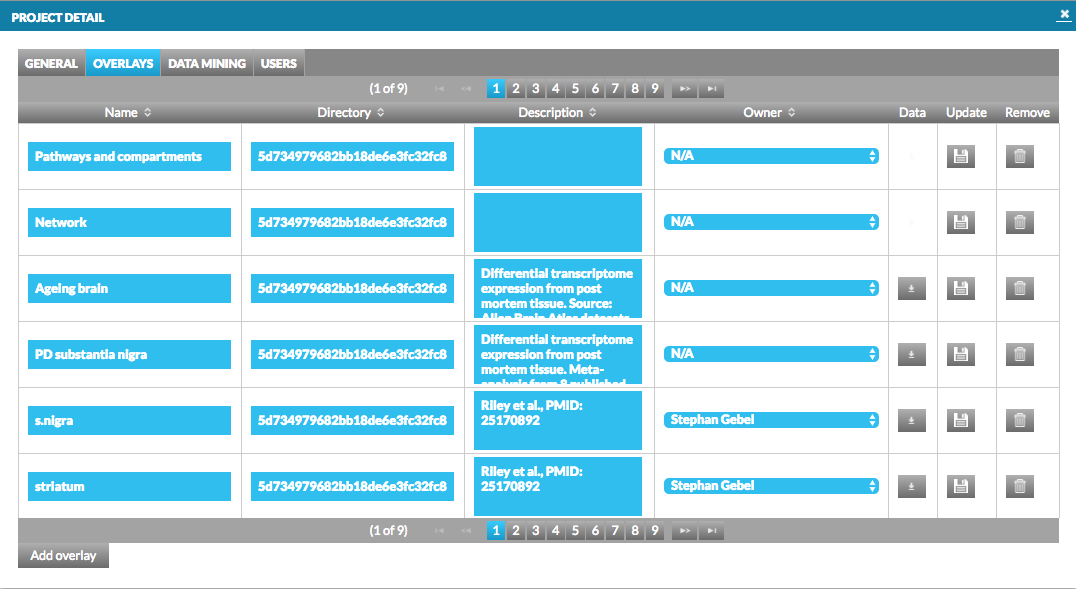 {:width=“800px”}
Manage users tab#
This tab contains a table of all users of the system (including the administrators) and allows to assign them rights to this particular map. It contains the following columns of checkboxes:
- Manage comments
- Manage overlays
- View project Ticking a checkbox in a respective column for a given user assigns this privilege to them. Each change needs to be saved with the Update privileges button.
User privileges are discussed in detail in Section User manager)
Important! Columns ‘Drug targeting advanced view’ and ‘Edit suggested connections’ are obsolete.
Add project#
The Add project button invokes a menu allowing you to upload your project and start its generation in the MINERVA platform.
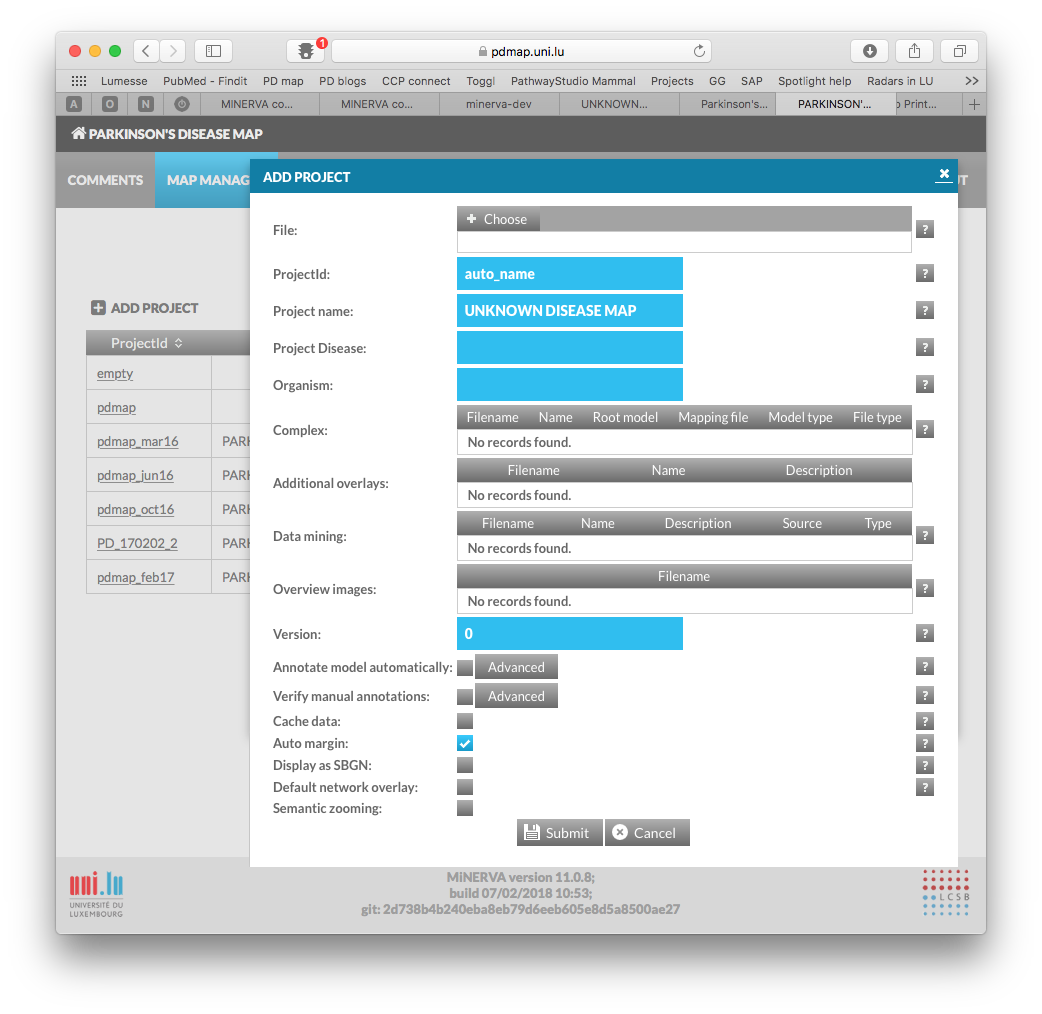 {:width=“800px”}
Fields of the Add project window#
File - Choose button: invokes a file upload dialog. For a quick start, CellDesigner files are accepted directly. Available options and configurations of the source file are discussed in Section Source file.
ProjectId: a working name of the uploaded project on the MINERVA platform
Project name: the name of the uploaded project displayed in the top left corner of the Admin and User panels; your official name of the project
Project disease: the disease associated with the project, the code has to be a valid MeSH identifier, e.g.D010300. This is needed for chemical target search, see Section User manual - chemical target.
Project organism: the taxonomy id of the species, for which the map is primarily developed, e.g. 9606.
Complex: this section describes how main map and uploaded submaps (if any) are related. For more details on how to upload predefined layouts, data mining datasets, images with biological overview and submaps associated with the main map, Source file. Ignore it if you submit a single file.
- Filename: name of one of multiple files
- Name: name of the main map, or a submap, in the project
- Root model: a column of checkboxes; only one position must be checked, corresponding to the main map in the project
- Mapping file: a column of checkboxes; only one position must be checked, corresponding to the mapping file describing relationships between the main map and the submap(s)
- Model type: whether the submap is a pathway, or a list of downstream targets; this name will appear in the Submaps tab.
- File type: type of the uploaded file; recognized automatically.
Additional overlays: this section describes uploaded additional overlays (element and interaction coloring) to be generated and accessible for all users of the project via Overlays tab in the User panel. Ignore it if you submit a single file.
- Filename: name of one of custom layout files
- Name: name of the layout visible in the project
- Description: the text to appear after mouse is moved on the name of the layout.
Data mining: Obsolete. Will be removed in the upcoming release.
Overview images: this section describes the uploaded overview images and their configuration file. It is a column of filenames. Ignore it if you submit a single file.
Version: a text field displayed next to the name of your project in the User panel.
Annotate model automatically: if this checkbox is checked, elements of the uploaded map will be automatically annotated using built in annotators. Behavior of the annotators can be configured by clicking the Advanced button (see Section Configure automatic annotation).
Verify manual annotations: if this checkbox is checked, elements and interactions of the uploaded map will be scanned for existing annotations; if present these existing annotations will be validated against a set of rules. Verification rules can be configured by clicking the Advanced button (see Section Configure automatic verification).
Cache data: if this checkbox is checked, all hyperlinks in the project resolved by MIRIAM repository (e.g. cross-links to external bioinformatics databases) are resolved and cached.
Auto margin: if this checkbox is checked, upon generation of the graphics, empty spaces surrounding elements and interactions will be cropped.
Display SBGN: if this checkbox is checked, the uploaded model will be displayed in SBGN format, instead of default CellDesigner format.
Default network overlay: if this checkbox is checked, the default view of the map will be Network (see Overlays tab), without masking of the contents by the compartments and pathways on the higher zoom levels.
Semantic zoom: if this checkbox is checked, detailed semantic zoom is created for the map.
Configure automatic annotation#
The Advanced button, next to the Annotate model automatically checkbox under Add project button, invokes a dedicated configuration window (see below).
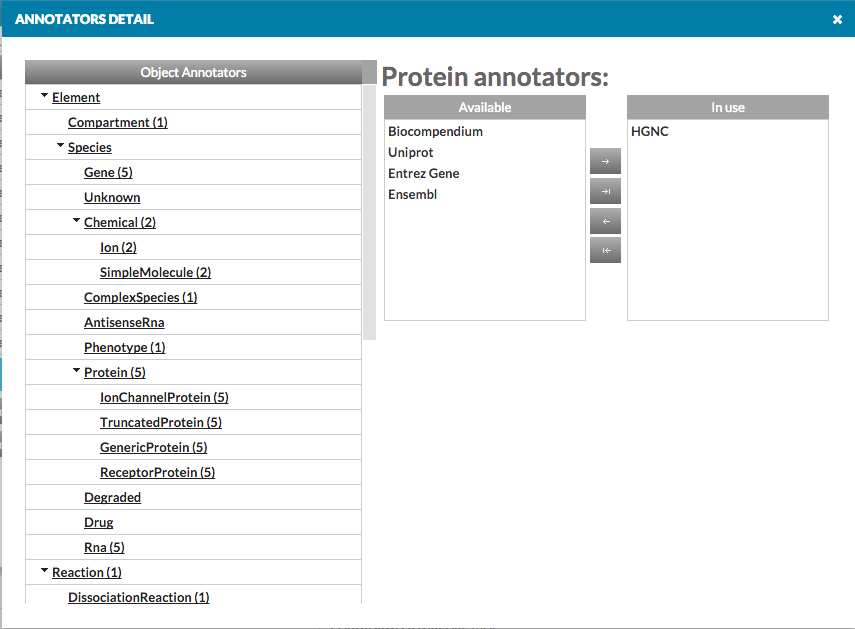 {:width=“800px”}
- HGNC
-
- HGNC identifier, if present, or, if absent, name of an element will be used to retrieve additional information, including full name, symbols, description and RefSeq identifier, ENSEMBL identifier, Entrez Gene identifier
- UniProt
-
- UniProt identifier, if present, will be used to retrieve additional information, including HGNC symbol and identifier, and Entrez Gene identifier
- Entrez Gene
-
- Entrez Gene identifier, if present, will be used to retrieve additional information, including full name, synonyms, description, HGNC symbol and identifier, and ENSEMBL identifier
- ENSEMBL
-
- ENSEMBL identifier, if present, will be used to retrieve additional information, including symbol, full name, synonyms, HGNC symbol and identifier, and Entrez Gene identifier
- ChEBI
-
- ChEBI identifier, if present, will be used to retrieve additional information, including synonyms, parents and children in the ChEBI ontology tree
- Gene Ontology
-
- Gene Ontology identifier, if present, will be used to retrieve additional information, including full GO definition for this identifier.
- Biocompendium
-
Warning! this annotation service is unstable due to maintenance
- Name of an element will be used to retrieve additional information, including: full name, symbols, description and identifiers: RefSeq, ENSEMBL, Entrez Gene identifier, HGNC symbol, KEGG, Reactome, PubMed and others
Configure automatic verification#
The Advanced button, next to the Verify manual annotations checkbox under Add project button, invokes a dedicated configuration window (see below).
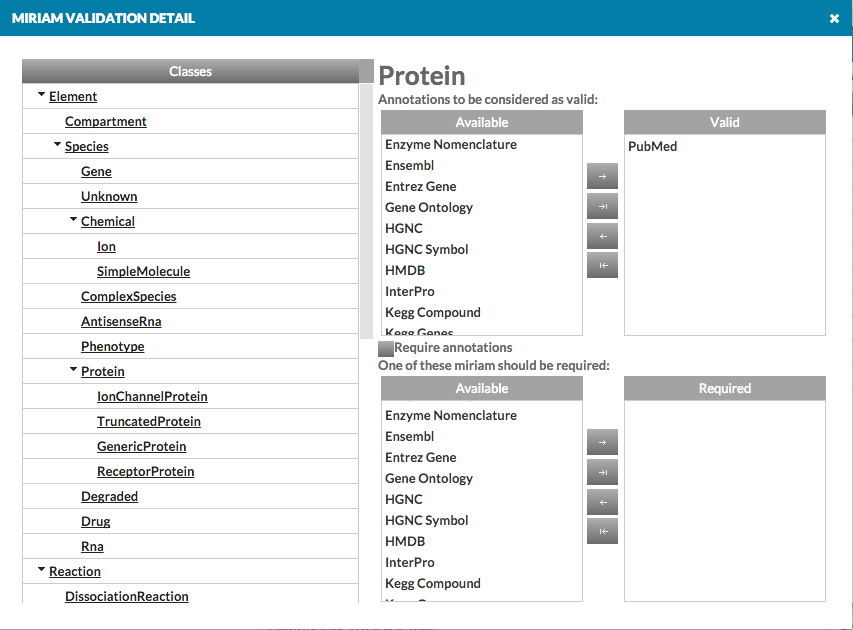 {:width=“800px”}
-
- top right panels
- a list of valid MIRIAM identifiers can be assigned. All elements or interactions in the uploaded model, annotated with an identifier outside of the Valid list will be flagged as warnings
-
- bottom right panels
- a list of mandatory MIRIAM identifiers can be assigned. If checkbox Require annotations is checked, all elements or interactions in the uploaded model, annotated without at least one identifier marked as Required list will be flagged as warnings.
Submit button: project generation#
Clicking Submit button at the bottom of the Add project dialog window will start generation of the project. The window will refresh automatically, showing status changes during the process. Any warnings raised during the process will cause an exclamation mark icon to appear next to the project status. The list of warnings is extended gradually, and you need to wait for the project completion to see the full list. You will receive an email notification after the generation is complete.
It may happen that the project generation will result in a failure. An icon will be displayed, and mouse over it will display the reason for failure. Moreover, you will receive an email message detailing the error you have received.
Examine warnings#
{:width=“800px”}
Clicking on the exclamation mark icon (if present) next to the project status description (see above, 3) will display the list of warnings raised during the generation of this project (see below).
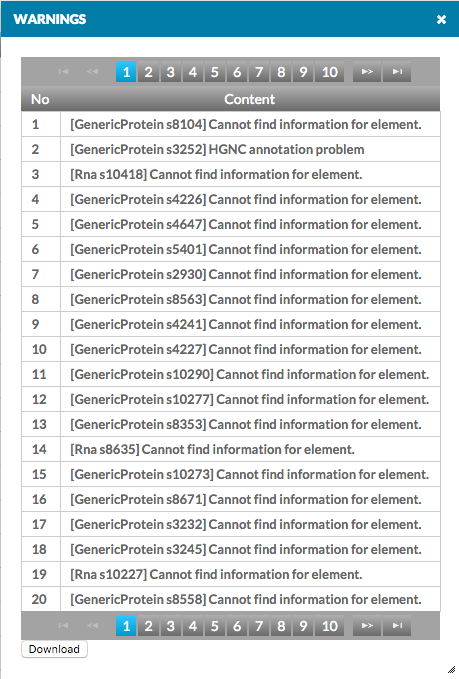 {:width=“400px”}
The list can also be downloaded as a tab-delimited text file. Types and identifiers of the elements and interactions are listed in the left column (No), while the nature of an error is provided in the right column. The table below lists possible errors and their explanations:
| Warning type | Explanation |
|---|---|
| Warnings generated by automatic annotation | |
| [Annotator] annotation problem | [Annotator] (e.g. HGNC) could not retrieve correct information for this element or interaction. The probable reason is wrong manual annotation, or name, of this element or interaction |
| Cannot find information for element. | None of the assigned annotators were able to retrieve information for this element or interaction. The probable reason is wrong manual annotation, or name, of this element or interaction |
| Chemical name cannot be found in ChEBI: [name] | ChEBI annotator could not annotate the element or interaction correctly by name, as [name] is not a ChEBI-recognized name. The annotation by manually provided identifier may still be successful. |
| Former symbols list different than default [list]. Ignoring | Existing annotation of an element (list of symbols) is different than the [list] retrieved by one of the assigned annotators. |
| New full name different than default [full name]. Ignoring. | Existing annotation of an element (full name) is different than the [full name] retrieved by one of the assigned annotators. |
| New symbol different than default [symbol]. Ignoring. | Existing annotation of an element (symbol) is different than the [symbol] retrieved by one of the assigned annotators. |
| Synonyms list different than default [list]. Ignoring. | Existing annotation of an element (list of synonyms) is different than the [list] retrieved by one of the assigned annotators. |
| Warnings generated by verification of manual annotation | |
| contains invalid annotations:[annotation] | Configuration in Validate manual annotations did not foresee [annotation] as allowed for this element or interaction. |
| misses one of the following annotations:[list]. | Configuration in Validate manual annotations required one of [list] of annotations for this element or interaction, but none was found. |
| misses annotations. | No annotation exists for this element or interaction. |
| Unknown miriam uri: [MIRIAM type] | An element or interaction was annotated with [MIRIAM type] - this type of identifier is currently not handled. |
User manager#
This panel allows you to manage users registered for a given instance of MINERVA platform (see below).
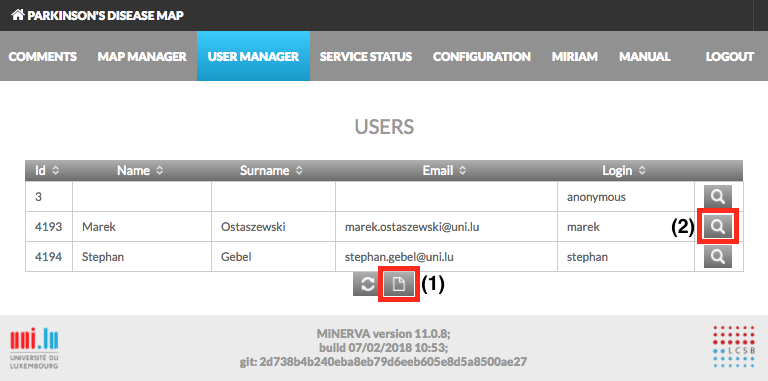 {:width=“800px”}
Registered users have access to additional functionalities besides accessing the visual content generated by the platform. Clicking on the New user button (above, 1) invokes the window allowing to set login, password and personal details of a new user. The window allows to set privileges of the new user.
Clicking on the magnifying glass icon (User manager figure above, 2) invokes a panel, allowing to configure privileges of a respective user. The panel is identical to the New user window, with the exception of Id and login, which are assigned and not editable.
The User detail window allows to configure the following parameters for a given registered user:
- Password of the user
- Name, Surname and Email details.
- Global privileges concern all projects on your MINERVA instance
- Add project checkbox, if checked, grants the user access right to the Add project button and permits the user to add new projects.
- Custom layouts field defines how many overlays can be created by a given user across all projects they have access to on your instance of MINERVA platform
- Manage configuration checkbox, if checked, grants the user access right to access Configuration tab and permits them to manage the global configuration of your instance of MINERVA platform.
- Manage genomes checkbox, under development - do not change the default setting.
- Map management checkbox, if checked, grants the user right to access Map manager tab and manage existing projects
- User management checkbox, if checked, grants the user right to access the User manager tab and permits the user to manage users on your instance of MINERVA platform.
- Project-specific privileges concern only the project, for which they are configured
- Manage comments checkbox, if checked, grants the user right to the Comments tab, and allows them to manage comments for this specific project
- Manage layouts checkbox, if checked, grants the user right to manage overlays of all users for this specific project
- View project checkbox, if checked, grants the user right to view this specific project. Important for non-administrator users only this box should be selected.
- Drug targeting advanced view and Edit suggested connections are obsolete functionalities
- Remove button removes this registered user from your instance of MINERVA platform
Service status#
Service status tab lists all external services and databases cross-linked by MINERVA platform. The left column contains service name hyperlinked to the original website. The right column contains the status of the service. Clicking on Service status tab invokes a checkup of the services and an update of their status. The checkup may also be invoked by the Refresh button at the bottom of the window. The figure below illustrates the Service status tab.
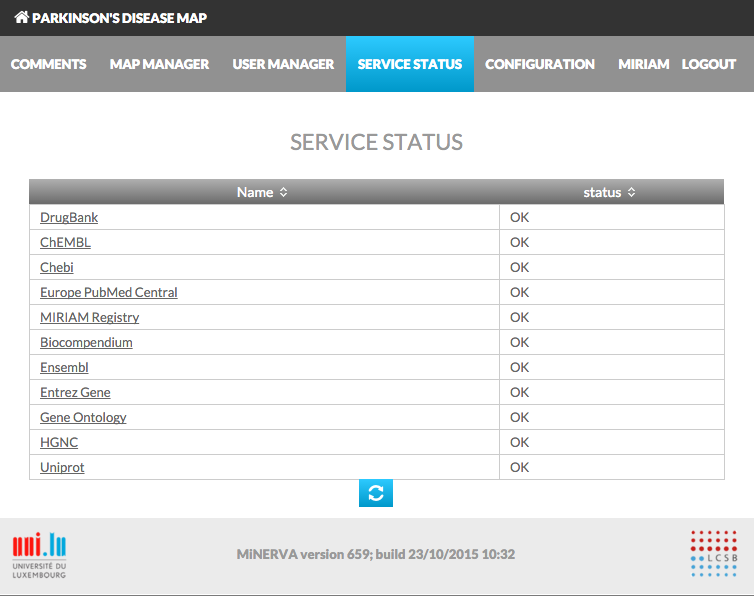 {:width=“800px”}
Configuration#
Configuration tab provides a summary of the current version of your MINERVA instance. Moreover, it allows privileged users to configure global parameters of the MINERVA instance. Clicking Refresh button (bottom left) displays the table of global parameters, which can be edited set using and Save button (bottom right).
Global MINERVA configuration parameters are:
- E-mail address: e-mail address used for sending notifications about the activity of your MINERVA instance - project uploads, comments, etc.
- E-mail server login, E-mail server password, IMAP server and SMTP server: configuration of your mail server for notification sending
- Default project id: the project that will be displayed by default under the root address of the platform (your.url/MapViewer/)
- Logo icon: the filename of your logo icon, displayed in the bottom-left corner of the visualized content
- Logo link (after click): the website to which you will be redirected after clicking on the logo
- Max distance for clicking on element (px): the content visualized by MINERVA platform is interactive, and clicked elements or interactions are recognized by the vicinity of the click event. This parameter controls, how close to an element or interaction, in pixels, you need to click to select them
- Email used for requesting an account: the Login tab in the user interface features a Request for an account button; clicking the button will auto-generate an message to the e-mail, or list of e-mails separated by a semicolon, provided in this field
- Max number of results in search box: it may happen that a Search query returns a large amount of results. This parameter allows to tune the performance of your MINERVA instance by setting the cap for the number of displayed results
- Google Analytics tracking ID used for statistics: MINERVA platform offers integration with Google Analytics to track user activity of your MINERVA instance by providing an appropriate Google Analytics ID in this field
- Logo description: the popup text that will be displayed upon mouse over your logo
- Domain allowed to connect via x-frame technology: the address of a website allowed to embed this instance of MINERVA via x-frame technology
- Path to store big files: location in the directory structure of this MINERVA instance to store big files
- Legend 1-4 image file: location in the directory structure of this MINERVA instance for displayed legend images
- User manual file: location in the directory structure of this MINERVA instance for the user manual file
- Overlay color for negative/positive values: configuration of overlay display - what colors should be used for positive and negative values. Values close to zero have the lowest color saturation, values close to -1/1 have the highest color saturation (see Section User manual - Upload user-provided overlay data)
- Overlay color when no values are defined: configuration of overlay display - what color to use for coloring named elements (see Section User manual - Upload user-provided overlay data)
MIRIAM#
The MIRIAM panel lists all MIRIAM-supported resources (see https://identifiers.org) currently handled by MINERVA platform. In particular:
- Annotation type: column lists the names of the resources, hyperlinked to the original website
- Miriam identifier: column lists corresponding MIRIAM identifiers, hyperlinked to their definition in the MIRIAM registry
- Valid for elements: column provides information, for which records this identifier is configured as valid (see Section Configure automatic verification)
- Valid uri column provides information on the correct format of corresponding MIRIAM identifier
Source file#
The source file is uploaded to establish a project on your MINERVA instance. It is a SBGN-compliant file in the .xml format. Two modes of upload can be discussed - basic and advanced. In the basic mode, a single SBGN file (.zip compressed files are also accepted) is uploaded via the Add project button (see Section Add project). This way the SBGN-compliant network is uploaded, without additional files.
Advanced upload mode assumes that a zip-compressed directory will be submitted as an input, with the following structure:
- main map: file in a SBGN-compliant format (CellDesigner or pure SBGN)
- images: directory with files (see Appendix Images)
- layouts: directory with overlay files (see Appendix Overlays)
- submaps: directory with submap files (see Appendix Submaps)
For an example, see Examples - Advanced file upload. Detailed description of each section of the source file follows below.
Images#
The images subdirectory contains static image files in .png format that will be displayed after pressing the Show overview button (see User manual - Show overview). Besides the images, the directory also has to contain a text, tab-separated file named coords.txt, describing links between the images and the associated network(s). The coords.txt file is a table with the following structure:
- FILE - linked image file
- POLYGON - a sequence of points in the linked image file forming a polygon, which will be treated as an active area for the link. The points should be
x,ypairs separated by a spacebar, representing absolute coordinates of the pixels in the corresponding image. They should be provided in a single line - LINK_TYPE - the type of link to the image, has to be one of the types specified below; link type determines the usage of the remaining fields.
- IMAGE - links to another image of the uploaded set
- MODEL - link to the main map, or one of the submaps
- SEARCH - link to the results of a search query
- LINK_TARGET - determined by the field
LINK_TYPE- if IMAGE - filename, must be one of the uploaded image files in the images directory
- if MODEL - filename of the uploaded main map, or one of the submaps
- if SEARCH - query to be executed and linked (see Section User manual - Search)
- MODEL_COORDINATES - if the field
LINK_TYPEisMODEL, this field should contain absolute coordinates of the point in the target map, in the formatx,y; otherwise it should be left empty - MODEL_ZOOM_LEVEL - if the field
LINK_TYPEisMODELand absolute coordinates are given, this field should contain a number corresponding to the zoom levels in the display area; otherwise it should be left empty. The the furthest zoom out has number 1, each zoom in increases the zoom number by one. Smaller maps will have less zoom levels than big ones. Try uploading the map without images first, and assess the coordinates and zoom levels for the version with images - COMMENT - a field for supplementary information, not used for configuration.
Example of a coords.txt file:
| FILE | POLYGON | LINK_TYPE | LINK_TARGET | MODEL_COORDINATES | MODEL_ZOOM_LEVEL | COMMENT |
|---|---|---|---|---|---|---|
| image.A.png | 51,218 107,218 107,252 51,252 | MODEL | PD_151023_1.xml | 7488,11986 | 5 | A link from image.A file to a point in the display area with zoom level 5 |
| image.B.png | 15,187 73,187 73,52 15,52 | IMAGE | image.A.png | A link from image.B file to invoke image.A | ||
| image.C.png | 30,8 10,8 10,7 30,7 | SEARCH | reaction:c1,reaction:c2 | A link from image.C to results of a search query pointing to interactions c1 and c2 |
Overlays#
The layouts subdirectory contains files with custom coloring of the uploaded content that will be accessible to all the users. The format is identical to the format of files uploaded by registered users. See Section Upload custom data - format for details on file format.
Submaps#
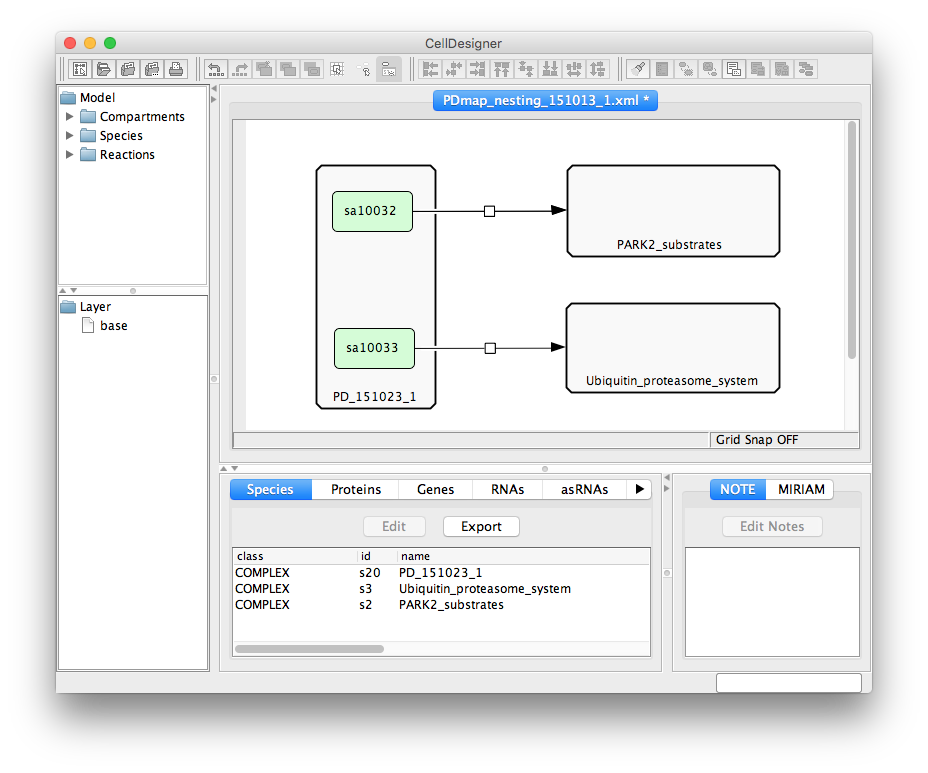
The submaps subdirectory contains SBGN files that will be displayed in the Submaps tab in the functional area of the User view (see Section User view - Submaps). Additionally to the submap files, one additional file, a submap mapping file, can be added to the directory. This file describes connections between the submaps and the main map itself. See below for the exact structure of the submap mapping file.
Submap mapping file#
Submap mapping file is a CellDesigner file, in which relations between the uploaded maps are represented graphically. Two types of components and one type of interaction is considered when parsing this file:
- Complex should be named as a map file (the main map, or a submap), but without the .xml extension
- Protein should be named as an alias of referred element in the source file (the main map, or a submap). Please, note that a species alias is not the same as a species identifier! (see remark below)
- State transition reaction describes relations between components of the map.
Remark to alias vs identifier: CellDesigner has a single species identifier for all copies of a certain element (e.g. protein) in a file. Different instances of the same element have a distinct species alias. It is the species alias that is used to link specific map elements with submaps.
A screenshot below demonstrates an exemplary submap mapping file.
 {:width=“800px”}