This panel allows you to:
- 1 add a new project
- 2 open the project
- 3 examine the messages generated during upload of the projects
- 4 edit the project
- 5 remove the project

Add Project#
You can upload to MINERVA a simple file (e.g. CellDesigner) or zip-compressed file (further called advanced upload). The latter allows to broaden your project, you can attach to the single map submaps, glyphs, overlays or images (read more).
The Add project button invokes a menu allowing you to upload your project and start its generation in the MINERVA platform.

Simple formats#
The single files that can be uploaded to create a project on a MINERVA instance are:
CellDesigner SBML files
GPML files
SBML files, importantly:
elements (species) and reactions should be defined by SBOTerms, to match the CellDesigner style (see the list of CellDesigner types matching SBOTerms). If not, all elements will be shown as small molecules and all reactions as state transitions. Find more in example 2 - SBML file modifications
layout and render packages are supported
MIRIAM annotations in the
<annotation>node are supported
SBGN-ML and Newt files
Advanced format (submaps, glyphs, overlays)#
Advanced format project - its structure is uploaded as a zip-compressed file. Advanced project can contain submaps, overlays, images or glyphs. See details how to build your advanced project (Advanced format).
Fields of the Add project window#
Upload file - Choose File invokes a file upload dialog.
File format - the format is picked up automatically after uploading a file. Available formats are: CellDesigner, SBGN-ML, SBML or GPML. In case you upload Newt (*.nwt) file, you need to choose manually SBGN-ML from the list to upload file successfully.
Map canvas type - choose Google Maps API or OpenLayers to display the map, if you choose Google Maps API you have to agree on Google Maps API Terms by ticking the checkbox.
ProjectId - a working name of the uploaded project on the MINERVA platform.
Project name - the name of the uploaded project displayed in the top left corner of the main view; your official name of the project.
Project Disease - the disease associated with the project, the code has to be a valid MeSH identifier, e.g.D010300. This is needed for chemical target search, see section chemical target.
Organism - the taxonomy id of the species, for which the map is primarily developed, e.g. 9606. This is needed to display genetic variants overlays.
Version - a text field displayed next to the name of your project in the User panel.
Notify email - e-mail address that should be used for project-related notifications.
Annotate model automatically - if this checkbox is checked, elements of the uploaded map will be automatically annotated using built in annotators. Behavior of the annotators can be configured by clicking the Advanced button (see section Configure automatic annotation).
Verify manual annotations - if this checkbox is checked, elements and interactions of the uploaded map will be scanned for existing annotations; if present, these existing annotations will be validated against a set of rules. Verification rules can be configured by clicking the Advanced button (see section Configure automatic verification).
Cache data - if this checkbox is checked, all hyperlinks in the project resolved by MIRIAM repository (e.g. cross-links to external bioinformatics databases) are resolved and cached.
Auto margin - if this checkbox is checked, the map will be drawn with equal amount of empty spaces around it.
Display as SBGN - if this checkbox is checked, the uploaded model will be displayed in SBGN format, instead of the default CellDesigner format.
Configure automatic annotation#
The Advanced button, next to the Annotate model automatically checkbox, invokes a dedicated configuration window, where you define annotators of species and reaction for your model (image below).
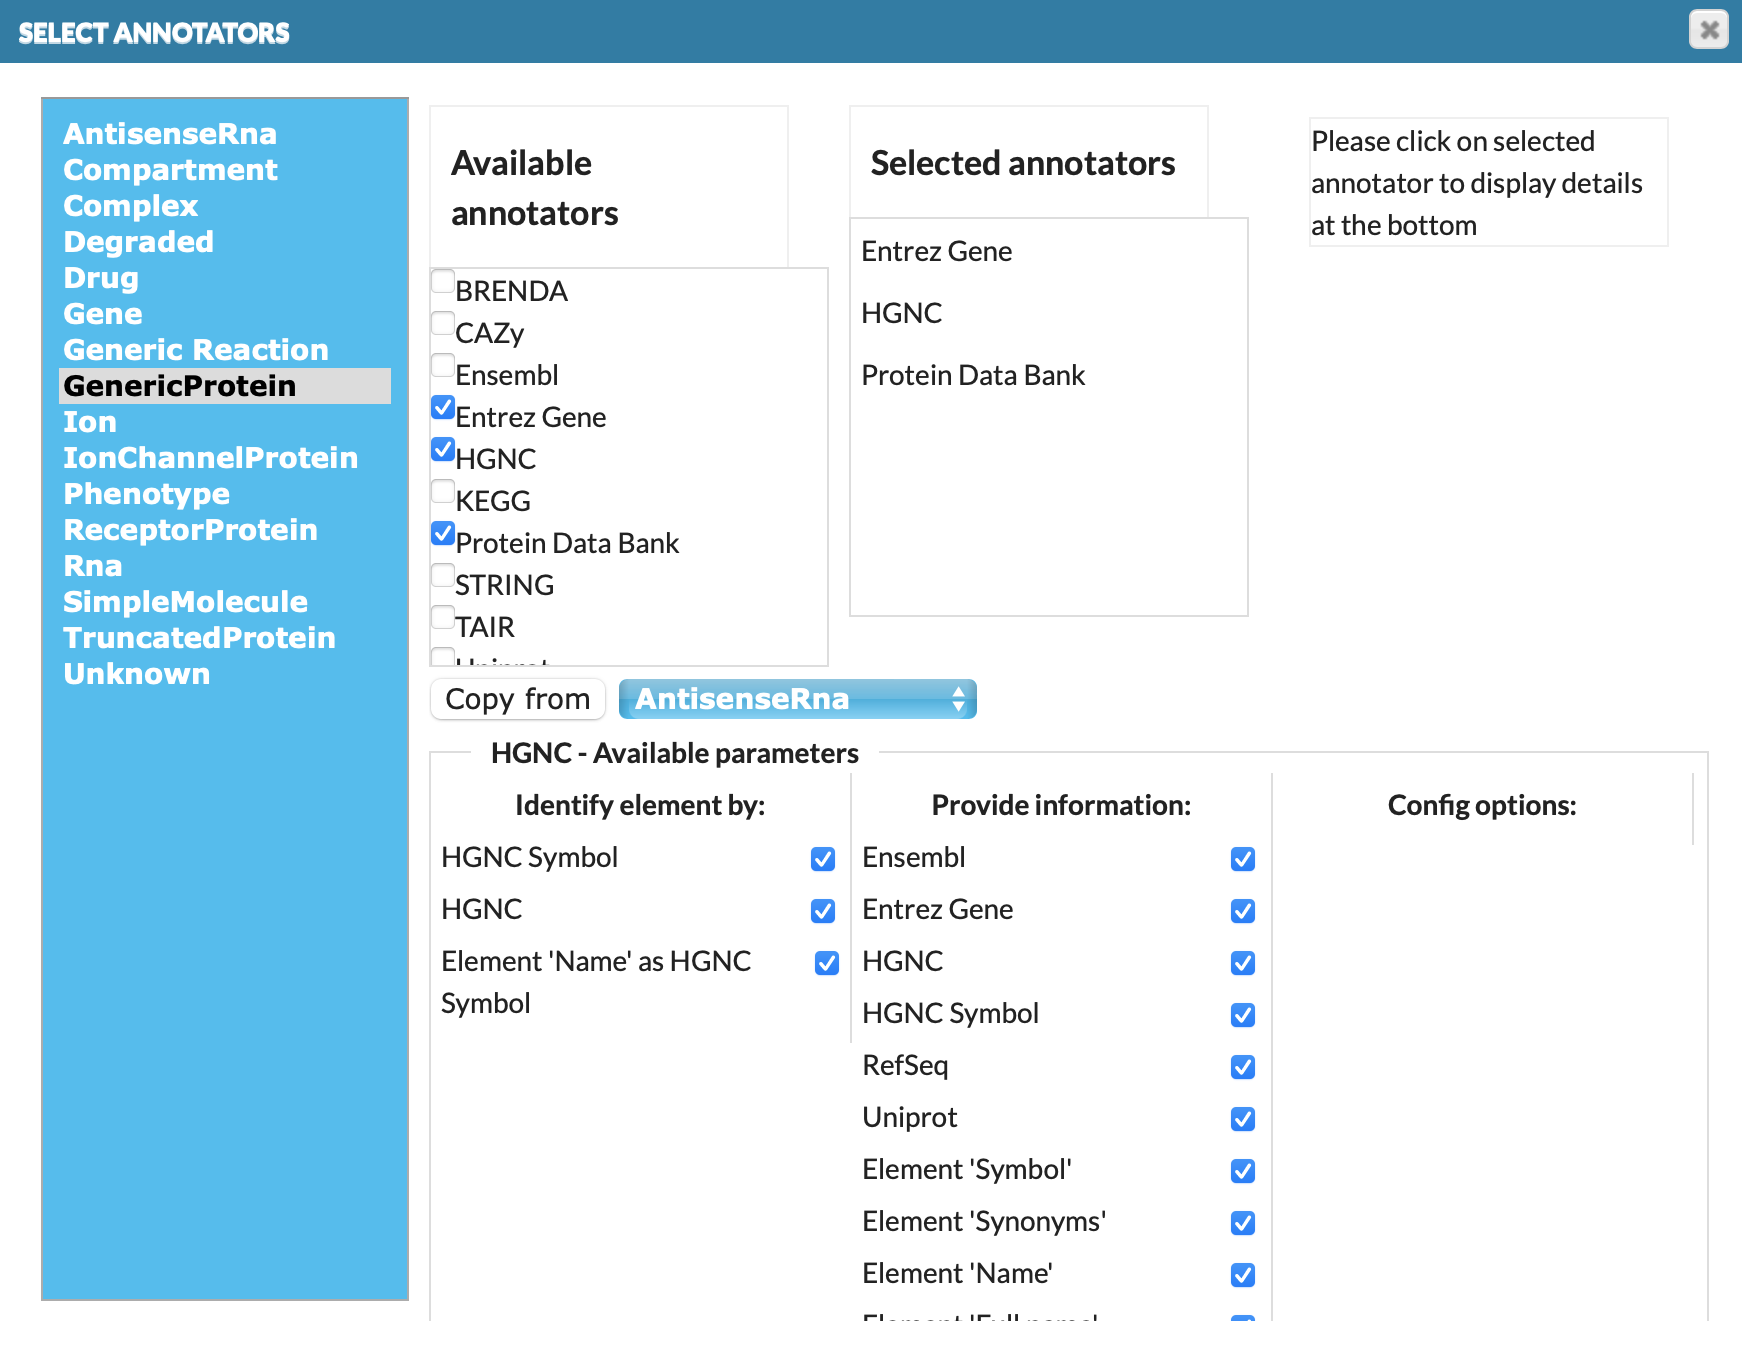
In the left panel contains elements eligible to annotate (e.g. GenericProtein). Click on the element to display its available annotators in Available annotators. Select desired available annotators by checking checkboxes. They will be displayed in Selected annotators. The selected annotators will attempt to automatically retrieve information from external bioinformatics databases for each relevant element and annotate them. Click on the annotator’s name in Selected annotators to see its parameters at the bottom of the window. There are: Identify element by, Provide information and Configuration options.
- Identify element by: there are a number annotators available, working either by name or by annotation of an element.
- By name - ‘Name’ of element as HGNC Symbol.
- By annotation refers to the MIRIAM identifiers in the
<annotation>section of SBML and CellDesigner formats. These annotators use specific identifiers, mentioned below, to retrieve additional information for elements. For instance, by UniProt annotation means that the annotator needs a valid UniProt identifier in the<annotation>section. Note: SBGN files can be automatically annotated only by name as they have no<annotation>section.
- Provide information: elements annotations that MINERVA will provide in the left panel of the main view of the map.
Copy from button allows to copy the annotators set from other objects we choose (see above image: click on copy from will copy annotators set of AntisenceRna for GenericProtein).
List of elements identifiers (Identify element by) and retrieved details (Provided information) by MINERVA:
| Annotator | By annotation | Retrieves |
|---|---|---|
| BRENDA | BRENDA; UniProt | All BRENDA codes for enzymatic activity of the element. |
| ChEBI | ChEBI; name (ChEBI name) | Full name and synonyms in the ChEBI ontology. Additionally, stitch annotation is available. |
| ENSEMBL | ENSEMBL | Full name, symbol, synonyms, HGNC Symbol and identifier, Entrez Gene identifier. |
| Entrez Gene | Entrez Gene | Full name, symbol, synonyms, description, HGNC identifier and ENSEMBL identifier. |
| Gene Ontology | Gene Ontology | Full GO definition for this identifier. |
| HGNC | HGNC; name (HGNC symbol) | Full name, symbol, synonyms and UniProt identifier, HGNC Symbol and identifier, RefSeq identifier, ENSEMBL identifier, Entrez Gene identifier. |
| Protein Data Bank | PDB; UniProt | All relevant PDB structure identifiers. If HGNC symbol or identifier are used, it will also run the HGNC annotator. |
| UniProt | UniProt; name (UniProt name) | HGNC Symbol, Enzyme Nomenclature identifier and Entrez Gene identifier. Additionally String annotation (all relevant STRING identifiers) is available. |
Note: Selected annotators retrieve details from databases in order the annotators were selected. For example: If your model contains just elements names (HGNC Symbol) and selected annotators is setup as per image above. MINERVA will check firstly Entrez Gene, but model does not have any Entrez Gene identifiers - MINERVA will not provide Entrez Gene details. Then, HGNC database is checked by name (HGNC Symbol), and MINERVA provides details specified in Provide information, i.a. UniProt annotations. Next, Protein Data Bank is checked. MINERVA returns its details, thanks to UniProt identifier which has been retrieved previously from HGNC database.
Configure automatic verification#
The Advanced button, next to the Verify manual annotations checkbox, invokes a dedicated configuration window (see below).
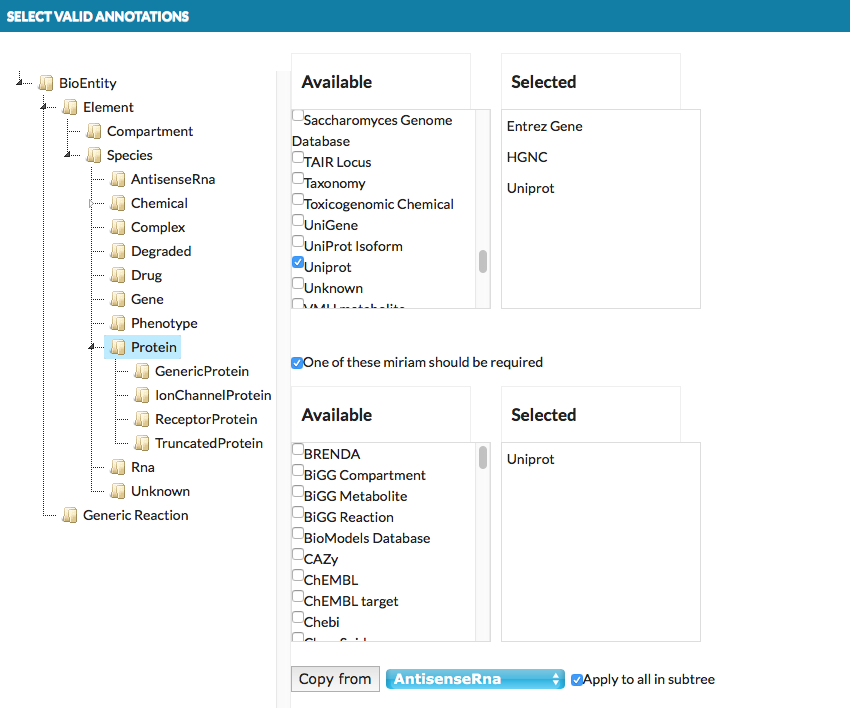
-
- top right panels
- A list of MIRIAM identifiers which are configured as valid. Elements or interactions in the uploaded model annotated with any identifier other than the valid list will raise a warning.
-
- bottom right panels
- A list of MIRIAM identifiers which are configured as mandatory. If checkbox One of these miriam should be required is checked, elements or interactions in the uploaded model annotated without at least one identifier from mandatory list will raise a warning.
Save button: project generation#
Clicking Save in the Add project window will start generation of the project. The status of the project in the Projects tab will update during the process. Also, you can use the Refresh button. Any warnings raised during the process will cause an exclamation mark icon to appear next to the project status. The list of warnings is extended gradually when the project upload advances, and you need to wait for the project completion to see the full list. You will receive an email notification after the generation is complete.
It may happen that the project generation will result in a failure. An icon will be displayed, and mouse over it will display the reason for failure. You will receive an email message with the brief description of the error.
To find out more, check example 1 - CellDesigner file upload and annotation.
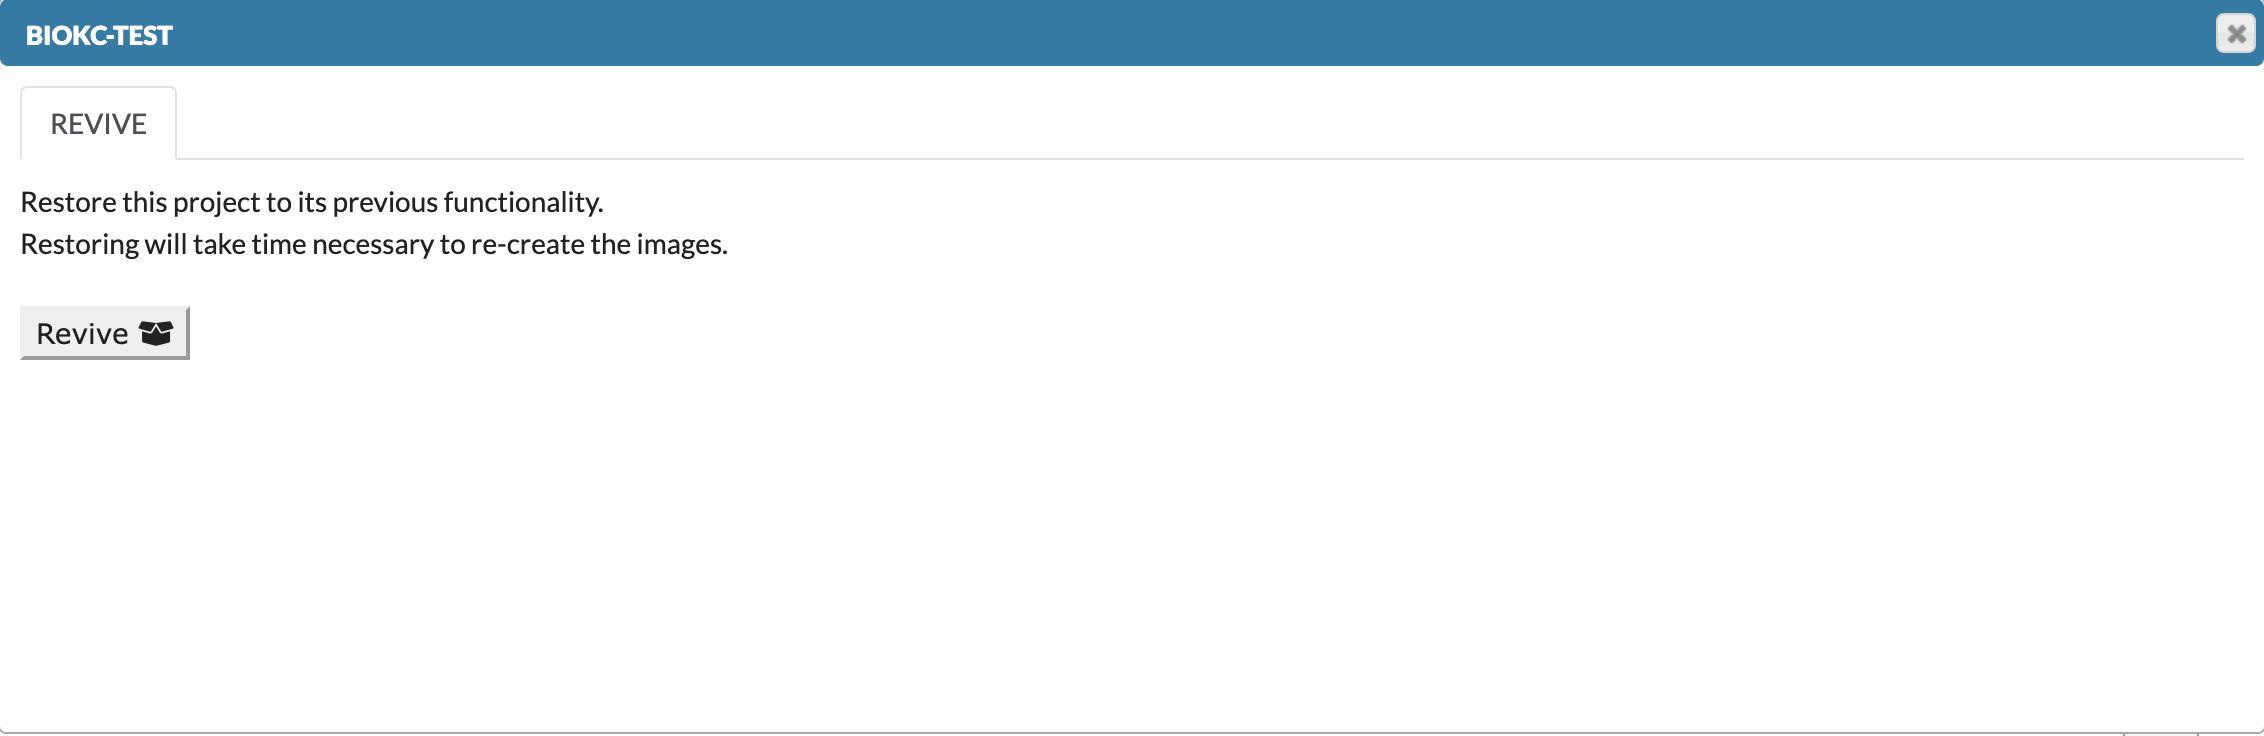
Archive project#
In the process of editing a project, the admin also has the option to archive it.

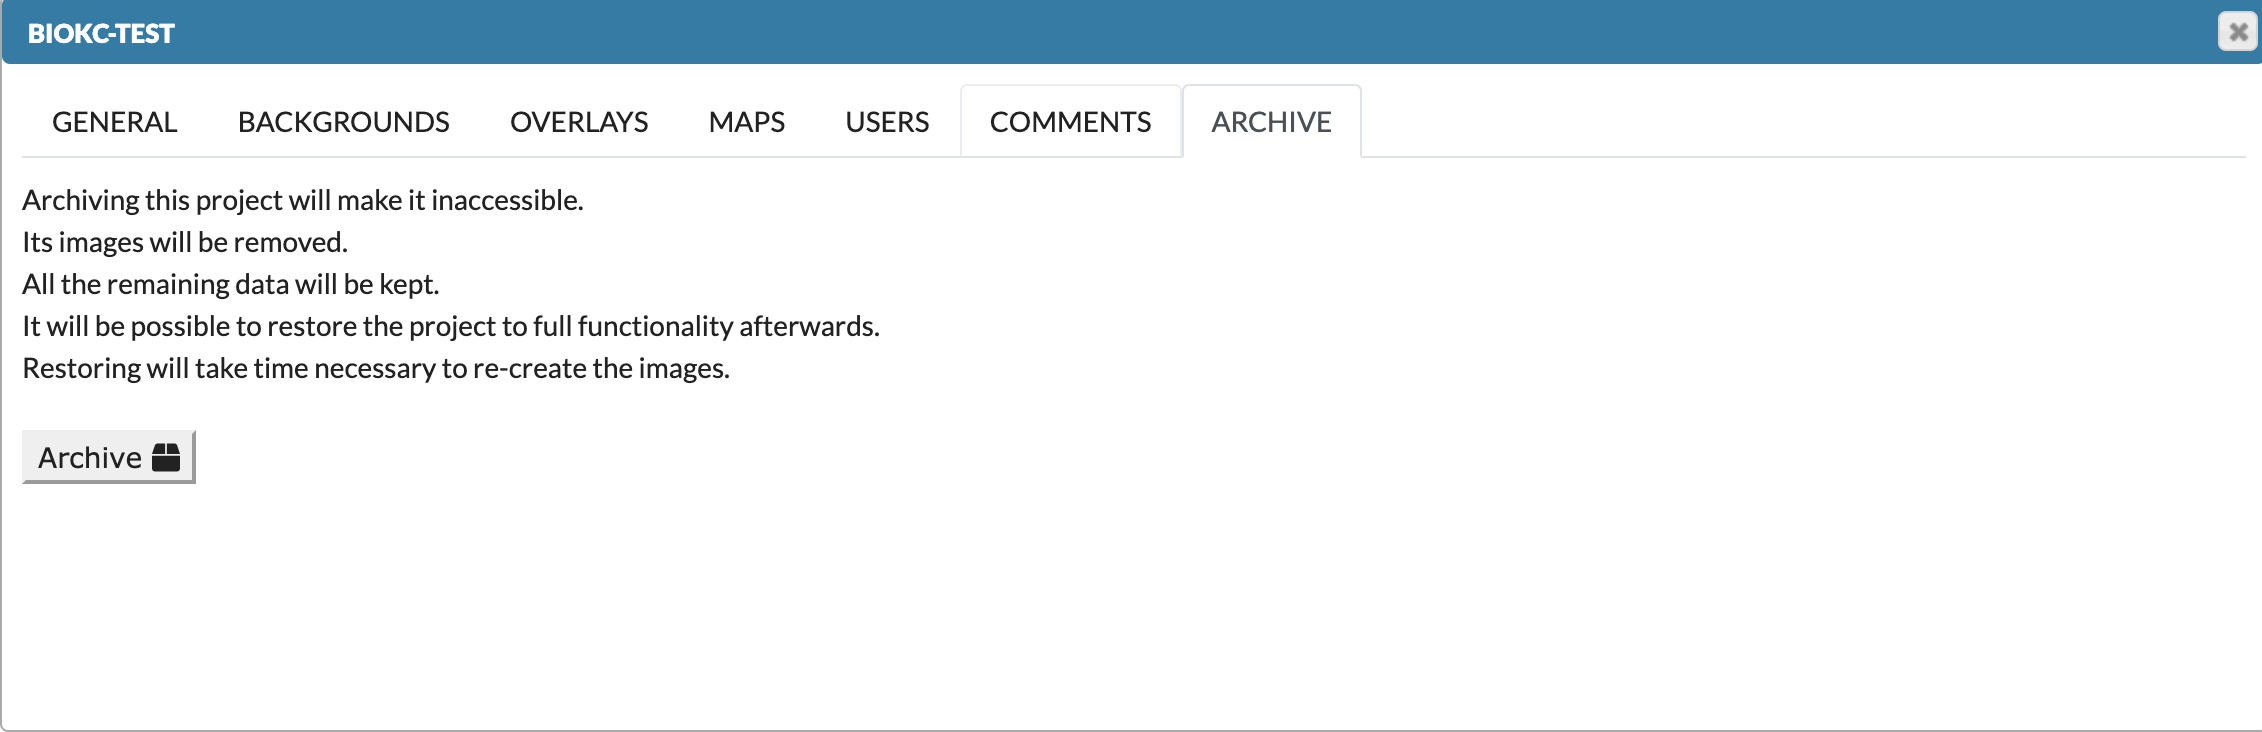
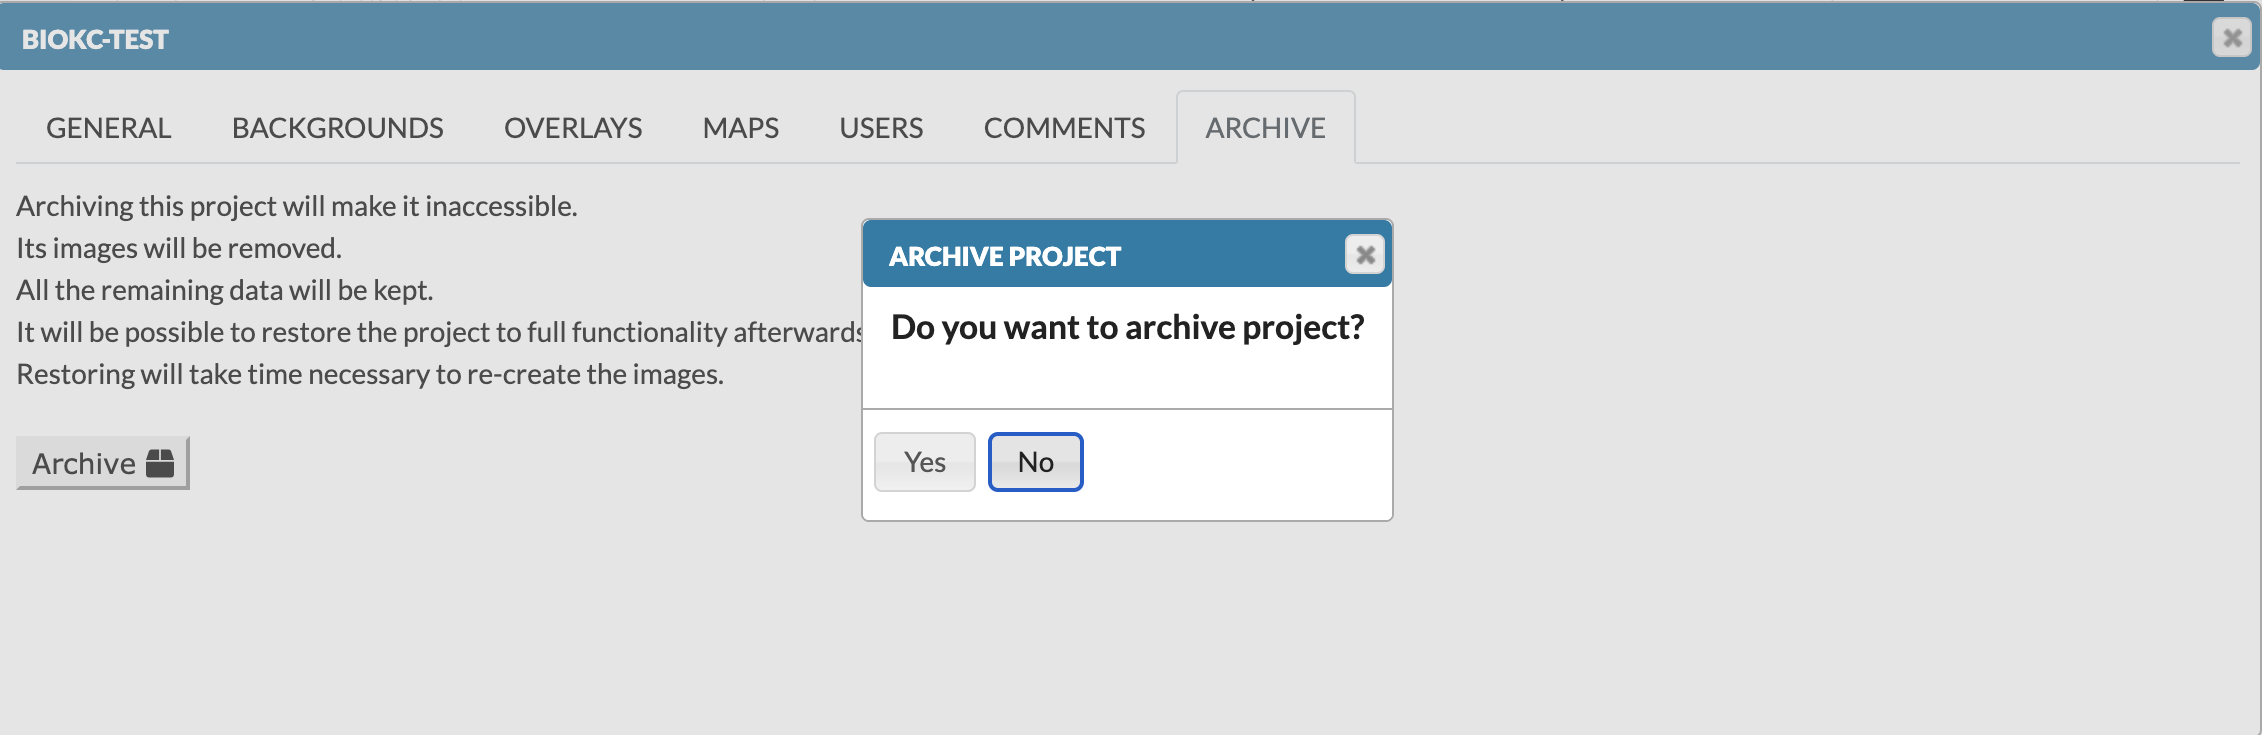

After archiving, they can restore the project back.
Project status#
Clicking on the exclamation mark icon (if present) next to the project status description, will display the list of warnings raised during the generation of this project (see below).
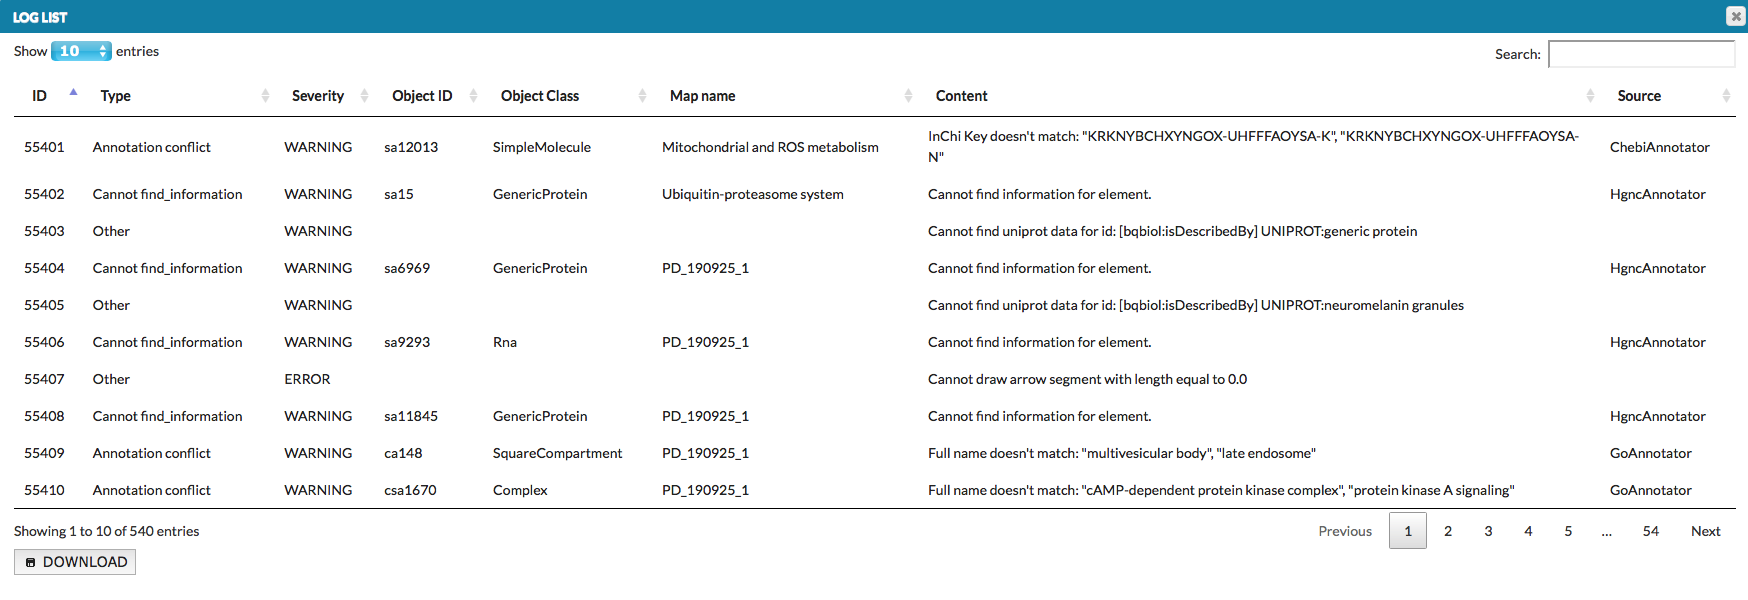
The list can also be downloaded as a tab-delimited text file. Types and identifiers of the elements and interactions are listed on the left side of column Content, while the nature of an error is provided on the right. Take a look at the list of possible errors and their explanations.
Edit project#
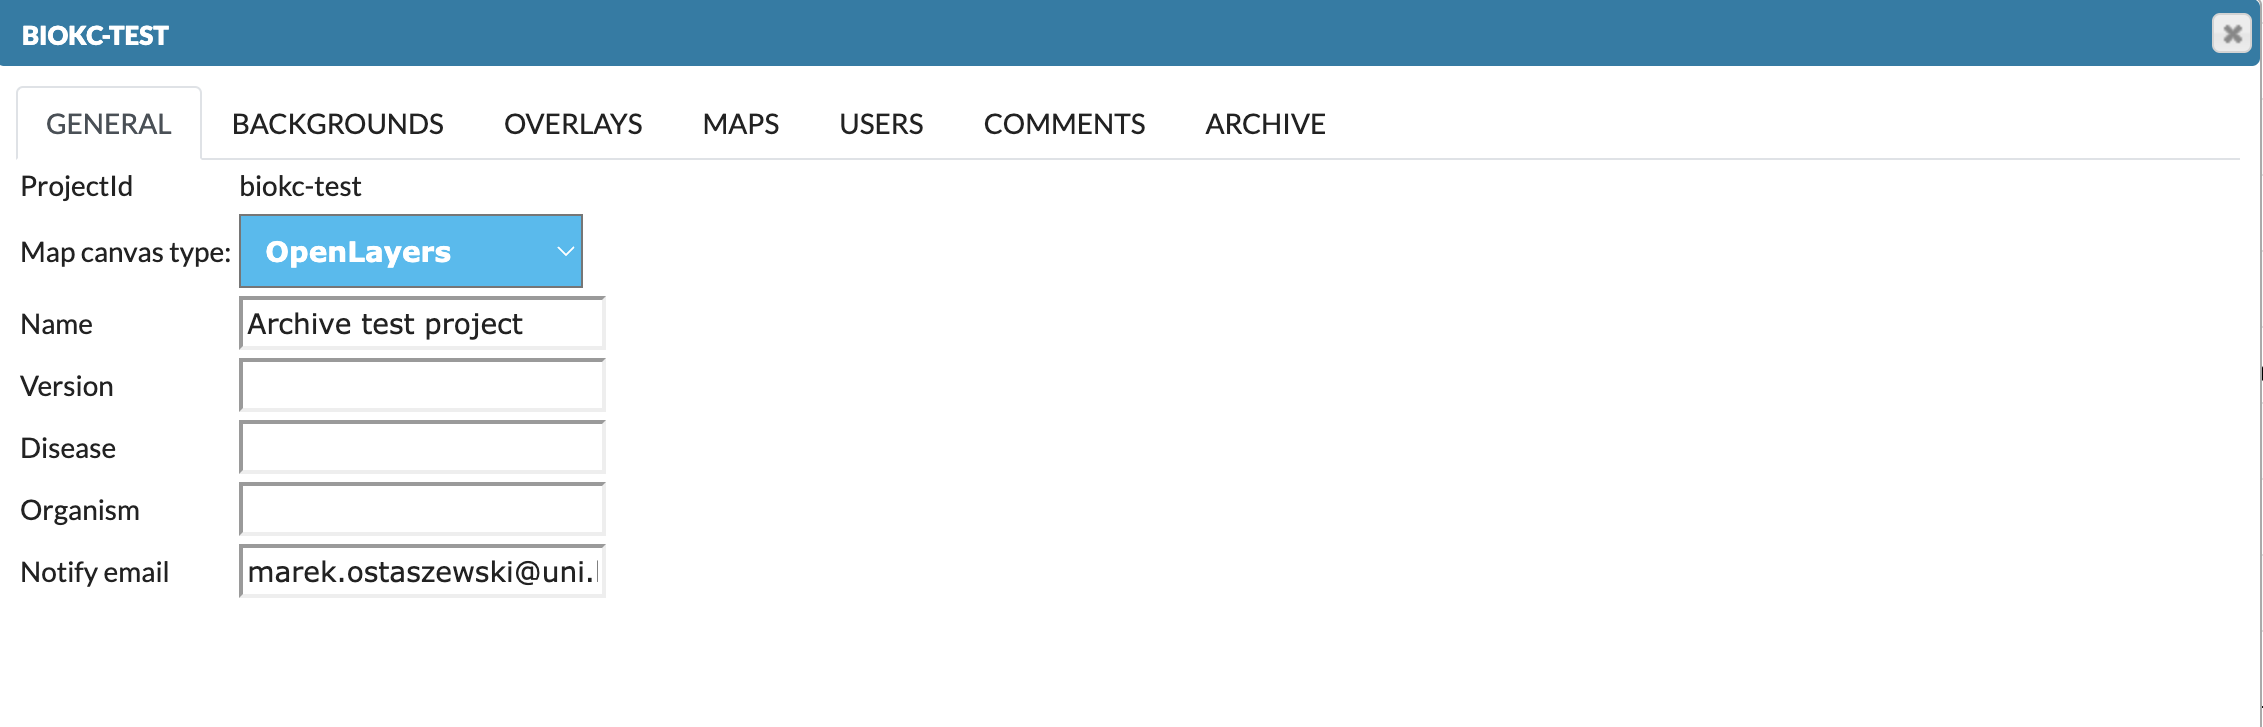
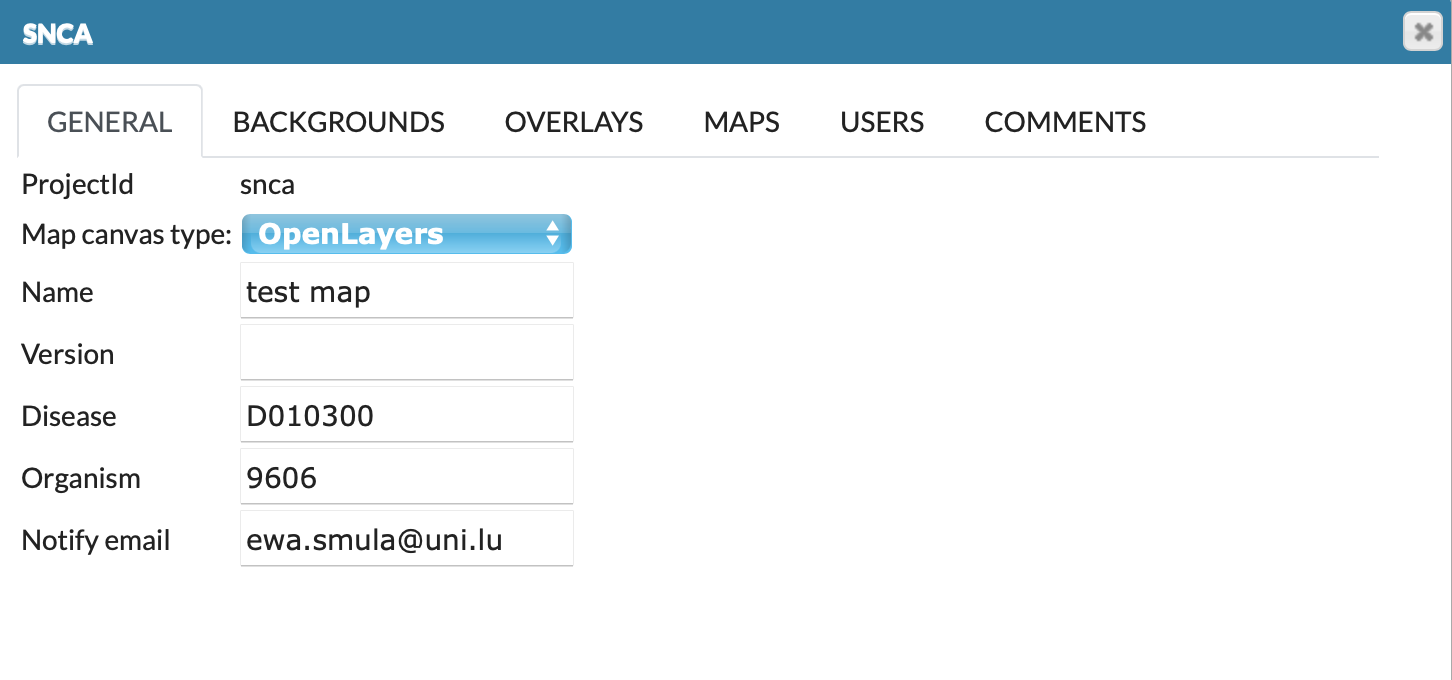
This panel allows you to configure and manage the project. Functionalities are grouped in the following tabs (see below for an illustration):
- General edit information about this project: canvas type, name, version, disease and organism type or notify email address.
- Backgrounds contains three default views of the map, Pathways and compartments, _Network, and Empty.
- Overlays add or configure overlays for this map, both general (public) and user-provided.
- Maps configure visuals for the main map and submaps.
- Users manage users’ access rights to this map.
- Comments manage user-provided comments for this map.
Backgrounds#
This tab contains the view of the map: Pathways and compartments, Network and Empty. They allow for different ways of displaying the map’s content, and they have no data associated with them. Here you can set default background for your project or remove it.
Overlays#
This tab allows you to add new overlays and edit properties and ownership of existing overlays. Here you see the overlays that have been:
uploaded with the project, if it has contained overlays already (see Add project and Advanced upload).
uploaded by the users (see Upload user-provided overlay data).
uploaded by the administrators by Add overlay button in top left corner.
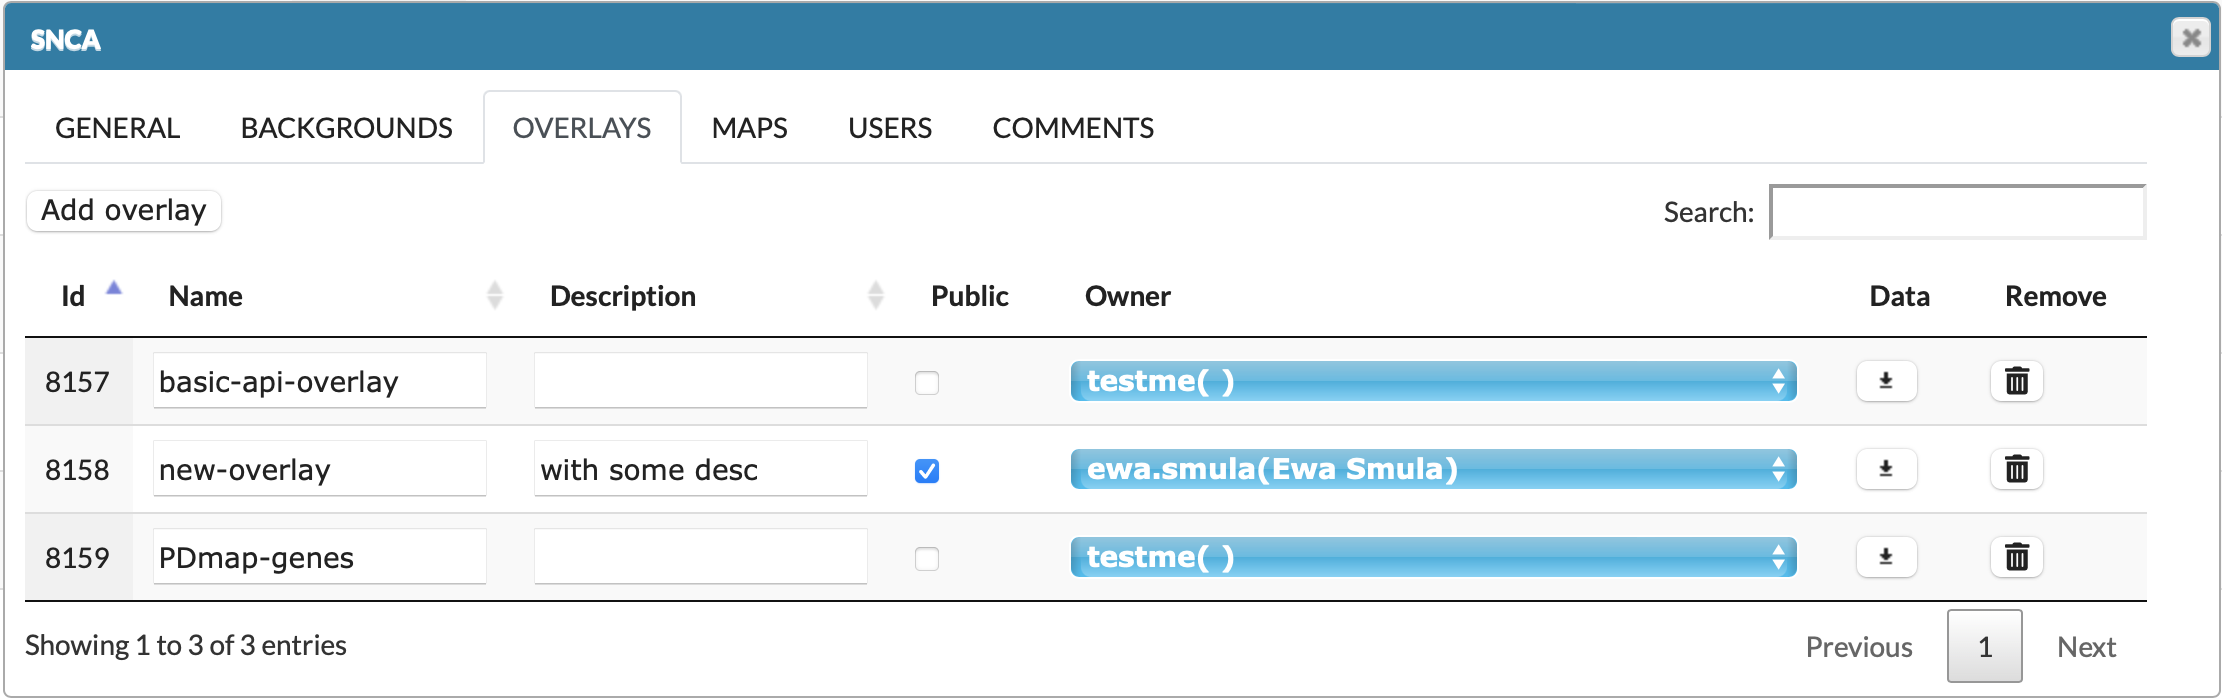
Besides Name and Description, the following columns are available:
- Public - this checkbox makes the overlay available to any user. It will be available to display in General overlays in OVERLAYS.
- Owner - the user having the access right to a given overlay. Dropdown menu allows to choose from existing users.
- Data - action buttons to download the associated dataset.
- Remove - action buttons to remove the corresponding overlay.
Maps#
This tab lists all available (sub)maps in the project. Also, it allows to personalise the default displaying options for the (sub)maps, see image below.
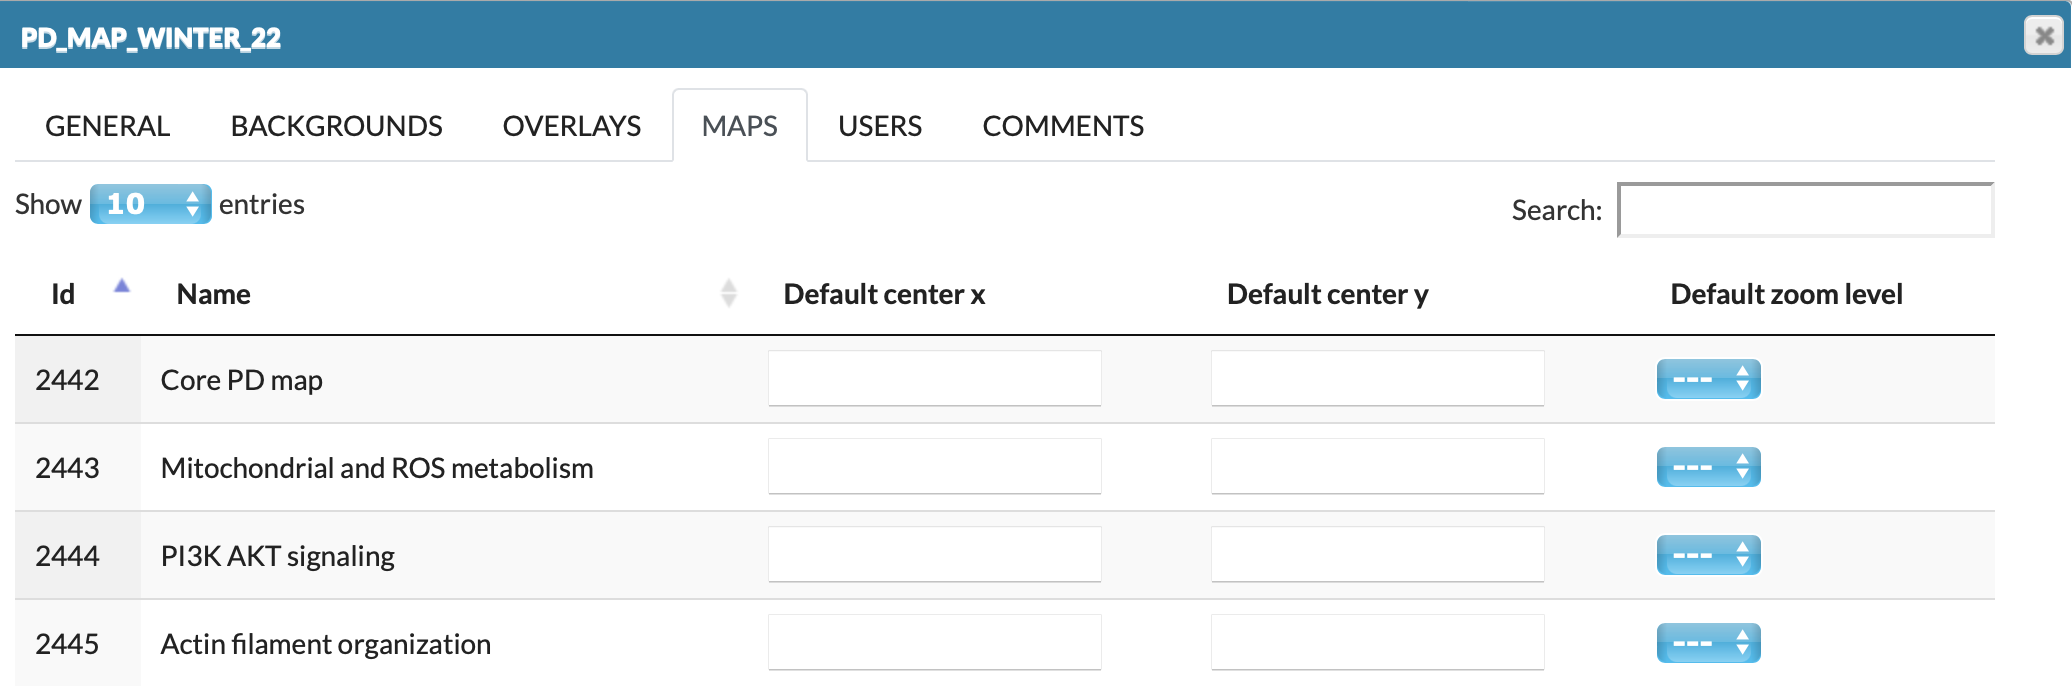
The available display parameters are described below:
- Default center x and y set the default center point of the (sub)map. x can be positive or negative values, y is positive values only.
- Default zoom level set the default zoom level for this (sub)map.
Users (of this map)#
This tab lists all users of a MINERVA instance and allows to configure their access rights to this particular map. It contains the following columns of checkboxes:
- View project
- Modify project
Ticking a checkbox in a respective column for a given user assigns the corresponding privilege to them. General users privileges are discussed in detail in the following section USERS.
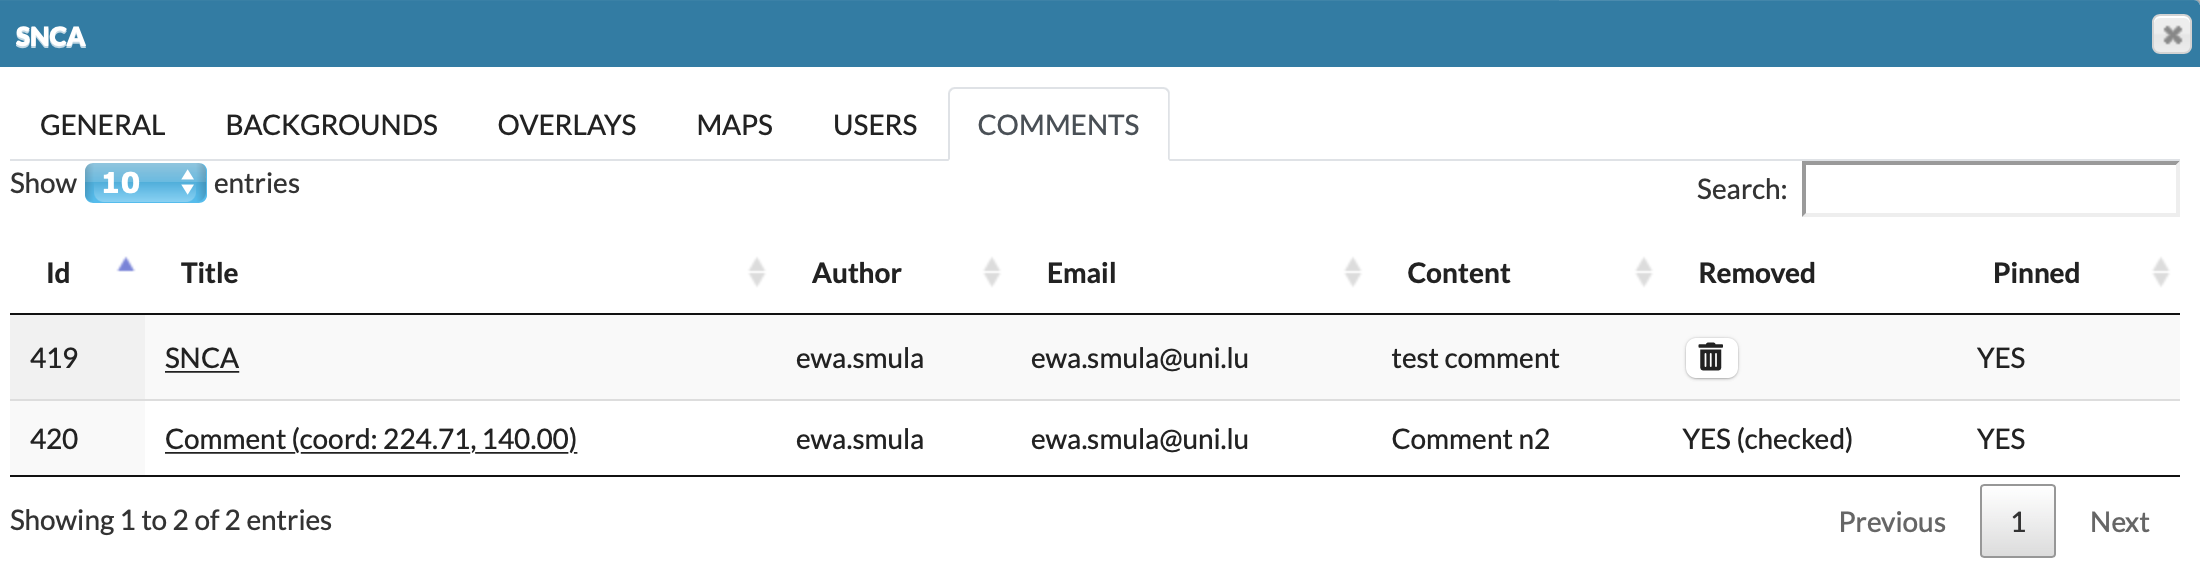
Comments#
This panel allows you to manage comments provided by users to the particular map (see section User manual - Comments).
The field Title is a hyperlink to a given comment in the map. In the following columns there are author of the comment, his email and the content. Last column Pinned informs if the comment’s icon is visible on the map.
Users logged in as administrators or curators have a possibility to delete a comment by click on Remove button. The users can remove only their own comments. The removed comment will no longer be visible among the pinned comments on the map, and its status will be updated in the Removed column with comment in the brackets (see image below).
Register in MINERVA-Net#
MINERVA-Net is a registry of publicly shared disease maps projects. This registry was established to enhance the collaboration of the MINERVA Platforms users by providing possibility to share information about the projects on the central server. This information can be used to query individual instances of the MINERVA Platform using their API interfaces.
Read more and view the list of registered projects in MINERVA-Net here.
Check MINERVA-Net API Docs here.
To share your projects on MINERVA Net, first your MINERVA instance must be registered. Go to Admin Panel and click Register in MINERVA-Net button.

Dialog will be open:
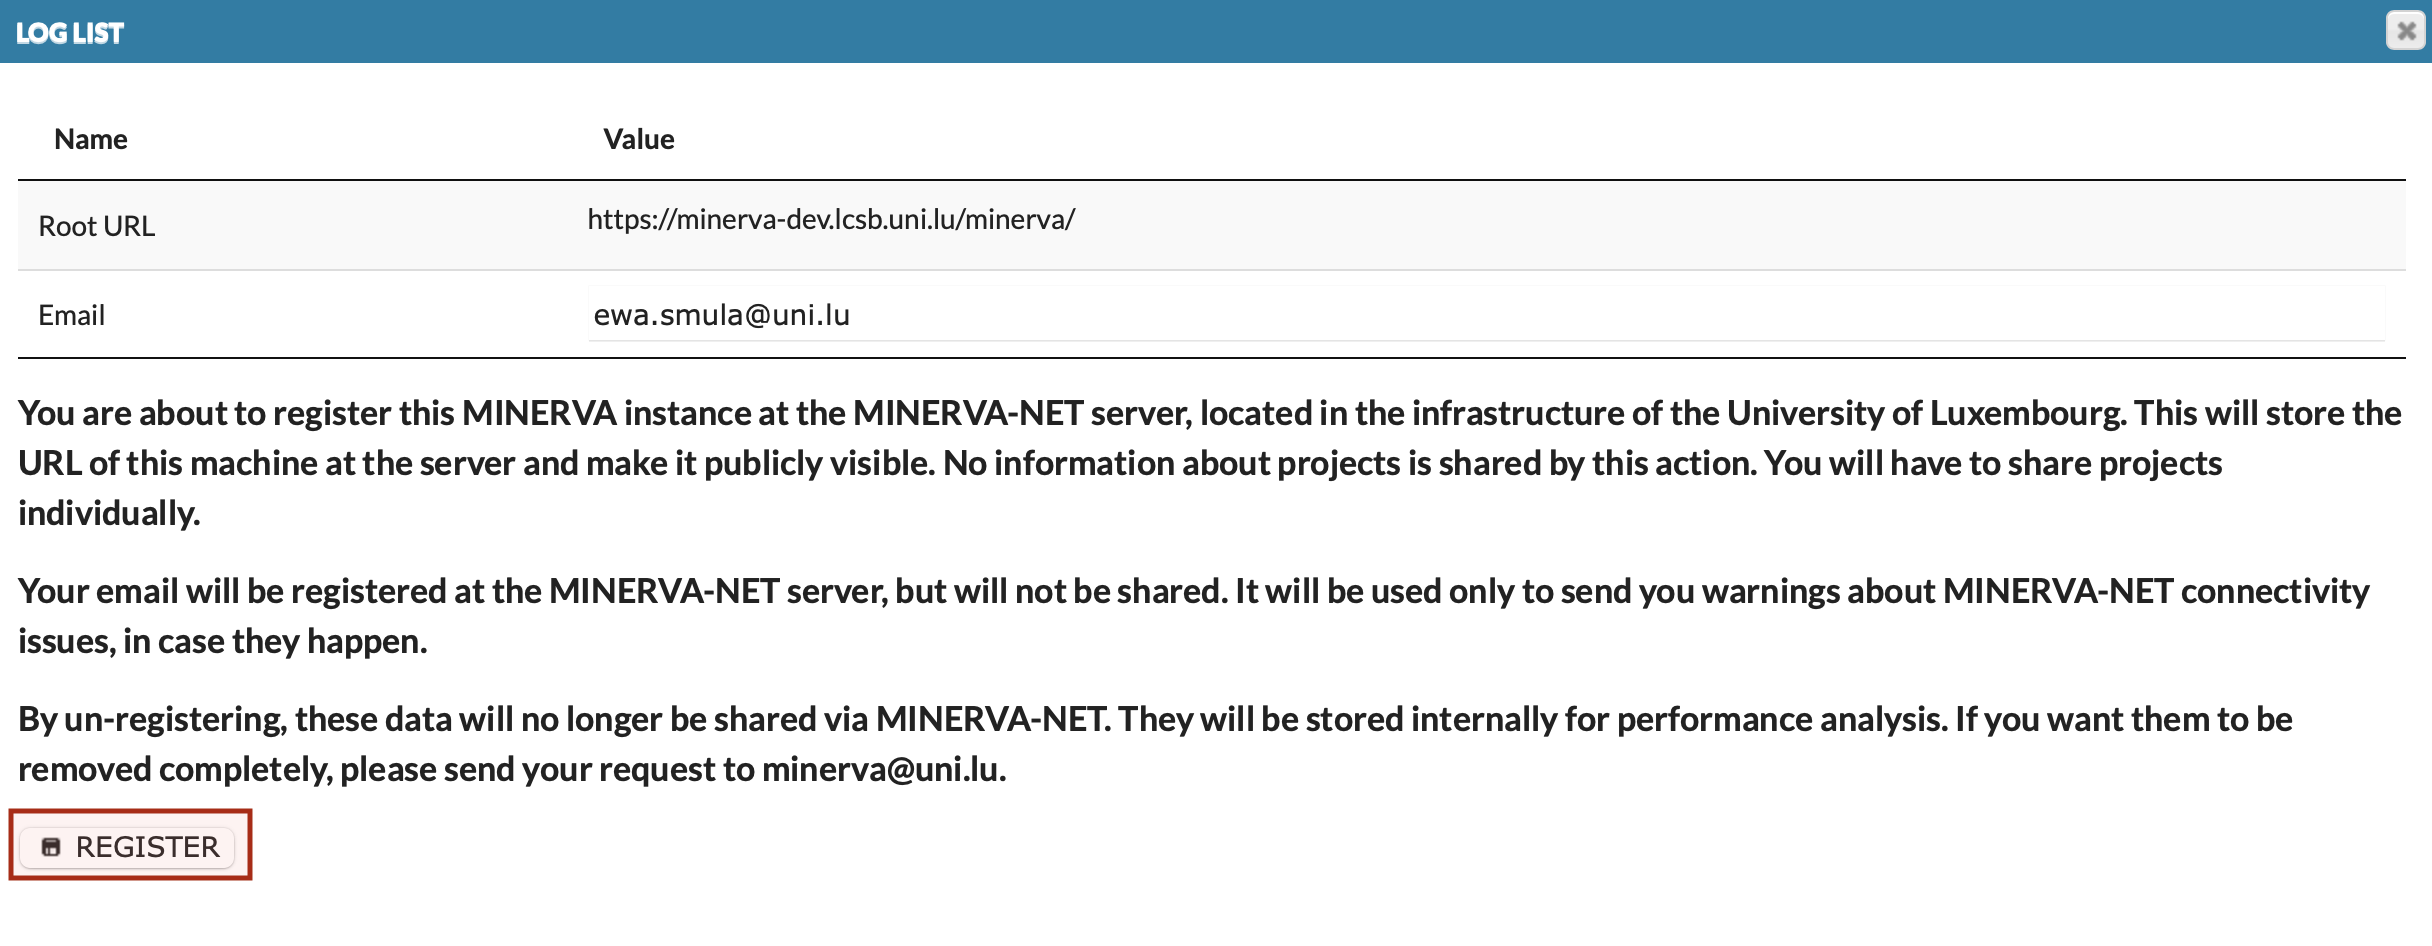
While registration of the MINERVA instance, MINERVA-Net collects:
- URL of this instance,
- email of the platform administrator, used only internally, to inform about potential communication errors.
Importantly, only projects publicly visible on a given instance of the MINERVA Platform can be shared via the registry. This way the registry contains information that is openly accessible.
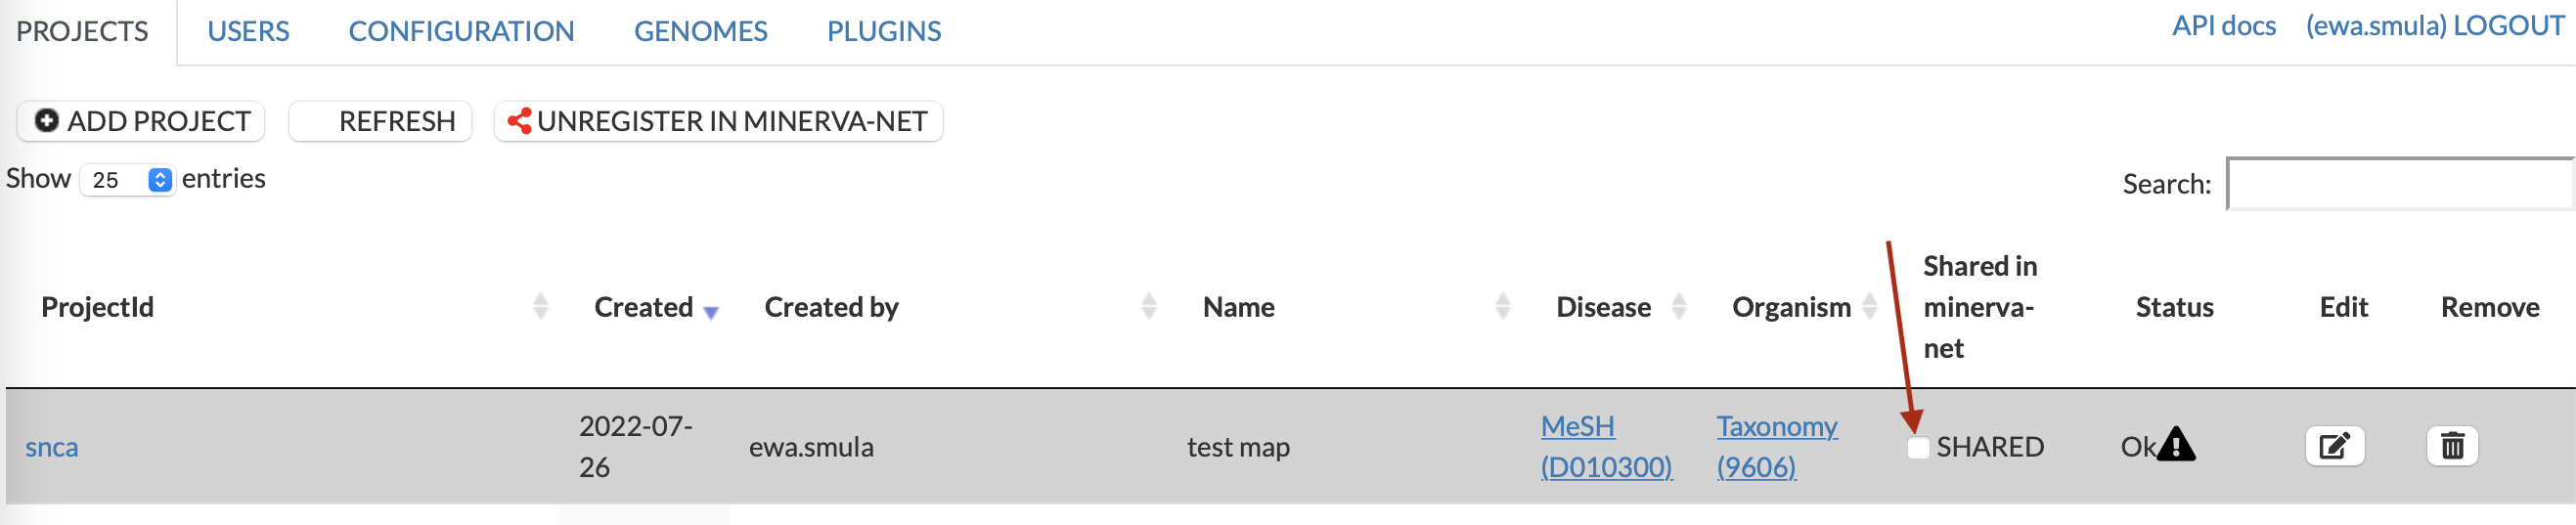
Next step is to register your project. It will allow on sharing project’s details with users. Check the box in column Shared in minerva-net of project you wish to share.
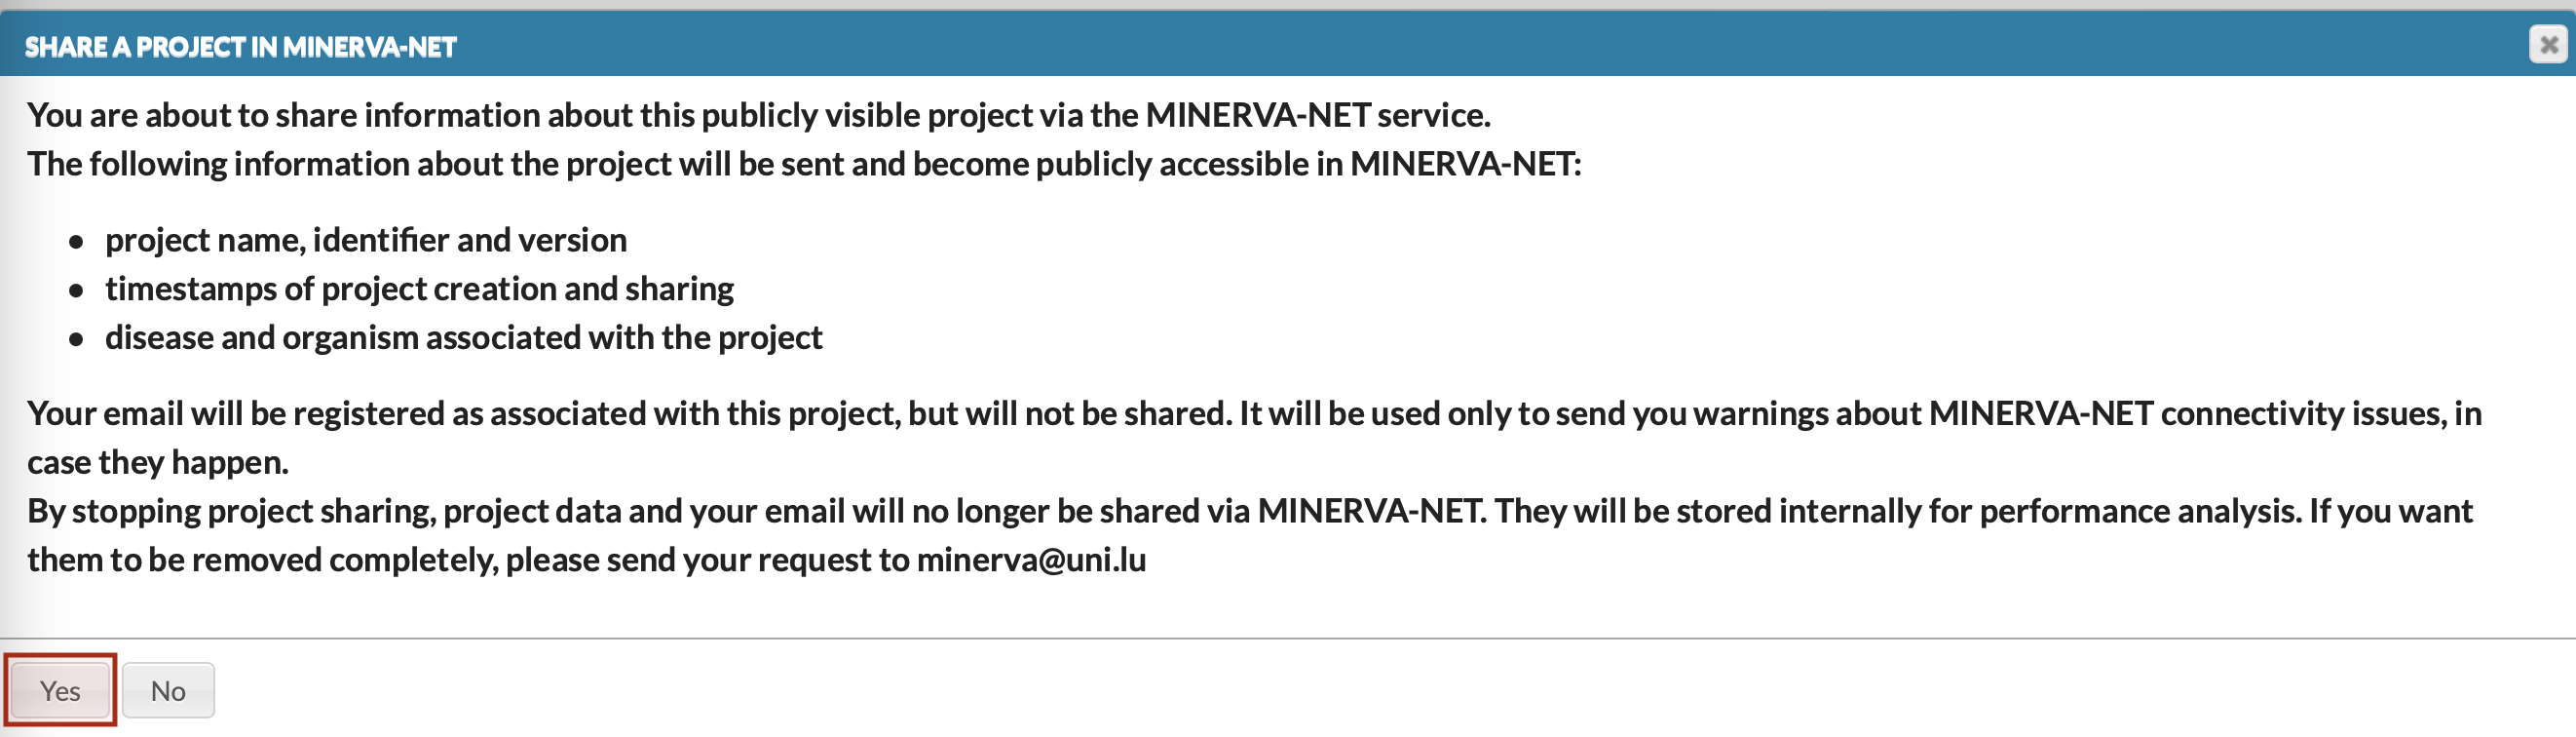
Dialog below will be open informing what details MINERVA-Net collects (image below). This information becomes available via the MINERVA-Net API. Additionally, the registry collects the email address associated with the project to inform about potential communication errors observed by the registry, related to the availability of the project.
When project is shared in MINERVA-Net, its box Shared in minerva-net checked.

At any moment you can stop sharing project’s details by unchecking the box and unregister your instance from MINERVA-Net by corresponding button (image above).
List of projects registered in MINERVA-Net is available here.