MINERVA configuration: Administrator’s manual#
Administrator view#
Administrator view refers to the set of functionalities for web-based management of the content and configuration of a MINERVA instance.
Login#
Administrator view is accessible via the button with the lock icon in the upper left corner of the main view (see below).
![]() {:width=“400px”}
{:width=“400px”}
Many projects (maps, networks) can be hosted in parallel on a single MINERVA instance. The users access the projects via direct hyperlinks. To manage these projects, the user with administrator’s rights to at least one of the projects can log as an administrator via lock icon. After successful login, you will have an access to the administrator panel to manage a MINERVA instance (see below).
 {:width=“900px”}
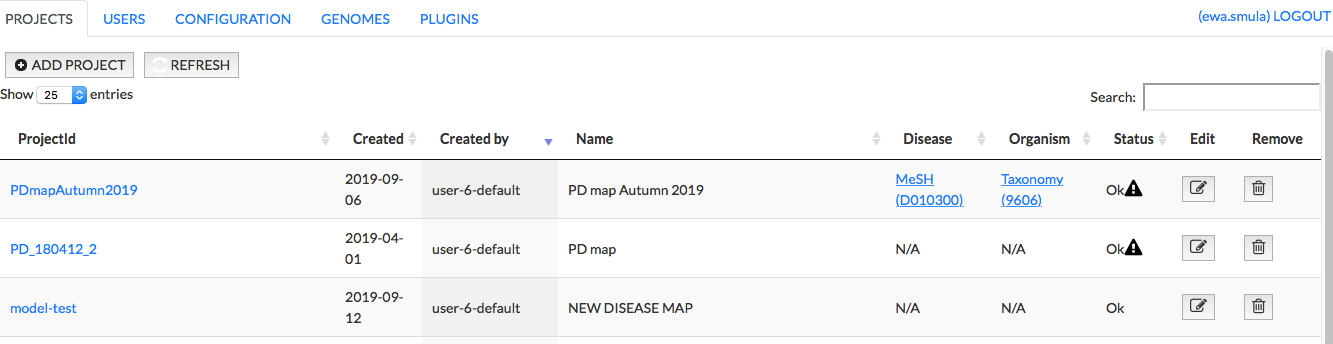
PROJECTS#
This panel allows you to:
- add a new project
- open the project
- examine the messages generated during upload of the projects
- edit the project
- remove the project
 {:width=“900px”}
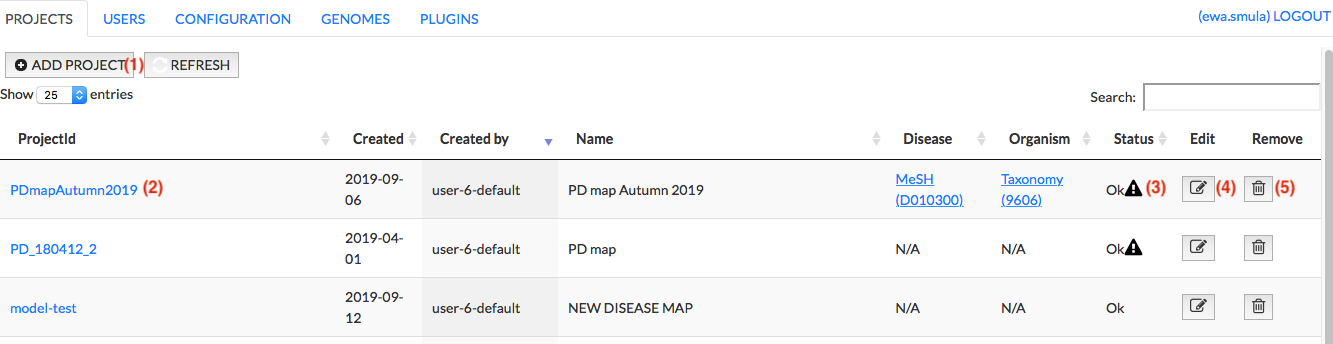
Add project#
The Add project button invokes a menu allowing you to upload your project and start its generation in the MINERVA platform.
 {:width=“900px”}
File formats#
You can upload to MINERVA a single file or zip-compressed file (advanced upload).
The single files that can be uploaded to create a project on a MINERVA instance are:
CellDesigner files (see CellDesigner website)
SBML files, importantly:
- elements (species) and reactions should be defined by SBOTerms, to match the CellDesigner style (see the list of CellDesigner types matching SBOTerms). If not, all elements will be shown as small molecules and all reactions as state transitions. Find more in example 2 - SBML file modifications
- layout and render packages are supported
- MIRIAM annotations in the
<annotation>node are supported
SBGN files
Advanced format project - its structure is uploaded as a zip-compressed file. See the file’s description in section Advanced format.
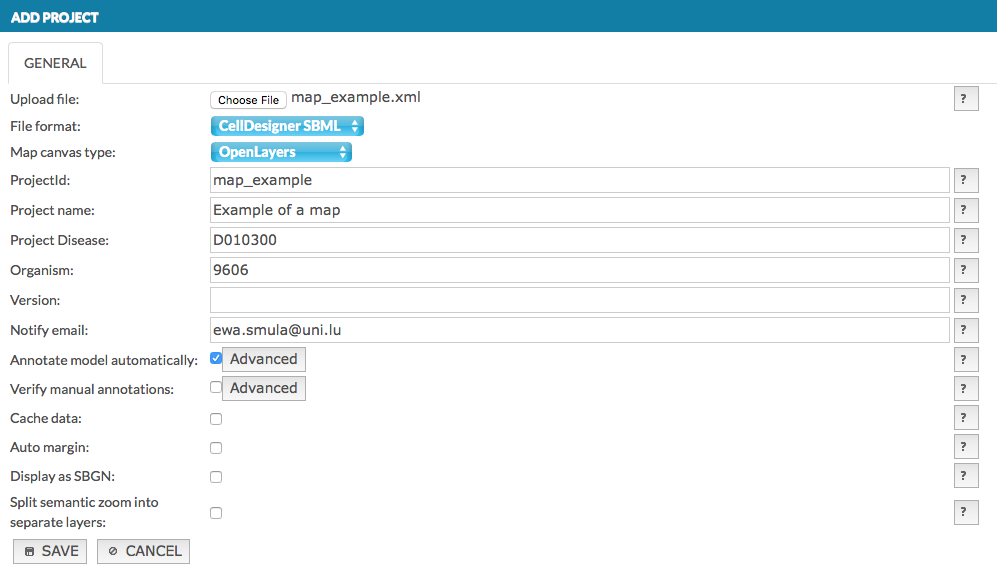
Fields of the Add project window#
Upload file - Choose File invokes a file upload dialog.
File format - choose a format of an uploading file: CellDesigner, SBGN or SBML.
Map canvas type - choose Google Maps API or OpenLayers to display the map, if you choose Google Maps API you have to agree on Google Maps API Terms by ticking the checkbox.
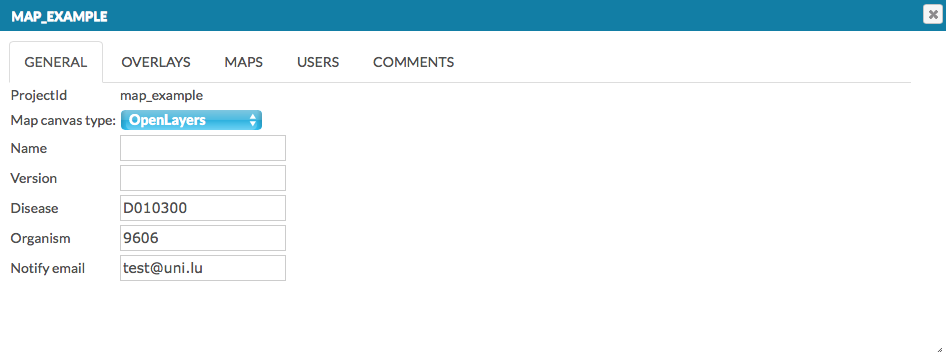
ProjectId - a working name of the uploaded project on the MINERVA platform.
Project name - the name of the uploaded project displayed in the top left corner of the main view; your official name of the project.
Project Disease - the disease associated with the project, the code has to be a valid MeSH identifier, e.g.D010300. This is needed for chemical target search, see section chemical target.
Organism - the taxonomy id of the species, for which the map is primarily developed, e.g. 9606. This is needed to display genetic variants overlays.
Version - a text field displayed next to the name of your project in the User panel.
Notify email - e-mail address that should be used for project-related notifications.
Annotate model automatically - if this checkbox is checked, elements of the uploaded map will be automatically annotated using built in annotators. Behavior of the annotators can be configured by clicking the Advanced button (see section Configure automatic annotation).
Verify manual annotations - if this checkbox is checked, elements and interactions of the uploaded map will be scanned for existing annotations; if present, these existing annotations will be validated against a set of rules. Verification rules can be configured by clicking the Advanced button (see section Configure automatic verification).
Cache data - if this checkbox is checked, all hyperlinks in the project resolved by MIRIAM repository (e.g. cross-links to external bioinformatics databases) are resolved and cached.
Auto margin - if this checkbox is checked, the map will be drawn with equal amount of empty spaces around it.
Display as SBGN - if this checkbox is checked, the uploaded model will be displayed in SBGN format, instead of the default CellDesigner format.
Split semantic zoom into separate layers - tick the checkbox to display each semantic zoom level as a separate overlay in the General Overlays panel in the map. Find out more about semantic zoom here. This mode is primarily for testing purposes and we advise it should be unchecked by default.
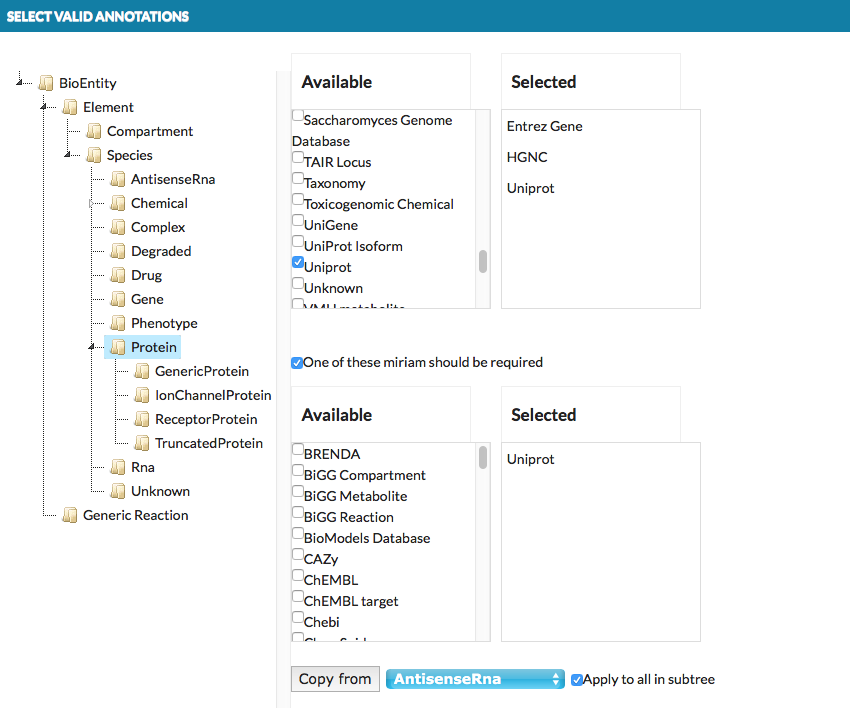
Configure automatic annotation#
The Advanced button, next to the Annotate model automatically checkbox, invokes a dedicated configuration window (see below).
 {:width=“900px”}
Clicking on the object in the left panel, displays available annotators that can be assigned for it. Selected annotators will attempt to automatically retrieve information from external bioinformatics databases for each relevant element and annotate them. Copy from button allows to copy the annotators set from other objects we choose (see above image: GenericProtein will get the same annotators as AntisenceRna already has set). Bottom part of the window presents information than MINERVA provides for the selected annotators. These boxes can be checked depending to user’s preferences.
There are a number annotators available, working either by name or by annotation of an element.
By annotation refers to the MIRIAM identifiers in the <annotation> section of SBML and CellDesigner formats.
These annotators use specific identifiers, mentioned below, to retrieve additional information for elements.
For instance, by UniProt annotation means that the annotator needs a valid UniProt identifier in the <annotation> section.
Note: SBGN files can be automatically annotated only by name as they have no <annotation> section.
- BRENDA
-
- By annotation: BRENDA, UniProt.
-
- Retrieves all BRENDA codes for enzymatic activity of the element.
- ChEBI
-
- By annotation: ChEBI or by name (ChEBI).
-
- retrieves full name and synonyms in the ChEBI ontology.
- ENSEMBL
-
- by annotation: ENSEMBL.
-
- Retrieves symbol, full name, synonyms, HGNC Symbol and identifier, Entrez Gene identifier.
- Entrez Gene
-
- By annotation: Entrez Gene.
-
- Retrieves full name, symbol, synonyms, description, HGNC identifier and ENSEMBL identifier.
- Gene Ontology
-
- By annotation: Gene Ontology.
-
- Retrieves full GO definition for this identifier.
- HGNC
-
- By annotation: HGNC and by name (HGNC symbol).
-
- Retrieves full name, symbol, synonyms and UniProt identifier, HGNC Symbol and identifier, RefSeq identifier, ENSEMBL identifier, Entrez Gene identifier.
- Protein Data Bank
-
- By annotation: PDB, UniProt, HGNC, HGNC symbol and by name (HGNC symbol).
-
- Retrieves all relevant PDB structure identifiers. If HGNC symbol or identifier are used, it will also run the HGNC annotator.
- STRING
-
- By annotation: STRING, UniProt.
-
- Retrieves all relevant STRING identifiers. If UniProt identifier is used, it will also run the UniProt annotator.
- UniProt
-
- by annotation: UniProt.
-
- Retrieves HGNC Symbol, Enzyme Nomenclature identifier and Entrez Gene identifier.
Configure automatic verification#
The Advanced button, next to the Verify manual annotations checkbox, invokes a dedicated configuration window (see below).
 {:width=“900px”}
-
- top right panels
- A list of MIRIAM identifiers which are configured as valid. Elements or interactions in the uploaded model annotated with any identifier other than the valid list will raise a warning.
-
- bottom right panels
- A list of MIRIAM identifiers which are configured as mandatory. If checkbox One of these miriam should be required is checked, elements or interactions in the uploaded model annotated without at least one identifier from mandatory list will raise a warning.
Save button: project generation#
Clicking Save in the Add project window will start generation of the project. The status of the project in the Projects tab will update during the process. Also, you can use the Refresh button. Any warnings raised during the process will cause an exclamation mark icon to appear next to the project status. The list of warnings is extended gradually when the project upload advances, and you need to wait for the project completion to see the full list. You will receive an email notification after the generation is complete.
It may happen that the project generation will result in a failure. An icon will be displayed, and mouse over it will display the reason for failure. You will receive an email message with the brief description of the error.
To find out more, check example 1 - CellDesigner file upload and annotation.
Project status#
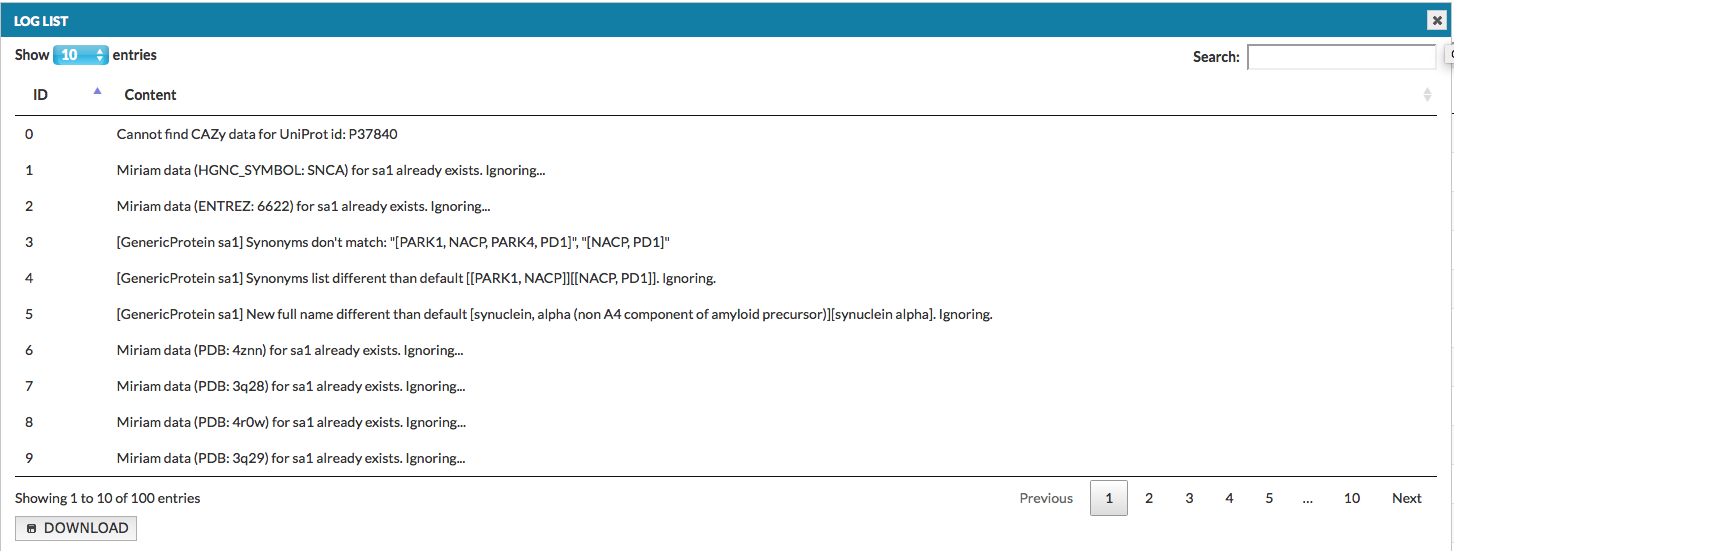
Clicking on the exclamation mark icon (if present) next to the project status description, will display the list of warnings raised during the generation of this project (see below).
 {:width=“900px”}
The list can also be downloaded as a tab-delimited text file. Types and identifiers of the elements and interactions are listed on the left side of column Content, while the nature of an error is provided on the right. Take a look at the list of possible errors and their explanations.
Edit project#
This panel allows you to configure and manage the project. Functionalities are grouped in the following tabs (see below for an illustration):
- General edit information about this project: canvas type, name, version, disease and organism type or notify email address
- Overlays add or configure overlays for this map, both general and user-provided
- Maps configure visuals for the main map and submaps
- Users manage users’ access rights to this map
- Comments manage user-provided comments for this map
 {:width=“900px”}
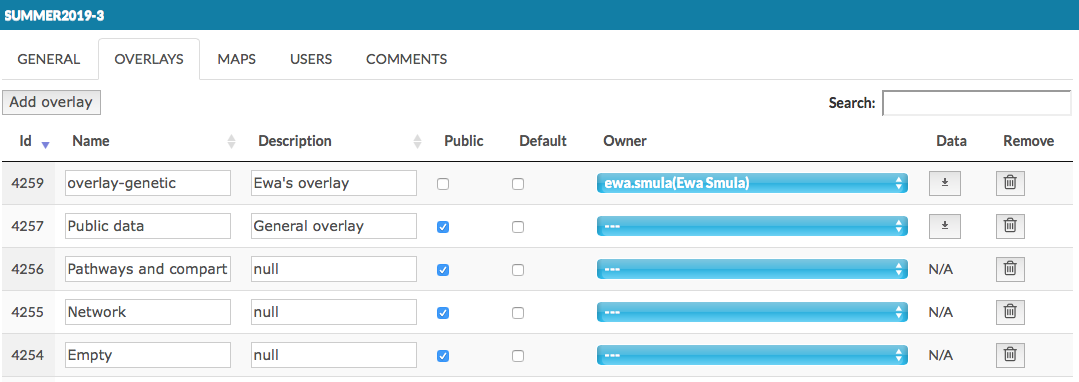
Overlays#
This tab allows you to add new overlays and edit properties and ownership of existing overlays. Here you see the overlays that have been:
- uploaded with the project, if it has contained overlays already (see Add project and Advanced upload).
Important! Overlays named Pathways and compartments, Network and Empty allow for different ways of displaying the map’s content, and they have no data associated with them.
uploaded by the users (see Upload user-provided overlay data).
uploaded by the administrators by Add overlay button in top left corner.
 {:width=“900px”}
In this tab, besides Name and Description, the following columns are available:
- Public - this checkbox makes the overlay available to any user.
- Default - this checkbox sets the default view of the map.
- Owner - the user having the access right to a given overlay. Dropdown menu allows to choose from existing users, see image above.
Important note: choosing the owner undefined (- - -) from the top of the list and checking the Public checkbox makes this overlay a General overlay, accessible for all users.
- Data - action buttons to download the associated dataset.
- Remove - action buttons to remove the corresponding overlay.
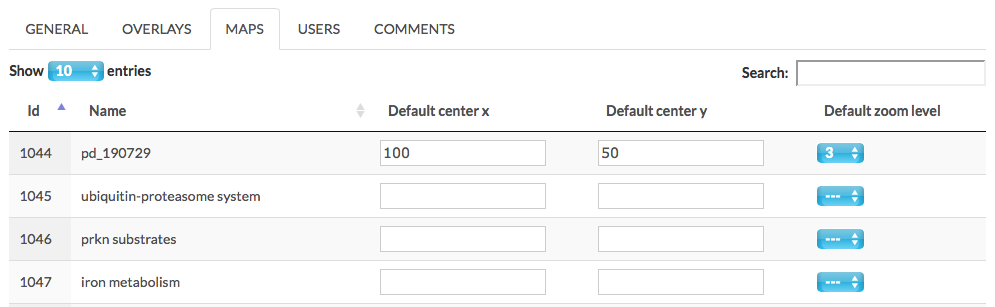
Maps#
This tab lists all available (sub)maps in the project. Also, it allows to personalise the default displaying options for the (sub)maps, see image below.
 {:width=“900px”}
The available display parameters are described below:
- Default center x and y set the default center point of the (sub)map. x can be positive or negative values, y is positive values only.
- Default zoom level set the default zoom level for this (sub)map.
Users (of this map)#
This tab lists all users of a MINERVA instance and allows to configure their access rights to this particular map. It contains the following columns of checkboxes:
- View project
- Modify project
Ticking a checkbox in a respective column for a given user assigns the corresponding privilege to them. General users privileges are discussed in detail in the following section USERS.
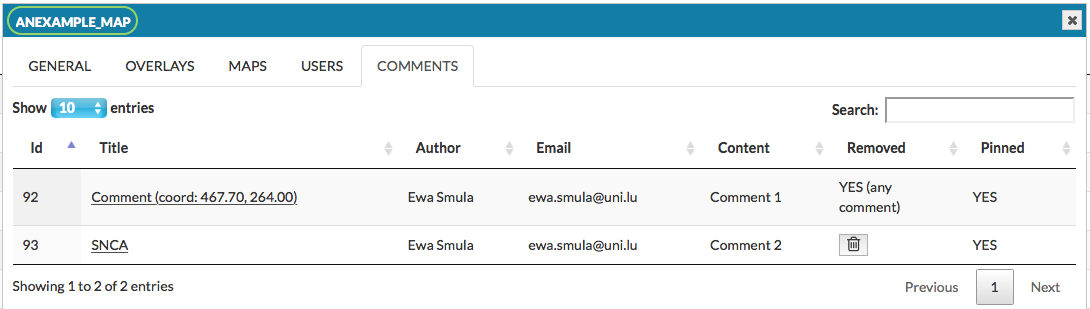
Comments#
This panel allows you to manage comments provided by users to the particular map (see section User manual - Comments).
The field Title is a hyperlink to a given comment in the map. In the following columns there are author of the comment, his email and the content. Pinned informs if the comment’s icon is visible on the map.
Users logged in as administrators or curators have a possibility to delete a comment by pressing press the Remove button. The users can remove only their own comments. The removed comment will no longer be visible among the pinned comments on the map, and its status will be updated in the Removed panel with comment in the brackets (see image below).
 {:width=“900px”}
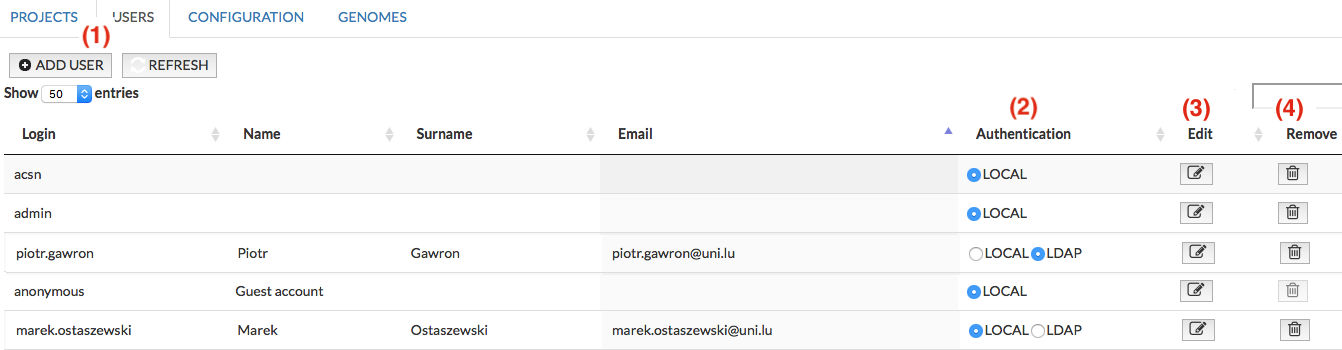
USERS#
Registered users can be allowed to upload data overlays to maps hosted on a MINERVA instance, and to manage it. This panel allows you to (see image below):
- Add (1) user - clicking on that button invokes the window allowing to set login, password, name and the privileges (role) of a new user.
- Choose LDAP authentication (2) for the user; find out more how to configure LDAP in the section LDAP configuration.
- Edit (3) user details and privileges. All information except the login field can be modified.
- Remove(4) the registered user from a MINERVA instance.
 {:width=“900px”}
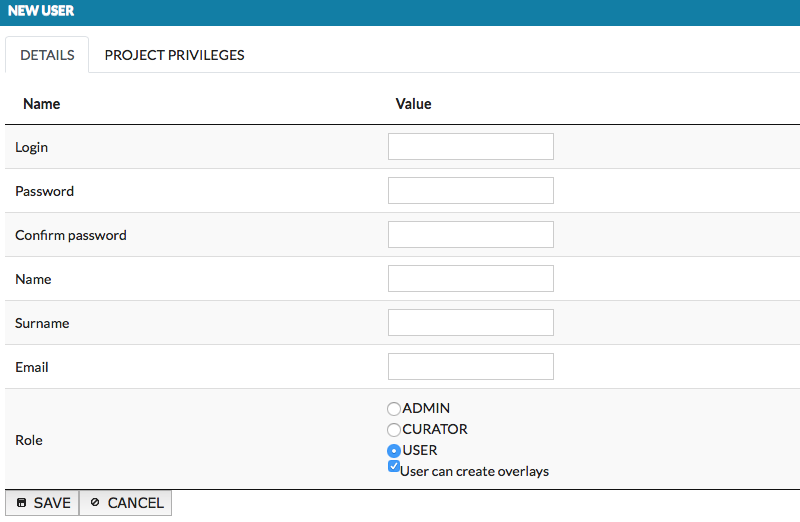
Add user#
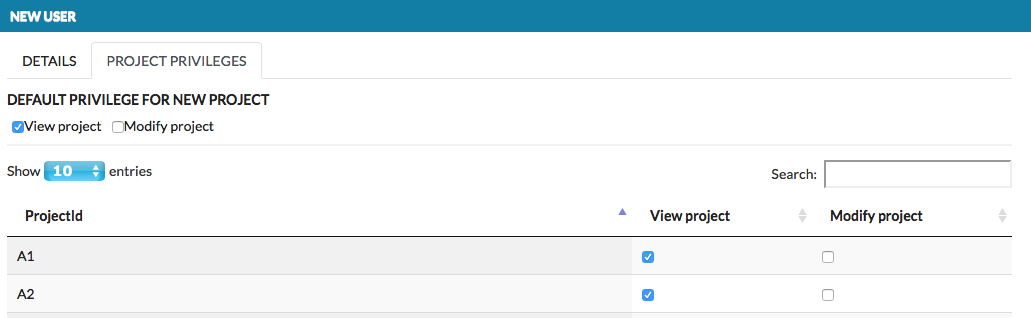
Add user window is presented below. The first tab Details allows to provide user details and set his role. The role describes the user’s access rights - Admin, Curator or User. The second tab Project privileges is concerned on user’s privileges for a particular projects (View project, Modify project). Note that users can not be granted only with Modify project, as View project is necessary to see the project on the projects list, see images below.
 {:width=“900px”}
 {:width=“900px”}
The project’s privileges are listed below:
Default privilege for a new project checkboxes - set up default privileges assigned to this user for any new project on the instance.
View project checkbox - allows the user to see that project on the projects list.
Modify project checkbox - allows to manage the project. Note that depending on a role, Modify project privilege grants User and Curator with different access rights (see below).
Roles are listed below. More detailed specification is presented in the following table.
Admin has full access on MINERVA instance to manage projects, users, genomes, plugins and MINERVA configuration.
Curator can add, remove and manage projects (see the table below for more details).
User can create overlays - user sees the list of projects (if has View), manage their details (if has Modify) and can add overlay.
User can view the project (if has View) and manage its details (if has Modify).
| Role | if View | if View & Modify |
|---|---|---|
| Admin | N/A - full access | N/A - full access |
| Curator | add/view the project; view only the project details (in Edit); add overlay; remove own comments | add/remove/view the project; full access to manage the project (in Edit) |
| User can create overlay | view the project; add/remove overlay (in User View) | view/manage the project’s general details & maps; remove own comments; add/remove overlay (in User View) |
| User | view the project | view the project; manage the project’s general details & maps; remove own comments |
CONFIGURATION#
Configuration tab allows privileged users to configure global parameters of a MINERVA instance. Particular categories of configuration items are grouped in separate tabs (see image below).
 {:width=“900px”}
General configuration#
MINERVA configuration categories are listed below:
Email notification details
- E-mail address - e-mail address used for sending notifications about the activity of a MINERVA instance - project uploads, comments, etc.
- Email content used for requesting an account - the Info and Overlay tabs in the user interface allow to a Request for an account action, which will auto-compose an email with the message defined in Email content used for requesting an account to addressed to the e-mail, or e-mails (separated by a semicolon) provided in the field Email used for requesting an account.
- E-mail server login, E-mail server password, IMAP server, SMTP port and SMTP server - configuration of your mail server for notification sending.
Server configuration
- Default project Id - the project that will be displayed by default under the root address of the platform (your.url/MapViewer/).
- Domain allowed to connect via x-frame technology - the address of a website allowed to embed a MINERVA instance via x-frame technology.
- Disable CORS - when selected the response will allow for Cross-Origin Resource Sharing when authenticated (for instance when JS code on other site would like to connect to the API of this specific minerva instance). However, to make it work properly CORS request must have ‘ORIGIN’ header set properly.
- Google Analytics tracking ID used for statistics - provide here a valid Google Analytics ID to track user activity of a MINERVA instance.
- Issue tracker - a tool to submit MINERVA issues.
- Max session inactivity time (in seconds) set the time after inactive session is expired.
- Path to store big files - location in the directory structure of a MINERVA instance to store big files.
Legend and logo
- Left logo description - the popup text that will be displayed upon mouse hover your left logo.
- Left logo icon - the filename of your left logo icon, displayed in the bottom-left corner of the main view; path in the directory or URL.
- Left logo link (after click) - the website to which you will be redirected after clicking on the left logo.
- Legend 1-4 image files - path in the directory structure of a MINERVA instance for displayed legend images.
- Right logo description - the popup text that will be displayed upon mouse hover your right logo.
- Right logo icon - the filename of your right logo icon, displayed in the bottom-right corner of the main view; path in the directory or URL.
- URL of platform Terms of Service - path in the directory or URL.
- User manual file - location in the directory structure of a MINERVA instance for the user manual file.
Point and click
- Max distance for clicking on element (px) - the content visualized by MINERVA is interactive, and clicked elements or interactions are recognized by the vicinity of the click event. This parameter controls how close to an element or interaction, in pixels, you need to click to select them.
- Max number of map zoom levels - sets the max size (of canvas) of the map, that can be uploaded to MINERVA.
- Max number of results - sets the max number of search results, (similar elements are grouped into a single search result)
Overlays
- Opacity used when drawing data overlays (value between 0.0-1.0)
- Overlay color for negative/positive values - sets the colors should be used for positive and negative values in basic overlays. Values close to zero have the lowest color saturation, values close to -1/1 have the highest color saturation
- Overlay color for value=0
- Overlay color when no values are defined - sets the color to use for coloring list of elements overlays; see section User manual - Upload user-provided overlay data
Default user privileges Sets default user privileges to manage comments, overlays and view projects for any project on a MINERVA instance.
Search panel options Defines which search results in the left panel will be expandable via plus/minus icon.
LDAP configuration#
LDAP allows to log in to MINERVA with user’s global credentials. Note that: A user can log in to MINERVA via LDAP authentication without creating account on MINERVA instance. Such users is granted with Default user privileges (see section above). To set non-default privileges for a user (who have not logged in yet) it is necessary to create MINERVA account for him. Then set the custom privileges and choose LDAP authentication in USERS section.
Please find below description and examples of LDAP configuration for MINERVA:
LDAP address - address of the machine where LDAP server is located; e.g.
lums2.uni.luLDAP base DN - definition of the point from where a server will search for users; e.g.
cn=users,cn=accounts,dc=uni,dc=luLDAP bind DN - Distinguished Name of the user account that should be used for LDAP connection (this user should be able to search/list accounts on LDAP server); e.g.
uid=ldap-reader-minerva,cn=users,cn=accounts,dc=uni,dc=luLDAP email attribute - which attribute in LDAP directory corresponds to the user email address; e.g.
mailLDAP filter - when there are many accounts in LDAP administrators create groups of users that have access to specific systems, this filter allows to define LDAP filter that will limit set of accounts that can access minerva, empty string disable filtering; e.g.
(memberof=cn=minerva,cn=groups,cn=accounts,dc=uni,dc=lu)LDAP filter objectClass - this parameter allows to filter by objectClass type of LDAP entry; value
*skips the filteringLDAP first name attribute - which attribute in LDAP directory corresponds to “First name” of the user; e.g.
givenNameLDAP last name attribute - which attribute in LDAP directory corresponds to “Last name” of the user; e.g
snLDAP login (user id); e.g.
uidLDAP password - password for the LDAP bind DN
LDAP port - port on which LDAP is listening (by default it’s 389, for SSL connections usually it’s 636)
LDAP uses SSL - check to use SSL for LDAP connection
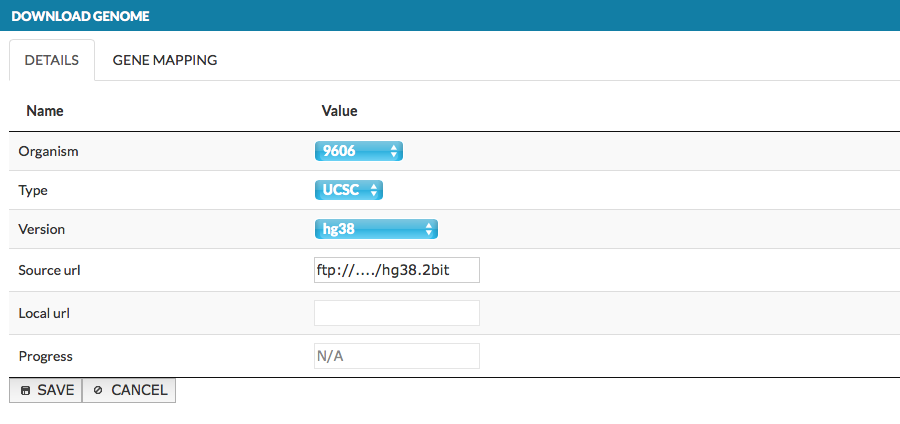
GENOMES#
In this section an administrator can set up a reference genome for displaying genetic variant overlays and a genome browser in the map. Currently, MINERVA supports human genomes data from UCSC Genomics Institute. Available fields (see also image below):
Type informs about type of data, currently MINERVA supports UCSC format
Organism identifier of the organism of the added reference genome (e.g. 9606)
Version version of the added reference genome (e.g. hg19)
Progress of the upload
Source - url address of the genome data; sets up automatically after selecting Version, or user can paste own url address Note: the file must be in .2bit format
Edit/Remove buttons allows to edit the gene mapping and remove the genome from the instance
Important note: The Taxonomy id (e.g. 9606) for Organism must be provided for the project, and the reference genomes uploaded on a MINERVA instance must include its type. If Organism for the project is missing, the genome browser is not displayed in the overlay’s popup window.
 {:width=“900px”}
Add new genomes#
In top left corner choose ADD GENOME button; the window pops up, as shown below:
 {:width=“900px”}
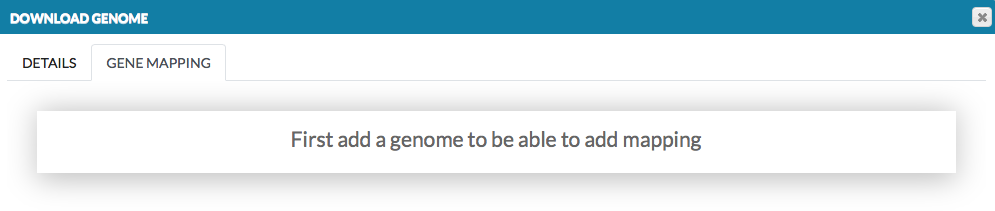
The window contains two tabs:
- DETAILS - select new genome parameters as described above
- GENE MAPPING - information about the gene loci in the genome, which are visualized on the blue axis in the genome browser. In the dialog window, provide the name of the data set and its url address. The name will be displayed in the genome browser (here: gene ref), see User manual - Overlays. The data must be provided in .bb format file. More details how to create .bb file.
The second tab is inactive unless you choose a genome in Details and SAVE it.
 {:width=“900px”}
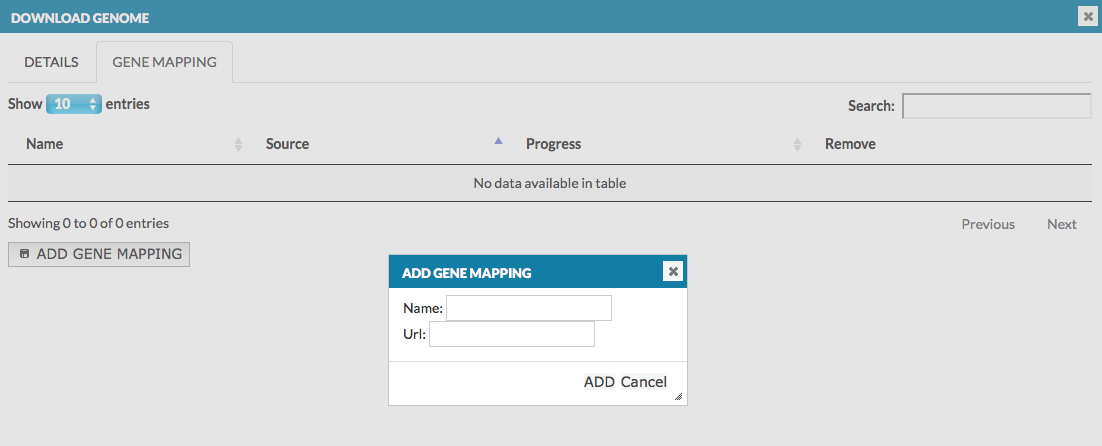
After saving the genome, open Edit for it and add a gene mapping.
 {:width=“900px”}
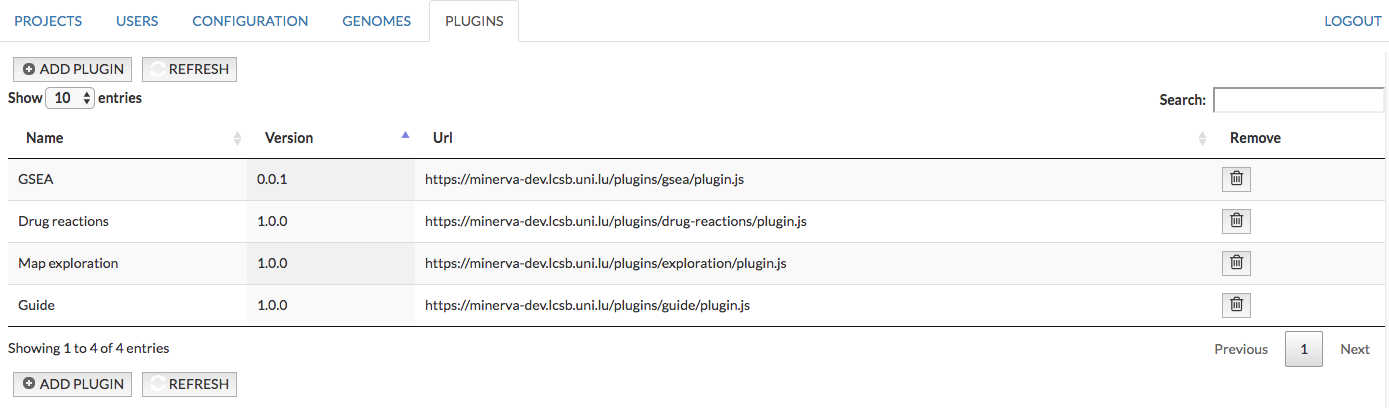
PLUGINS#
The plugin tab allows the administrator to add a public plugin to a MINERVA instance. These plugins will be displayed if in the Plugins menu in the map. The Plugin tab is shown on the image below, it contains:
- Name of the plugin
- Version of the plugin
- URL of the plugin
- Remove the plugin from a MINERVA instance
 {:width=“900px”}
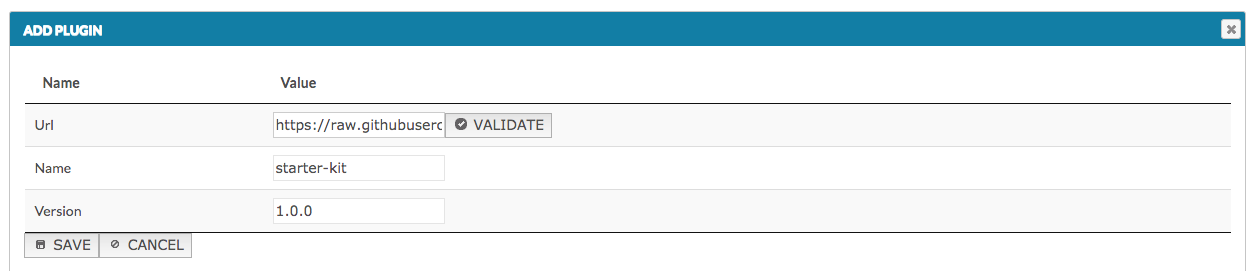
To add a new plugin, click Add plugin button, and paste the plugin url into the URL field and click Validate (see image below). The name and version fields are usually filled automatically from the plugin content. Click Save to add the plugin to a MINERVA instance.
 {:width=“900px”}
Note: The administrator cannot add the same plugin twice to the MINERVA in the Administrator panel (the notification is displayed). But a user can upload an already exiting plugin via Plugins menu in the user’s view of a map.